From such material as felt, you can do completely different things. We suggest you learn how to make felt crafts , do-it-yourself patterns and different toys. Pictures of products and step-by-step master classes are attached.
Crafts from felt - DIY patterns
Various toys and felt dolls are made quite easily, because they consist of a minimum of parts that are very easy to sew together.
As for the pattern itself, even if you don’t have one, it’s easy to do it yourself. At the same time, possessing artistic skills is optional. In the picture below, an example of crafts made of felt. Do-it-yourself patterns in this case consist of the following elements:
- body;
- eyes (two pieces);
- pupils (two pieces);
- beak;
- wings (two pieces).
If you can’t draw the parts individually at once, then make a sketch of the future toy as a whole, and then divide it into elements.
DIY felt dolls
A master class on how to make toy princesses will help to master this simple needlework:
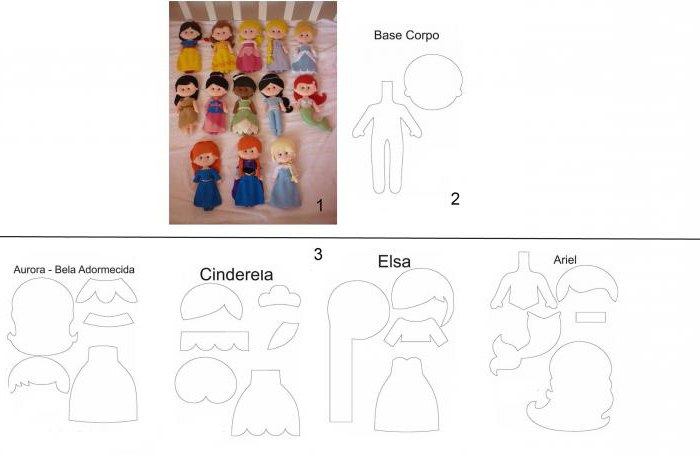
- Take shreds of felt of different colors, scissors, a marker or pencil, threads and a needle, a little cotton, and also a pattern.
- You will need the main pattern (Figure 2) and one additional (Figure 3), which shows the details for a particular princess. For example, if you make a Little Mermaid, then her distinctive features are a hairstyle, tail and top.
- Cut out all the elements of the pattern with scissors.
- Attach the paper parts to the felt of the appropriate color (for example, the body is a beige shade) and circle them.
- Cut out the details by slightly stepping away from the edges. Remember that each element from the main pattern should be two, and from the additional pair quantity you need only for the costume (dress).
- Sew together the two parts of the body and head, leaving a small hole.
- Stuff cotton into the parts so that the dolls are not too flat.
- Sew together the head and body.
- Sew on the hair and bangs on the front side.
- Sew a suit (dress) on the body from two sides.
- Sew or glue the remaining decorative elements of the outfit and hairstyle with the glue gun to the front of the doll.
- Make a face.
DIY doll made of felt is ready!
Felt bear
In order to make cute felt toys, a large number of colored shreds are not always required. Sometimes just a couple of pieces are enough. For example, to sew a charming bear, you need only two pieces of felt brown and red.
The sequence of sewing crafts from felt:
- Do-it-yourself patterns in a specific example are optional. You can immediately draw the outline of a future toy on the fabric. There will be only three parts: head, body and small heart.
- Cut two parts of the head and body of felt.
- Sew a heart on the front of the body in the left area above the foot.
- Sew together pairs of parts, leaving a small hole for stuffing.
- Use a wooden stick to stuff parts of the toy with cotton or other filler (such as padding polyester). It’s not necessary to fill a lot in the craft, it should be only a little voluminous. Instead of a stick, you can use a pencil or brush.
- Sew the head to the body so that the chin is on the main part of the toy (as in the picture above).
- The muzzle and the contour of the legs can be drawn with a marker or stitched with stitch thread.
Cute little bear is ready! Such a toy can be made not only to a child, but also presented to a friend on Valentine's Day!
Volumetric seals
You can also make familiar voluminous felt toys. For example, to make such wonderful cats, you need to take the following tools and materials:
- multi-colored felt (one main color and small shreds of additional shades);
- wide tape;
- thread and needle;
- scissors;
- filler (cotton wool, synthetic winterizer, foam rubber and the like).
Toy workshop:
- Take a large piece of felt and cut from it two identical ovals, resembling the shape of a pear.
- From a piece of the same color, cut two identical circles. They should be less than half of the previous parts.
- Now you have the details for the torso and head.
- Cut four rounded triangles. It will be ears.
- Sew together the paired parts of the body, head and ears, leaving a small hole in each component of the toy.
- Tightly fill the body and head with filler. And in the ears, place a thin layer of cotton wool. Make the bottom of the part responsible for the cat’s body more even so that the toy can stand on its own.
- Sew the body, head and ears together.
- From flowers of different colors, cut flowers and leaves, and then sew them on the belly of a cat.
- Embroider the cat's face and tie a ribbon around his neck.
A charming toy is ready! If desired, you can sew the legs and tail in the same way as they did the head with the body.
Felt piggy bank
A piggy bank is in almost every child. But when the time comes, then it becomes a pity to break it. Therefore, children can sew a wonderful felt piggy bank, from which it is very easy to get coins.
To do this, you need to take a pattern of piggy banks, felt, scissors, a needle and thread, a marker. Further steps:
- Transfer the pattern to the fabric and cut two identical elements.
- Sew a rectangle on one detail, and make a cut inside it (Figure 2).
- Sew the two parts together.
The piggy bank is ready!
Toy on hand
Another master class - felt monkey on hand:
- Make a pattern. To do this, circle your hand on a piece of paper. Draw a smooth contour, draw legs and ears. Separately, draw a contour of the muzzle and pusik, as well as the inner parts of the ears and the toe zones.
- Cut out the details of the pattern.
- Attach all the elements to the felt, circle them and cut them out. Remember that there should be two main parts (body with paws), as well as midpoints for the ears and areas with fingers. Puziko and a muzzle in a single copy.
- Take one part of the body and wash on it all the additional elements: zones of the muzzle, belly, inner part of the ears and fingers.
- Sew together two body parts.
- Make a face.
The felt monkey mitt is ready!
Optionally, you can make a toy tail. To do this, make a pigtail of woolen threads, and place the wire inside. Attach the resulting tail to the craft.