Despite the fact that the shelves of modern stores are full of all kinds of dolls, cars and robots, a homemade toy is of particular importance for children . With his own hands, with the help of an adult, a child can make many original and unique gizmos with his own hands, which will occupy his attention not only during the game, but also during the manufacturing period. In addition, the original craft can be a great gift for a child on his birthday or any other holiday.
Gum Doll: Making Curls
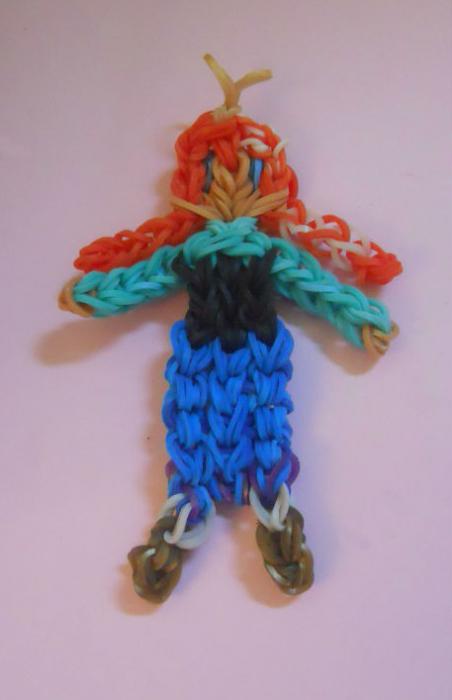
Recently, various toys made of rubber bands have started to be very popular among children, and adults, so this material will probably be found in your home, and you can weave a doll out of it with your child. In addition to the multi-colored Rainbow loom, you will also need to prepare a weaving machine and a hook.
To get started, the tool must be placed in such a way that its middle row is advanced forward by one column compared to the rest. Start making dolls with her hair. To do this, gum should be worn on the extreme row of the machine, pairwise combining the first column with the second, the second with the third and so on. This action should be performed until the desired curl length is reached. When you decide to stop, another element of the same color must be wound in three turns on the last column with an elastic band, from under which, using a hook, you will need to pull out a single elastic band and hook it onto the rear column. Such actions should be done with all the elements, after which the curl must be removed from the machine, hooking the first loop on a wooden stick or spare hook. Two or four such elements will need to be made, depending on what hairstyle the future doll will have.
Making hands for a rubber doll
Next, you need to make sleeves for T-shirts and hands for the doll - these two elements are best done with elastic bands of different colors. Begin with sleeves. To do this, two elastic bands folded together combine two columns of the extreme row of the machine. Further hands. Two elastic bands folded together should be thrown on the second and third columns, then two more on 3 and 4. After that, the elastic should be wound on the last one in four turns. Next, you need to throw the elements on the machine in the same way as in the manufacture of curls. After that, the finished part can be removed. Handles, of course, for this toy from gum will need two.
Gum doll: making a head and joining hair
After manufacturing all the additional elements, you can begin weaving the main part. To do this, two rubber bands need to combine the protruding column with the leftmost, and then the other two with the extreme right. Then, in a similar way, you need to put on elastic bands on 1 and 2 pegs of all rows - this will be the upper part of the doll's head. Now the face. A pair of elastic bands are poured on the central row two times, and one at the extreme ones. Then, to round the head, it is necessary to combine the extreme columns with the protruding middle. Now you need to fix the hair. To do this, previously woven elements should be thrown on the extreme upper columns - two for each. It is important not to forget about the doll’s eyes. To do this, on the second columns of the extreme rows of the machine should wind one elastic band in four turns. Next, on the same protrusions, as well as on one middle row, located slightly lower, you should throw another element through which to remove the "eyes" and move them to the center. Then one more elastic band should be thrown with a triangle, combining those columns where the “eyes” used to be, and one middle row, which will also be the top of the second triangle, and the columns below it will be its corners at the base.
Making the body and legs of a doll from rubber bands
Now you can go to the neck. To do this, two elastic bands should be thrown on the middle row where the head ends and on the lower one. Then, two sides diagonally from the place where the neck ends, you need to throw two elastic bands - these will be the shoulders. Then, for each row, you should throw another pair of similar elements. And then attach previously made handles to appropriate places. Below the t-shirt, you need to throw three pairs of elastic bands on each row to form the skirt. After that, four pairs of rubber bands should be thrown along the extreme rows of the machine - these will be the legs without which a toy with improvised materials cannot be completed with one's own hands. On the last legs, you need to wind the elastic band in four turns. Now in the field of skirts and T-shirts you need to wear one elastic band with a triangle. Thus, all rows will be combined. Further, in an already familiar way, it is necessary to remove the elastic bands from the machine, first the left side, then the right, and then the center. At the junction of the neck with the shoulders, the nakids should be made to the central column, the situation with the crown of the doll is similar. Through all the layers of the “top” of the toy, one more element should be passed and tightened by a loop. After that, the product can be removed from the machine and used for the game.
Snake: making a soft toy from nylon tights
If your baby likes soft toys, you can make a magnificent snake for him from nylon tights and synthetic winterizer. For the product, it is best to use things of bright colors, then the finished craft will look more original. Work should begin by cutting off one “leg” from the tights - it is important that it be whole and without puffs. Further, in the area of the sock, on its upper part, buttons should be sewn that will play the role of the eyes.
From red felt, you need to cut out the tongue for the future snake (the bifurcated element looks more interesting) and sew it in the appropriate place. To complete the manufacture of a soft toy from kapron pantyhose, the prepared “leg” must be packed tightly with a synthetic winterizer, and the end of the product should be tied to a knot or gently sewn up. Such a snake will be an excellent addition to the collection of your child, especially since he will be able to take an active part in its manufacture. It is worth noting that it is possible to make such simple toys from fabric, having previously sewed a cylinder from it.
Making Flowers from Flowers: Preparing the Basics
Toys made of flowers made with your own hands can be a great addition to the main present for the child to whom you will come for the holiday. To create this unusual craft, you will need a floral sponge, wooden skewers or wire, water, a stationery knife and, of course, fresh flowers of the shades in which the toy is planned to be made.
Having at hand all the materials, you can proceed directly to the creation of the product. To do this, a figurine of any animal should be cut from a floral sponge using a clerical knife. If you can’t create it from one piece, you can cut each part separately, and then combine them with wooden skewers or wire. The cut figure should be lowered into a container of water and saturate it as much as possible. This is done so that toys made of flowers are stored longer.
The formation of toys from flowers
Now you need to prepare the main material. The buds need to be cut off, leaving 2-3 cm of the stem. Next, the flowers should be evenly inserted into the prepared sponge, avoiding gaps. At this stage, the color scheme of the toy is fully formed. Sometimes you have to use shades that are not at hand. In this case, you can use a spray paint. At the final stage, you need to attach the eyes to the toy (they can be drawn on paper and cut out) and the nose (a candy is suitable for its manufacture). If necessary, the finished craft can be decorated with additional elements - decorative bugs, butterflies, ribbons, etc.
New Year's toys from candies: how to make?
Despite the fact that today you can buy a wide variety of toys for the Christmas tree, you can be sure that your child, and the rest of the family, will be delighted with unusual jewelry made with their own hands. After all, they will be not only beautiful, but also edible. We are talking about Christmas toys made of sweets. To make them, you will need metal cookie cutters, an oven, a baking sheet and a sheet of parchment paper. Since toys will be made from sweets, this product will also be needed - it should be caramel, preferably multi-colored. In this case, the finished toys will look more interesting.
So, you need to cover the sheet with parchment and place metal molds on it. Next, they need to be filled with sweets in the order you like, and place the sheet in a preheated oven for 3-8 minutes. The process must be monitored and stopped at the right time - when the sweets have already melted, but have not yet burned. After removing from the oven, cool the caramel a little and carefully remove the molds. After that, make a hole for inserting the thread with a wooden skewer, for which the toy will be suspended.
Plastic Bottle Penguins
Using plastic bottles, acrylic paints and a spray can of white paint, you can create very funny penguins. First you need to cut off the lower halves from two plastic bottles and insert them into each other so that a completely closed container is obtained. Next, the part must be coated with white paint and wait for it to dry completely.
When the element is ready for further use, it is necessary to paint with the help of paints and brushes all the details of a fabulous penguin - eyes, beak, tummy, back, scarf and hat. At the final stage of creating a toy from bottles, a pompom can be attached to the top of the penguin's cap.
Making a snowman out of thread
It turns out that snowmen beloved by all children can not only be made from snow in the winter, but also made from toys at any time of the year. For this purpose, you will need to prepare 5 balloons, PVA glue, a gypsy needle and cotton threads.
First you need to inflate the balls - they must be of different diameters - the largest for the base, a little smaller for the middle, even smaller for the head and very tiny for the hands. Next, by threading the needle, you need to pierce the tube with glue in its lower part. This is done for greater convenience during further work, since it is necessary to use a thread coated with glue. Next, you need to wrap each ball, - this should be done in different directions. After that, all parts must be dried. Then the ball in each of them must be punched and gently pulled out. After that, all elements should be glued together in the appropriate order. However, the toy is not yet ready. With your own hands, you need to make a snowman a face from improvised material or specially purchased items, after which you can use it for its intended purpose.
How to make finger toys from boxes?
When it becomes necessary to occupy a child with some interesting new game, then homemade finger-type toys from boxes can be an excellent way out. Their production will not take you much time, and a child with their help will be able to create a whole puppet theater.
So, you need to take a rectangular box and cut it in half so that the bottom wall remains intact. Then, the received parts should be pasted over with colored paper. After folding the box in half, you get the mouth of the toy and all that is needed is to glue the eyes drawn and cut out of paper. The new original toy is almost ready. With your own hands from improvised material, it remains only to give the figure a special appearance - by drawing or gluing lips, teeth, tongue, hair, ears, depending on which character you want to get.
Egg Toys
If you want to surprise and please your child, create toys for him from eggs, watching which he can imagine how ducks, chickens, dinosaurs and many other animals are born.
For the manufacture of crafts, you will need an egg shell in which a small hole is made in the upper part, small plastic or rubber toys. The shell must be placed in a tray, put the animal inside, pour water and put in the freezer. After complete freezing, remove the top layer and hand the toy over to the child. For a more interesting effect, you can place the made egg in a transparent container with water and observe the process of the "appearance" of the animal.