Many mothers and fathers like to craft something together with their child. Therefore, in this article we will describe various natural crafts made from natural material. Interesting ideas and step-by-step instructions to help parents will also be offered.
Funny fox
Of course, it’s important to choose the idea of crafts that mothers and fathers will bring to life with the child correctly, so that the little man is really interested in doing this or that application, toys, pictures, etc. For this reason, the first thing to take into account is the age of the child. For example, even a small baby can make the animal described below. But the student will be bored with such a simple product.
So, to perform a funny application you will need:
- A4 sheet of paper;
- black marker;
- PVA glue;
- scissors;
- four dried leaves collected from cherries, apple trees and similar trees.
How to make a simple children's crafts out of natural material:
- We take the paper and put it in front of us.
- At the very center in a horizontal position we have the first leaf smeared with glue. It will be a fox body.
- Then we attach the second leaf perpendicular to the first, thus marking the head of the red creature.
- The third leaf will be the tail of our fun fox.
- And from the fourth we will cut the legs and ears.
- After which we leave the craft to dry for several hours.
- When the necessary time has passed, using a marker, draw the eyes and nose of the chanterelle, draw the legs.
As a result, we get an original craft from natural material, similar to the one presented in the next photo.
Golden bird
Using the technology described above, you can make almost any existing or fictional animal. And if the parents themselves do not know what can be made, they can talk with the child, discussing what he would like to do with his own hands. Perhaps it will be a squirrel, a kitty, a mouse, a Christmas tree, a meadow with flowers, or something else more interesting and original. And having already chosen a theme for creativity, it will be possible to figure out how to bring the idea to life.
For example, if the baby wants to make the “Bird” crafts out of natural material, he and his mom and dad will need to prepare the following materials:
- acorn;
- cone ate;
- three maple seeds;
- a piece of thin wire;
- two black beads and white beads;
- PVA glue.
How to make a cute birdie:
- We build paws out of wire.
- We attach them and maple seeds to the cone. As a result, we get the body of a bird.
- Then we glue the beads to the acorn, and beads on them. Now we have a head.
- Finally, connect the two main parts together.
If desired, you can cover the finished product with shiny paint to make it look like a real work of art. Similar to one of the following pictures.
Chestnut Frog
Another interesting product is very simple. And the set of necessary materials is minimal:
- plasticine of green, white, black and pink or red;
- one chestnut.
Making a frog similar to the one shown in the photo presented after the instructions is very simple. It is only necessary:
- From the green piece of plasticine, fashion four legs and two small circles. We will subsequently place eyes on them.
- From white plasticine - smaller circles.
- And from black - very small.
- Attach one white and black to each green circle. As a result, we get two eyes.
- Then chop off a small piece of red or pink plasticine.
- And roll it into a sausage, and then bend it into a kind of boomerang. After all, our frog must smile!
- Having prepared the necessary details, you can start assembling the crafts.
- To do this, attach the legs, eyes and mouth to the chestnut.
- And the charming frog is ready!
It is very simple and fun to make such a children's craft from natural material. Especially for the kids.
Chestnut pig
Using the technology described above, you can make almost any funny animal. We will consider a charming little pig. But for this purpose, prepare the following materials:
- plasticine pink, white and blue;
- two chestnuts.
How to do:
- First of all, we need to create four legs, two ears, two eyes, a neck, a patch and a tail.
- Then attach ears, eyes and a patch to the first chestnut.
- And to the second paws and tail.
- Fasten two parts together. To do this, use a prepared neck.
Thus, the implementation of another natural crafts made from natural material will not take much time, but the children will be indescribably delighted with it.
Moving caterpillar
To make the following interesting work, the student will need the help of the pope. Because he will not be able to make holes in chestnuts on his own. Moreover, such a lesson can end in failure.
So, the necessary materials:
- ten chestnuts;
- strong thread;
- needle;
- plasticine of different colors.
How to do:
- Carefully thread the needle.
- We make a durable knot at the end.
- We string chestnuts.
- And fix the thread.
- From plasticine we sculpt eyes and a mouth.
- We attach them to the head of the caterpillar.
The theme of the crafts made of natural material is "Insects." Thanks to its implementation, the child learns the structural features of the body of the caterpillar.
Sleeping bat
Real bats are rather unpleasant, but in the stylized version they look incredibly cute. That is why we offer the reader the following master class. Its implementation requires quite accessible tools and materials:
- dried maple leaf;
- Pine cone;
- acorn;
- three pluses of the acorn (fetal caps);
- small twig;
- PVA glue;
- four pieces of a tourniquet.
It will become obvious to many readers how to make an original natural craft from natural material if they look at the photo proposed below.
But we still describe the detailed instructions for the execution of the bat:
- Glue four pieces of rope onto a maple leaf.
- On top of them is a pine cone.
- We attach an acorn to it.
- And on it are three pluses of an acorn.
- Now we hook the resulting product to a twig so that the mouse fun upside down.
- We decorate any room in the house or apartment with a finished craft.
Cute hedgehog
The easiest way to make a funny creature with needles from a regular bump. To do this, you need plasticine of different colors and the fruit of the spruce. And even a small child can make paws, a muzzle and an apple, which we place on the back of a forest dweller. Of course, if adults help him a little.
An older child will easily create the following craft from natural material - a hedgehog from maple seeds, cardboard and colored paper. In addition to the above materials, you will need tools such as:
- PVA glue;
- scissors;
- black marker.
How to do:
- Cut the silhouette of a hedgehog from a brown cardboard sheet.
- We attach a small white circle to it.
- And put a black dot on it. Now our hedgehog has an eye.
- We put the same point on the nose of the prickly creature.
- From maple seeds we make “needles”.
Here you have an interesting product!
Charming Umka
Teddy bears are kids' favorite toys. For this reason, we offer mothers and fathers step-by-step instructions that will help the child build an incredibly cute bear with his own hands.
What is required to complete the master class:
- spruce cone;
- black and light brown plasticine.
How to make a funny craft:
- From a light brown plasticine, we split off a piece and roll it into a ball. This will be the head of the bear.
- Then, in the same way, we prepare two smaller balls. These are ears.
- The remainder of the plasticine is divided into two halves of different sizes.
- Then we divide each into two more halves.
- And roll them into small sausages. These are paws.
- From black plasticine we split a small piece and two smaller ones.
- And also roll them into balls. It will be a nose and eyes.
- Finally, we attach the prepared parts to the bump.
- We make cuts on the legs, outlining the fingers.
- On the face “draw” a smiling mouth.
And a beautiful handicraft made of natural material “Charming Bear” is completely ready!
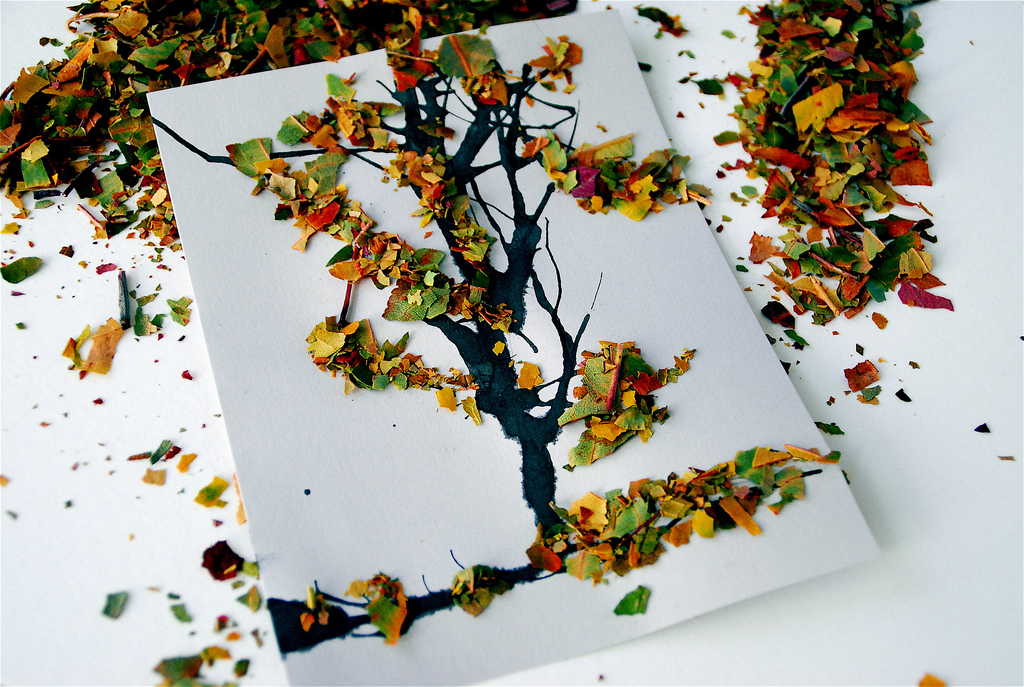
Painting "Autumn Time"
The next article, which we will consider in the article, will be interesting to complete for older children. Although even the kids will cope with it, if their parents come to their aid. Indeed, in technology there is nothing complicated, especially if you immerse yourself in the creative process with your head.
So, to perform an unusually beautiful picture you will need:
- A4 sheet of paper;
- black ink for drawing;
- art brush;
- PVA glue;
- scissors;
- cocktail straw;
- several dried leaves collected from any trees.
How to make autumn crafts from natural materials:
- First, we need to take the paper and put it in front of us in an upright position.
- Then open a jar of mascara and “arm” with a brush.
- Gently dip the brush in black liquid, bring to paper and make a blot at the bottom of the sheet.
- Then, for a long time immediately, take a straw and blow through it into a blot, moving the liquid to the top of the sheet.
- It will sprawl, depicting bizarre lines that will strongly resemble the trunk and branches of a tree. But this is exactly what we tried to achieve!
- Now we turn the sheet so that it lies in front of us in a horizontal position.
- Dip the brush again into the ink and make a blot almost from the edge of the paper (from the wide side of the sheet).
- We take the straws and “drive” the black liquid to the other side of the picture.
- When the above steps are completed, you should leave the craft to dry. About one and a half to two hours will be enough for this.
- After the necessary time, we again return to work on the craft.
- We take the prepared leaves and cut them into small pieces.
- Lubricate the branches of the painted tree with glue.
- And generously sprinkle them with leaves, imitating the yellowed autumn crown.
- Then leave the product to dry for three to four hours.
- And then, with a slight movement, we shake off the non-stick pieces of leaves and boast of the original crafts made with our child.
Painting "Wise Owls"
If parents can’t come up with an original craft from natural materials, fairy tales will become the best assistant who will tell you the most interesting and simple answers. For example, for crafts with older children, you can take various plots as a basis and make a funny picture or a real masterpiece from them. And younger children will gladly perform some kind of animal from their favorite fairy tale. Therefore, parents can take any fabulous character and think about how to build it from natural materials.
To make an interesting picture “Wise Sovushki” you will need:
- four sheets of colored paper (cyan, yellow, green, black);
- several pairs of leaves from different trees, differing from each other in size;
- scissors;
- PVA glue;
- compass - if necessary;
- thin twig.
The technology for performing bulk crafts from natural material:
- We take colored paper and put it in front of us.
- From the yellow sheet we cut out one big circle. This will be the body of the first owl.
- From green - two middle ones. These are the eyes.
- And from black - two very small ones. They are needed for the image of the pupils.
- Also, from a colored paper of black color, we need to cut a small triangle. It will be the beak of our wise owl.
- Having prepared the necessary details, we proceed to gluing the crafts.
- On a yellow circle we attach two small dried leaves. Thus, our bird has ears.
- We glue two green circles on them, marking the eyes.
- Add black pupils and nose. After the above actions, our owl seems to come to life.
- Then we attach two large dried leaves to the yellow mug. These are the wings.
- And from its back side we glue two more of the same leaves, imitating a tail.
- According to the described instructions, we carry out an identical natural craft from natural material. As a result, two wise owls lie before us.
- Now we take a blue sheet of colored paper and glue the prepared twig onto it.
- Leave the application to dry. This will take about one and a half to two hours.
- Finally, attach in the upper left and lower right corners of the owls. Photos of the finished version can be seen after the instructions.
- And again we are waiting for the glue to dry completely.
Thanks to simple manipulations, we get an interesting craft that is not ashamed to hang in the most prominent place in the house.
Making various original, funny or funny crafts with children is not only very fun, but also useful. After all, being engaged in such creativity, the child develops fine motor skills. Which has a beneficial effect on his psyche. The baby's level of intelligence rises, memory improves, mental activity is activated, he becomes more attentive and assiduous.
And not only in the fall it is available to carry out the described crafts from natural material. In winter, creativity is also possible, you just need to collect more leaves, acorns and cones.