It is possible to make sliding gates with an electric drive yourself. However, this process cannot be called simple, it requires certain knowledge and skills.
Features of installing automation
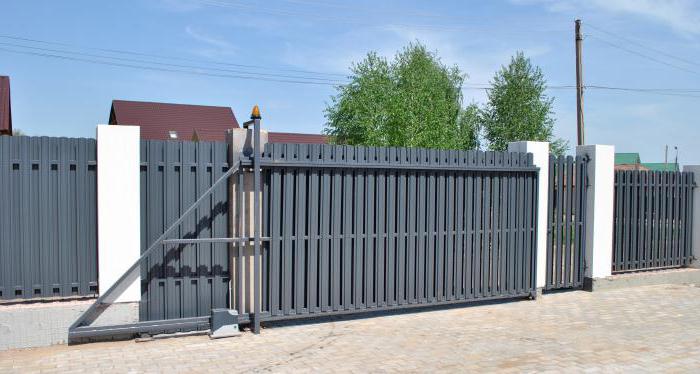
Such work is carried out at the final stage, if this option is assumed by the design. The movement of the gate leaf will be carried out by means of gear racks, they are sold by meter with mounting systems. Reiki are fixed to the supporting profile. If you decide to install a sliding gate with an electric drive, then you need to remember that in addition to the gear racks, you will need a remote control, electrical wire, key, as well as a beacon lamp. Everything will be installed in accordance with the requirements prescribed in the instructions.
Initially, you need to choose a place for mounting the electric drive. The installation base that comes with the kit will be needed. The drive is located on it. After the system should be fixed on the channel between the carriages.
When sliding gates with an electric drive are installed, the next step is to configure the automation by setting it in the working position to determine the location of the drive. The electric drive must be on the rail with teeth, it is important to ensure that these elements are in the central part of the gear and are fixed on the profile pipe at the location of the outer frame.
After the place is determined, it is necessary to lay the rest of the equipment for installation on it, and then go around the perimeter by welding. In some cases, there is a need to raise the drive a few centimeters higher. To do this, use a profile pipe to which the drive is welded. When choosing a pipe, be guided by the following dimensions: 40 x 20, 50 x 50, 60 x 30. As soon as the channel is installed on the mounting base, the electric drive should be fixed to it using a welding machine, and then fixed using bolts.
Gear rack work
Of course, you can order turnkey sliding gates with electric drive. However, the cost of these works will be quite high. To independently carry out such manipulations, although not so simple, but still possible. The next step is to take care of fixing the rack. The gates should be open, in the middle of the drive should be installed rail with gear. To fix the limit switches, it is important to leave a little rail with teeth. The latter will need to be welded to the profile pipe. The rail should pull the canvas. As soon as the next rake is in place, you need to perform the same procedure that was described above. There should not be gaps between the joints. Each element of the fastener for the automatic gate must be welded again. A millimeter gap must be left between the drive and gear.
Limit switch mounting technology
When the electric drive for sliding gates is installed, it is necessary to fix the limit switches with bolts, installing them on the end rail. The circuit breakers may have a magnetic or mechanical design. The first option will work even at the lowest temperatures. The magnet is mounted on the rack, at the moment of passing a certain place the structure stops. Switches should be divided into right and left. Experts recommend setting up and installing magnetic switches, departing from them one meter or more. Installation of mechanical limit switches is quite simple. They work on the basis of a spring.
Gate preparation
If you decide to install a sliding gate with an electric drive, then initially you will need to fill the foundation, this is the preparatory stage. You should start such work with marking the location of the trench. The width of the base of the gate must be equal to the limit of 50 centimeters. When determining the depth of a pit, it is important to take into account the freezing line of the soil. If we are talking about the suburbs, then the foundation can be laid at 1.7 meters.
Do-it-yourself sliding gates with electric drive can be made. The fittings and channel will become materials for the embedded element. The parts should be welded together. The channel is used to increase the rigidity and strength of the base. If you connect the vertical rods with jumpers, you get a fairly strong frame. It is lowered into the trench, and then the foundation is poured. First, sand should be poured onto the bottom, which is well compacted.
Before pouring the foundation, it will be necessary to check how horizontal the reinforcement is. To do this, use the building level. In the process of alignment, make sure that the longitudinal axis of the channel is parallel to the fence line. If you plan to install sliding gates with an electric drive, then at the stage of pouring the foundation, it is necessary to lay the wires, hiding them in corrugated tubes. The exit point by a bundle of wires should be selected, taking into account the planned location of the electric drive. Most often, equipment is installed in the center of the foundation.
Installation work
The line of movement of the structure should be determined by the method of a string stretched along the opening, it should be positioned, departing from the road surface 200 millimeters. On the rope to align the position of the beam, which acts as a supporting profile. It will be necessary to prepare roller carts for installation by mounting them sequentially inside the carrier beam. Carts must be offset towards the center of the gate. The shutter must be placed on the steel channel of the embedded structure, and then position the supports in series in different places.
Trolley Lock
How to connect the electric sliding gate, as described above. However, at the next stage, it is necessary to mount the roller trolleys. The leveling pad must be welded to the channel. The gates are rolled out into the opening to the end, which allows you to check the horizontal position of the canvas. The adjustment pad is tacked by welding. The canvas should be removed from the roller bearings, which are removed from the adjustment platforms. The circuit will need to go through welding, welding the site to the embedded elements. The roller bearings must be fixed on the adjusting pad. The gates should be installed in the closed position, which will allow you to adjust the horizontal position of them in relation to the supporting profile. To do this, use a wrench to lower or raise the platform relative to each other.
Freewheel adjustment
The upper nuts must be loosened in order to adjust the position of the roller bearings. Gates must be opened and closed by rolling them from one end to the other. In this case, the roller bearings will occupy the correct position in which the structure will move freely and easily. After the adjustment is completed, tighten the upper nuts of the roller bearings.
Installing End Caps and End Rollers
You will learn how to install the electric drive of sliding gates if you read the information presented above. However, it is also important to know how to install the end roller. At the next stage, you can start carrying out these works. For this, an end roller should be installed inside the U-shaped profile, placing it on the front side of the gate. It will be possible to fix the part with fixing bolts. In the set of sliding gates there must be a stub of the supporting profile, it is welded from the back. This part does not allow the bearing profile to clog with snow, which eliminates the possibility of jamming of the device.
In order to mount the upper guide bracket, loosen the roller fasteners. After the bracket should be placed above the canvas so that the rollers touch the upper edge, the side with the holes should be directed towards the support.
Conclusion
Use the design more comfortably allow the electric drive. Sliding gates, the installation of which you can install yourself, at the next stage involves covering the canvas with a profiled sheet. Initially, the material will need to be cut in width and height, giving the canvas the desired size.