The belt is an important accessory, both in a female and in a man's image. He will decorate both strict trousers and an evening skirt. But an indicator of good taste and sense of style will not be an ordinary belt, but a leather belt. It’s difficult to make it yourself, but the result is worth it. After all, such a thing will be truly unique, and therefore priceless.
Briefly about how to make a leather belt with your own hands
Very unusual and effective belt made of vegetable tanned leather. You can apply a drawing to it, which is initially printed on the printer, and then transferred to tracing paper. This material is relatively durable and can be used more than once. If you draw on the glossy side, the image will turn out to be voluminous, although this is not an easy job.
When embossing, you should never wet the entire belt with water; only the part that is currently being worked on should be wet. For the background, any small stamps that are at hand are suitable. After embossing is completed, the belt must be left to dry for at least a day.
Where the skin will bend, it needs to be made thinner by half. The same thing is where the buckle joins.
Product Processing
Before you start painting, you need to punch holes and sequentially process the ends. First, a torzbil, then sandpaper, and then saddle soap. After the product has dried, it is coated with bone oil in one layer. Thanks to him, the belt will become softer and acquire the shade of “light tan”.
To make the picture seem brighter, it would be nice to paint it with contrasting paint. After the paint has dried, the belt is once again treated with oil and after that - finish.
Last of all, holes are made by a punch and treated with oil.
Plain leather belt
Before you sew a leather belt with your own hands, you need to prepare the materials. They do not need so much.
- Skin tape.
- Doublerin or any other lining.
- Pattern paper or plain tracing paper.
- Adhesive suitable for skin.
- Threads and needles.
- Iron.
Colored leather belts are always in trend, so you can experiment with shades. Perfectly accentuate the waist and complement the image of a bright leather belt. With your own hands to make such an accessory is quite possible.
Manufacturing technology
First you need to measure the waist. Add a dozen more to the obtained centimeters so that the belt is not close to the butt. Next, go to the pattern, which should be two times longer than the planned length of the finished product. The width can be any, but it is worth remembering that on the pattern an allowance is needed on both sides. It is better that he was about two centimeters. If the belt should be ordinary, then the pattern will look like a simple straight tape. Here the edges can be either straight or rounded.
Now the skin is attached to the pattern, this can be done with pins and needles. Then it needs to be cut. To do this with ordinary scissors is almost impossible. Of course, it would be ideal to purchase a furrier knife for this, but if this is not possible, then you can use a scalpel or, in extreme cases, a new shaving blade.
Belt assembly
The doubler is cut out from the same pattern. Only here it is necessary to leave without allowances. Clearly shaped belt. After that, the lining fabric must be attached with the sticky side to the skin and ironed. In order for these two parts to stick together well, you need to wait until the workpiece has completely cooled.
The allowances that remained on the leather part are carefully bent inside out and fixed with special glue.
After that, the workpiece is bent in half and secured with pins. Now it needs to be zabrochit. To do this, you must either have a special sewing machine, or purchase certain needles for a universal device. You can use a decorative stitch, but do not forget that handwork is valued above all. Although making leather belts with your own hands is hard work.
Belt trim
It remains only for the fittings. This refers to a buckle and various jewelry. Although you can fasten the belt on buttons, hooks and even buttons with loops. And as a decor, in some cases even lace is suitable. It all depends on the flight of fancy. So it’s quite possible to make any leather belt with your own hands. It’s not necessary to be a master for this.
Tip: to make an ordinary buckle more interesting, you can tie it with multi-colored threads, sew it with a bright cloth, or simply lace it around.
Combination belt
You can make a purely female belt of leather with your own hands. This is not so difficult. You need to prepare a narrow ribbon of flexible leather, high-quality scissors and a standard sewing kit.
Remove excess
It is necessary to decide how long and wide the belt will be and cut off unnecessary parts. Since the belt will not be on a buckle, but tied on a beautiful bow, then, accordingly, the skin ribbon should not cover the entire waist. It is better to remove ten centimeters from each edge. It would not hurt to overcast the edges of the belt with a sewing machine.
Ribbon Preparation
There will be ribbons at both ends of the belt. And you need to immediately determine their length. It depends on what the bow will be. It is worth noting that a beautiful magnificent decoration is obtained with a tape length of sixty centimeters. Fabrics need to be folded across twice, and then their width should be slightly wider than a strip of leather. This is a stock for allowances. That is, two strips of the same length should lie on the table, the width of which is twice as large as the main belt. Now these pieces of fabric need to be folded along in half with the seamy side facing out and stitching the hem.
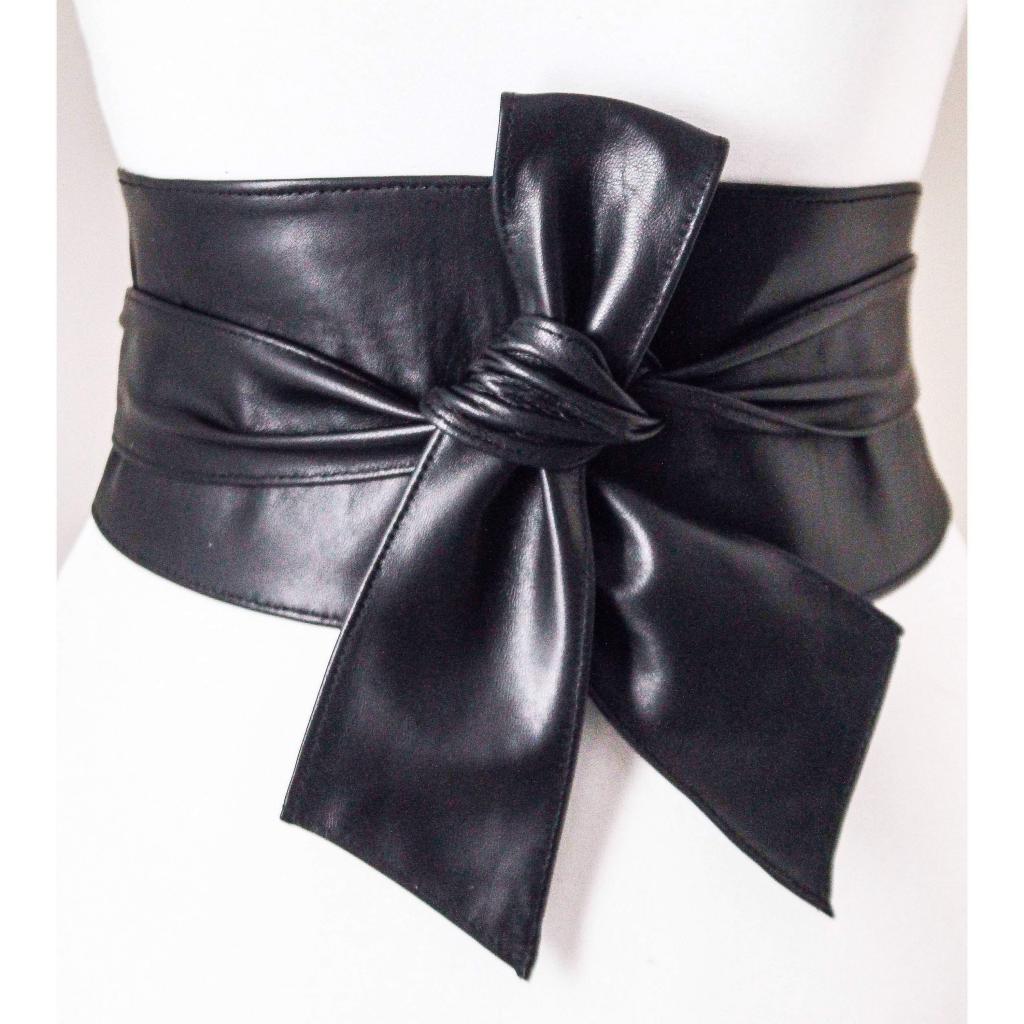
Next, using a pencil or other device, we turn the tapes out. To make the edges look finished, you need to make a small seam, stepping back a couple of centimeters from the edge that the tape will be attached to the skin. It remains only to stitch the fabric to the main belt. And that’s all, a wonderful accessory for the evening look is ready. It is not at all difficult to make such a leather belt with your own hands.
Types of weaving
When you see products made of wicker leather, breathtaking. They look quite elegant and expensive. It seems that in order to do such a thing you need to be a real master. Is it so? Can I make a woven leather belt with my own hands? The answer is yes. It’s even possible, you just need to be patient.
Today we look at two of the most popular and least complicated weaving methods.
Single Puzzle Method
To do this, you need a long ribbon of skin. Without touching the edges, you need to divide it into three narrow stripes. One of the ends, which remained intact, is attached to the desktop. We tighten the lower end, and then skip the first tape - the strip - between the second and third.
The first tape should lie on the second, and then it is pulled between the second and third. We transfer the third tape through the first, and the second through the third. The weaving tip must again be pulled back and again skipped between the second and third ribbons. And so, until you reach a logical conclusion. To understand how to do this, the diagram below will help.
If the belt is purely female, then it will not be amiss to decorate it with beads or rhinestones. Decorative buckle also does not spoil the look. But if a man will wear the belt, then it is better not to add any details to such weaving. Otherwise, it may look clumsy and tasteless.
Afghan braid
A very useful method. It is widely used in the east. In this way, you can weave not only a leather belt with your own hands, but also a horse harness or a handle for a bag, for example. This is not a simple weaving, with its help you can firmly connect two leather ribbons without using metal clips.
First you need to prepare two long strips of skin. It’s better not to be too wide. Using a blunt awl, it is necessary to mark the edges of the slots.
There are two important secrets for this weaving:
- The distance between the slots should be equal to the width of the strip, divided into two.
- On the first tape slots one more.
In order to make slots, it is most convenient to use a chisel. Using the same tool, you can sharpen the edges of the ribbons.
In the left hand you need to take the strip on which more slots. And in the hand should be the edge on which there are no holes. The nearest slot needs to be expanded; a screwdriver can be used for this. Pass the short tip of the second strip into this hole so that the slots are at the bottom.
The short end of the second strip is attached to the bakhtarma of the first strip. Then the procedure is repeated the opposite: now the first is skipped to the nearest slot of the second tape. And from the bottom up. And according to this principle to the end. The lower lane must always be passed through the upper.