Origami art is as ancient as paper, which is the main material in the manufacture of figures in this technique. Despite the fact that the word "origami" itself has Japanese roots and translates as "folded paper", China is still considered the founder of this art. Like many types of applied art, origami has not only an aesthetic, but also a religious and symbolic function. Samurai presented paper figures for good luck, for a long time letters were put in a crane figure so that they quickly reached the addressee and did not get lost on the road.
One of the most popular paper origami figures today is the swan. It symbolizes purity, integrity, sincerity and nobility. In addition, the swan couple is associated with fidelity, so their images and figures are often used as decoration of wedding ceremonies.
Materials
To make a swan out of paper using the origami technique, you must have patience, a certain sleight of hand and imagination, as well as a piece of paper. It depends on him what the figure will be, whether it will keep its shape, how many additions can be made from it. Despite the fact that it is proved that paper can be folded no more than 7 times, the density of the material can sometimes not even allow it to be folded 3 times. Therefore, the choice of paper must be approached responsibly and pay attention to the following parameters:
- Density. The denser the paper, the more difficult it is to work with it, but wrinkles are poorly fixed on loose paper, so the product can easily lose shape.
- Thickness. Cardboard is suitable for the manufacture of rough forms, for example, boxes. To create more elegant figures it is better to choose thinner paper. The thinner it is, the easier it will be folded, but the easier it will be torn.
- Structure. Products made of glossy paper look very neat, but on matte paper it is easier to correct inaccuracies of folding, which then leads to a somewhat messy appearance, but a clearer performance. If you choose colored paper, then it is better to choose office for printers or classic matte. Coated badly folds, and the paint in the places of the bends crack and erase. Figures from such paper look unaesthetically.
The perfect origami paper should be smooth, thick and thin.
Swan. Option 1
This is the easiest way to fold a swan out of paper. For beginners, origami of such a figure according to the presented scheme is more suitable than others.
Manufacture
To make a swan, you need 1 square sheet of paper. Such a figure from a sheet with a size of 15 * 15 looks better, but for beginners it is better to choose a larger size.
- Place paper angle down. Combine the lateral corners together, form a fold in the center from top to bottom, and again spread the sheet on the table.
- The lateral angles are reduced to the center so that the upper lateral sides of the rhombus coincide with the fold line. Lay the product face down on the table.
- Fold the bottom corner by aligning it with the center line. The fold line should be at the level of the lower edge of the folded sides, and the workpiece itself should be in the form of an isosceles triangle. Then divide the bent corner into 3 parts and bend the corner down at the level of the lower third.
- Fold the resulting workpiece in half.
- Fold each side in half lengthwise so that the sides coincide. Verify the resulting blank of the origami swan from paper with the scheme.
- Next, you need to determine the length of the neck and torso. To do this, the workpiece must be bent in half along the long side.
- To form a neck, it is necessary to bend the workpiece diagonally, so that at one point the line passes through the line of the previous bend, and at the other, it contacts the line of addition of the lower corner.
- Turn a long corner along the line of diagonal folding. This part of the part should deviate upwards by approximately 45 °. Then bend the neck along the line of addition 1/2 of the part. The angle deviates another 90 ° and will be parallel to the tail line.
- Now you need to form a beak. To do this, bend the upper third of the neck so that the angle is between the two halves of the part, and divide it into 3 parts, bend the corner back at a height of 1/3. The angle should protrude from the workpiece by a third.
- To give the figure a finished look, you need to make 2 more additions. The first is at the height of half the neck, along the resulting line, the part must be concave, it will deviate 90 ° forward. The last addition is done just below the internal fold of the beak. The detail is also concave. Thus, the head of the swan will be located parallel to the lower part of the neck.
It remains to spread the tail and wings a little, if necessary, color the beak and draw the eyes. The swan is ready.
Option 2. Graceful bird
For more experienced craftsmen there is the opportunity to make a charming swan based on a triangle. The graceful creature, frozen on a wave of wings, is striking in its realism. How to make such an origami swan from paper in stages, is described below.
Manufacture
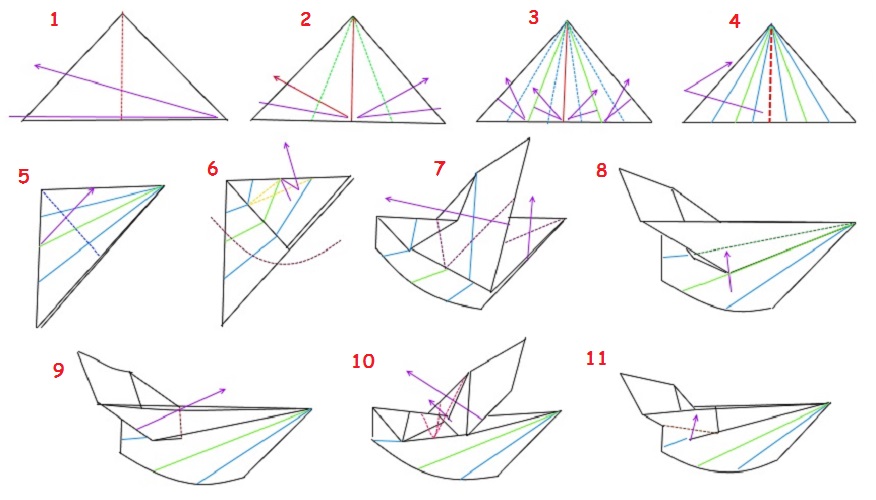
- Bend the triangular blank (1/2 square) in half.
- Combine the sides with the center, make 2 more bends.
- The distance between each bend, as well as the edges, must be halved and additional bends made. In total there should be 7 of them, diverging from the top peak.
- Fold the part in half along the central bend.
- Connect the angle of the upper half of the workpiece to the top of the workpiece.
- Next, we proceed to the formation of the first wing. On the upper triangle, 3 inflection lines are visible. It is necessary to make 2 additional folds by connecting the lower edge of the first blue line with the upper edge of the green and second blue lines. Fold along the resulting lines with a short kink from above.
- The following fold lines: from the bottom of the green line to the concave corner of the workpiece and to the side. There should be the same distance from the top corner as with the blue line of inflection. To shift the upper part of the workpiece, folding it along the planned fold lines.
- Fold the lower corner of the wing along half and bend into the workpiece.
- Arrange the origami swan wing from paper from left to right.
- At the junction of the wing with the body, lay a fold, turn to the left.
- Bend the lower corner of the wing up.
- Verify the result with the circuit.
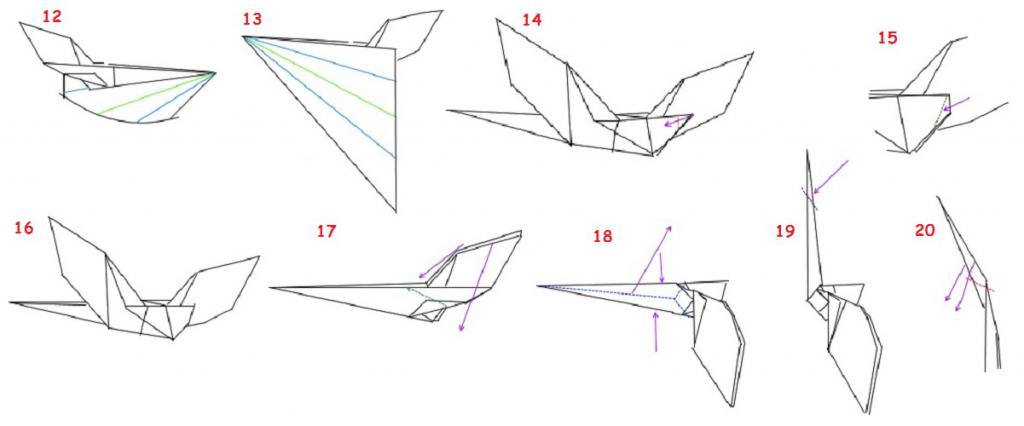
- Turn the part upside down. Repeat steps 5-12 to create a second wing. All actions must be mirrored.
- Tail. Divide the short angle between the wings into 3 parts, bend the extreme third inward.
- Bend the lower corner in the resulting workpiece into the workpiece as well.
- Verify the result with the origami swan pattern from paper, fold the wings towards the tail.
- Lower the wings down. Bend a long angle from the wing line upwards at an angle of 45 °.
- Bend it along the lines so that the neck rises 90 °. Fold each triangular part of the neck in half so that the edges are inside the part.
- Bend the upper third of the neck at an angle of 45 ° and bend it.
- Lower the top of the corner down so that the head is 90 ° from the neck.
- Turn the sides of the triangle from the inside of the head, thereby increasing the width of the head.
- Divide the head into 4 parts, bend the part inward 3/4 from the edge and return it back in half, forming a beak.
- On the wings, bend the front part parallel to the edge, shift them forward.
- Fold the halves of the workpiece along the neck, forming the necessary bend. On the tail, make a semicircular fold. Form folds on the wings as shown in the figure above.
- Verify the result with the circuit.
A do-it-yourself paper-made origami swan in such a pattern can become not only a decoration on your desktop, but also a symbolic gift to your loved one.
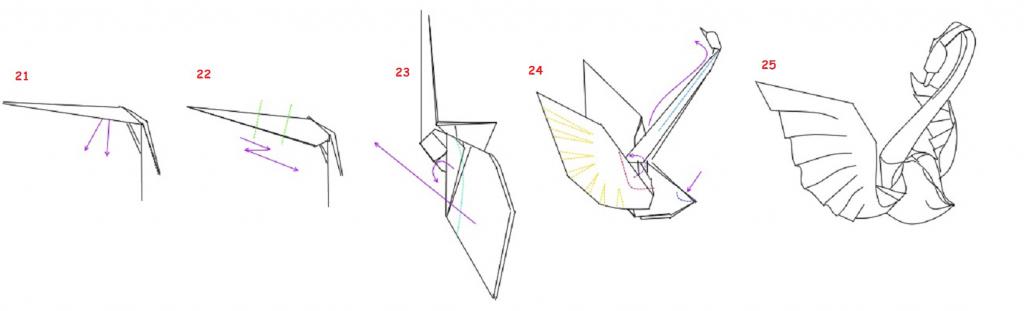
Option 3. A pair of swans
Another interesting origami option is the figure of a pair of swans. To make it, you need colored paper. To get the intended effect, the material must be painted only on one side.
Manufacture
To make such origami swans from paper according to the instructions is quite easy.
- First you need to do the basic excesses. To do this, the square must be folded twice diagonally, then flatten the paper and folded again twice, but in half. After that, place the sheet with the white side towards you so that the corner of the square is located below. The diagonal bend must be divided into 6 parts. On the left half of the square make 2 inflections. One is closer to the center in 2/6, folding the sheet on itself, and the second is closer to the edge, in 1/6, bending the sheet away from itself (1-3).
- Turn sheet (4).
- Repeat steps 1-3 to form symmetrical folds. Turn over the sheet (5) again.
- On the right half, divide in half the section closest to the center, bending the sheet onto yourself (6).
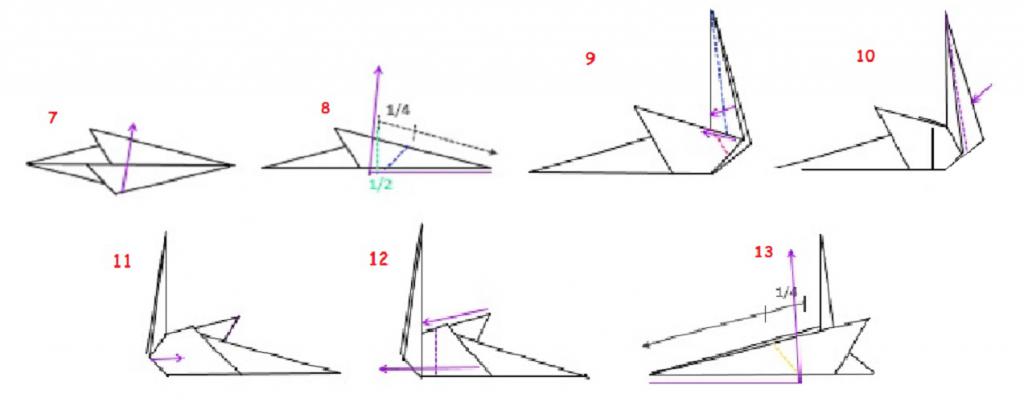
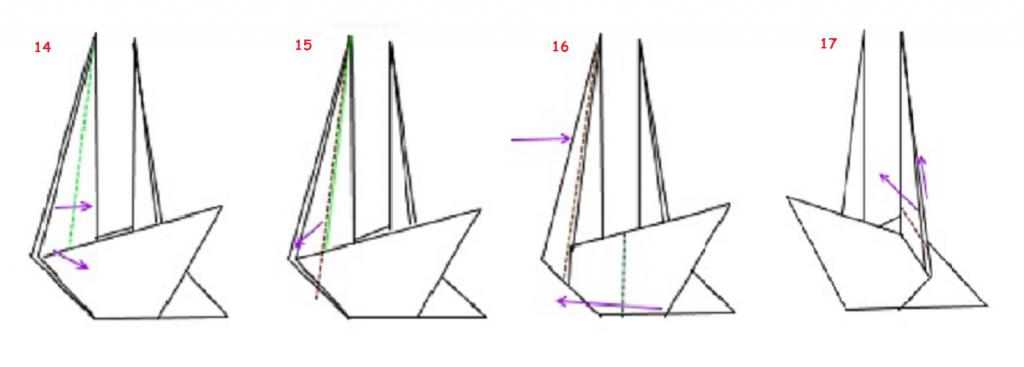
- In the second half of the workpiece, also raise the angle to form the neck of another swan, then fold it in half lengthwise and bend the lower corner. Shift the upper wing to the left (14-16).
- Stepping back a little, bend the neck parallel to the wing line, bend the neck to the left. Fold the second neck similarly (17).
Divide the remaining neck to the inflection line into 3 parts, and bend again at the height of the lower third. Both necks should be parallel to each other (18).
Now you need to shape the head. To do this, the upper corners must be divided in half and bent. Heads should be turned on each other (19).
Stretch the upper folds on the head, increasing the width of the angle (20), then double the “zipper” to form a beak and lower the side edges of the head down (21).
Fold the upper part of the neck in half, bending the edges inward. In this case, it is necessary to form the desired bend of the part (22).
Form folds on the wings (23-24).
The swan couple is ready.
Modular
Another type of origami is modular. A paper swan in this technique consists of many identical parts fastened together without additional materials, and the size of the product will vary only by the number of modules used. In this technique, you can also make absolutely any crafts, its shape and size will depend only on the imagination.
Module
Even a child can cope with the manufacture of parts for three-dimensional figures, so the whole family can participate in creating paper-origami swans from modules.
- Rectangular sheet folded in half.
- Fold in half across the workpiece.
- Lower the halves of the upper side, aligning them with the inflection line.
- Flip the part.
- Bend the outer corners of the bottom of the part, aligning the side with the bottom line of the triangular part.
- Fold up the bottom of the workpiece to make a triangle.
- Fold it in half. Inside there should be a bend line of the lower part, and outside - 2 pockets.
Assembly
The most common figure made using this technique is a paper swan. Modular origami, regardless of the shape of the finished product, is made according to the general principle. The module must be placed in corners from itself. There are 2 pockets near the central fold. The lower right corner of the second module must be inserted into the left pocket, and in the right - the left corner of the next module. Thus all modules are fastened. The product must be assembled from the base upwards, while it will stand on the central bends of the first row modules. For the craft to be solid, the modules must always connect the corners of adjacent parts, with the exception of the neck. To create it, they are simply inserted one into the other as a tower. As for the formation of the swan figurine itself, the following principle must be followed: the number of modules must be a multiple of 9. Of these, 3 parts will go to the wings, 2 parts to the tail and one to the chest.
The creation of any origami crafts from paper - a swan, their pair or other figures - contributes to the development of perseverance, attention, spatial imagination and fine motor skills, which has a beneficial effect on people of any age. Therefore, the creation of such figures can be an excellent pastime for the whole family.