In order to ensure the normal operation of the milling apparatus, it is necessary not only to handle the device used correctly, but also to correctly use
additional equipment, in other words, devices for
manual milling. In order for this tool to be able to shape the blank in accordance with the requirements of the master (that is, by cutting off the edges and other places of the material where necessary, and not where “it happened”). So, it is precisely to give the processed material a clear planned shape in the household that the “tools” for the manual milling cutter are used.
The difficulty of making homemade appliances
Often, manufacturers themselves understaff their products at the production stage, but, unfortunately, not every company can please consumers with a full set of all the necessary tools. And why do this if at any time you can make a suitable tool with your own hands in a garage. You can do this even without a preliminary drawing: their design is so primitive that even a novice master can cope with such work. To make a parallel emphasis or any other detail, it is enough to have a picture of this device and a minimal set of tools. But if you want to make a homemade table for a manual milling cutter, you definitely can not do without a drawing. You need to calculate everything correctly, designate the size of the table, and then go on to work.
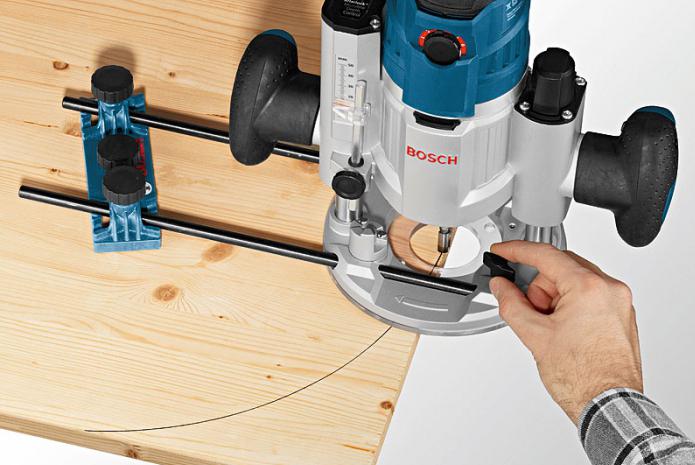
How to work with a manual milling cutter?
Before milling wood, you need to make sure of the following:
- Is the milling cutter secured in the collet?
- Does an additional fixture installed on the workbench correspond to its power and speed?
- Is the required milling depth adjusted (when working with immersion devices, this indicator is measured using a special immersion limiter).
- When working with edge milling cutters, make sure that a guide ring or bearing is installed that provides the desired tool path (the cutter thickness should be no more than three millimeters).
We pay attention to the supports for details when performing work
When considering the issue of “how to work with a manual milling cutter”, it should also be noted that the part you are processing must always have some kind of support. For example, before turning on the engine, the sole edge or bearing is pressed against the guide part or template. Only then does the master turn on the machine and begin milling.
Below we will consider what kind of attachments for the milling cutter are, and how they are special.
Parallel emphasis
Parallel emphasis is one of the few devices that are already included with each milling cutter. And therefore, there is simply no need for their independent development and manufacture. As for the functions, with the help of the mentioned element it is possible to make a reliable emphasis for the material being processed, thereby ensuring the linear movement of the cutter relative to the base surface. The latter can act as a straight edge of the part, the guide rail or table.
With this device for manual milling, you can quickly process the edges and milling various grooves, holding the material almost in the “dead center” position.
Guide rail
This tool has similar features to the previous one. Like a parallel emphasis, the tire provides exceptionally smooth rectilinear movement of the device. Working with a manual milling machine on wood using a guide rail can significantly reduce the time spent on processing a particular part. In addition, using the specified equipment, you can install the mechanism at almost any angle relative to the edge of the table.
In some cases, the design of the tools in question provides for the presence of special elements that facilitate the performance of certain operations (for example, it can be a function of cutting holes at the same distance from each other).
Copy rings and patterns
Such devices for a manual milling cutter, such as copying rings, are a round plate with a protruding collar, which can slide along the surface along the template, thereby ensuring the exact path of the cutter. Often, this element is attached to the sole of the workbench. There are several ways to install it:
- Screwing the ring into the threaded hole.
- Installation of special antennae of the device in the holes on the sole.
With a fixture for a manual milling machine such as a template, a more accurate and efficient execution of work can also be achieved. Signified
the element directly on the workpiece itself
with double-sided tape, after which both parts of the device are pressed to the machine with clamps. Upon completion of the work, experts recommend checking the condition of the ring - see if it is firmly pressed to the edge of the template or not.
Another feature of the tool in question is the ability to process not the entire edge, but only its angles. At the same time, some devices for the manual milling cutter allow you to make roundings of four different radii at once. Thus, the process of processing material according to the template is an excellent way to cut grooves for the part.
Compasses
These home-made devices for the manual milling machine are designed to move the entire machine in a certain circle. The design of this tool includes a main part (a compass consisting of one rod), attached with an end to the base of the milling cutter, and a secondary one - a screw with a pin inserted into the hole of the machine. The size and radius of the circle is set directly by the offset of the machine relative to the design of the device. Before starting work, it is necessary to carefully fix the tool to the base and make sure that the milling cutter is in good condition and is functioning properly. It is worth noting that the most effective and easy to use is the pair of compasses, which has not one but two bars at once.
Most often, this tool is made of transparent plexiglass. A small metric scale is additionally applied on its surface. It is worth noting that some compass models can have a circumference of up to 150 centimeters. With the help of such a device, you can easily make a round countertop for several people.
But back to the principle of work. Using an angular lever with an accurate scale, copying is performed on the workpiece. At the same time, here you have the opportunity to center the ring directly under the cutter. The angular lever, which is complemented by a special base plate, also provides precise edge milling.
The entire design of this device consists of a base plate, a set of probes and a chip protection device.
Devices for copying identical devices and parts
By this characteristic is meant a set of tools consisting of an angular lever and special copy probes, which are needed to make a batch of identical parts. Most often, such equipment is used in cases where there is a need for the replication of small wooden devices. But before you start working with such a milling cutter, it is necessary to prepare the scale of the angular lever in advance (the division price is 1/10 mm).
After the scale is set, you will be 100 percent sure of the correct centering of the thrust ring under the cutter, the location of which depends on the values set on the angle lever. Also, this adjustment element can be equipped with a base plate and a special mechanism that protects the surface of the device from chips. The use of such parts will significantly accelerate and secure the processing of product edges.