A hat with cat ears is a rather original and fun winter wardrobe item. Such gizmos are able to decorate any, even the most dull winter days. They are performed, as a rule, in the technique of crocheting or knitting, so these hats are not only funny and warm, but also quite comfortable. In addition, there may be a hat with cat ears, fox, squirrel and even with alien antennas. Human imagination has no limits. Caps can be with or without ties, on their own or in tandem with a scarf.
"Eared" hood
Knitted hat with cat ears can be connected with a scarf, which is made in the same technique. And then it turns out a kind of very warm hood. Often on the edges of such a scarf create pockets for hands. To do this, they knit it more authenticly and wrap the edges of the scarf.
Such pockets can be decorated, for example, with cat footprints. We start knitting with a hat, which in this case consists of two side halves. This
hat fits
with cat ears knitting. Choose yarn according to color and other characteristics based on your preferences, as well as characteristics of the future product.
Knit details
We start from the left half. We collect the required number of loops and knit 40 rows with the pattern we like. Starting with the forty-first row, we proceed to the reduction of loops. So, in the forty-first row we remove two loops at the beginning of the row. We knit the next row without decrease. In the forty-third row, we remove one loop at the beginning of the row. Again a row without reductions. In the forty-fifth - two more loops. We continue to reduce the loops in the same sequence through the row until sixty rows are crocheted.
In the same way, we knit out the right half of the cap. The only difference is that we reduce the loops not at the beginning of the row, as in the previous part, but at the end. Finishing each half, leave long threads at the end of knitting. They will be useful to us at the stage of assembly of the product. After knitting the halves of the cap, a scarf is knitted. To make the product look more interesting, choose a different pattern for the scarf. Or maybe a thread of a different shade.
Putting the parts together
So, all the details are ready. And now our hat with cat ears should be assembled. We begin the assembly with the halves of the headgear itself. We put them together and connect with each other, using one of the halves of long threads left at the edges. We turn the edges of the scarf and sew them on the sides, if you want to make such pockets. If not, then just leave them alone and move on to the next step.
Now we define the middle of our scarf and combine it with the seam that was formed when the two halves of the cap were joined. You can even grab a pin in this place to prevent unnecessary shifts and deformations during operation. We connect the cap with a scarf using the thread left at the end of previous work. We get a practically finished product. There remains one important point - the manufacture of ears.
Knit ears
Since our hat with cat ears, they must first be tied separately, and then attached to the product. In order to make one eye, we need to create two triangular blanks.
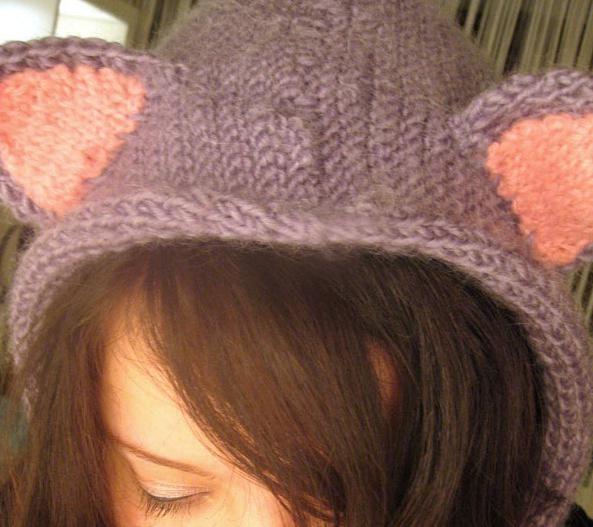
For the first one, which should be slightly larger, we collect such a number of loops so that the width that was obtained in this case completely suits you. This is the foundation of the future ear. We knit four rows, and then begin to reduce the loops in each odd row, one from each edge of the row. We do this until you have one loop left on the spoke. Since the hat with cat ears, the photo of which you can see in this master class, provides for two ears, there must also be two blanks. Moreover, larger and smaller. A smaller workpiece, as a rule, is knitted from threads of a different color. It can be white,
pink or any other suitable for the middle of the ears. The smaller blanks are knitted in the same way as the larger ones, only we collect a smaller number of loops. And, accordingly, get fewer rows. Well, the part itself will turn out to be smaller. Do not forget to leave a long thread at the end of the work.
Collecting ears
Before our hat with cat ears gets its ears, they must be collected. Each ear consists of two blanks. One of them is external, and the other is internal. To assemble the ears together, place the smaller part on the large so that the wrong side of the small part is applied to the front of the large part.
Sew it using the very long thread that was left after completing your work. Also do the second eye. After collecting both ears, sew them on your hat in the place where you would like to see them. Thus, the knitted hat with cat ears is ready.
Crochet hat with cat ears
Caps, as you know, can be knitted not only with knitting needles, but also with a crochet. Therefore, if you are not very friendly with the knitting needles, then pick up the threads, as well as the hook and boldly get to work. If you own these tools equally, then this is a great reason to diversify your wardrobe. After all, such hats in any case will differ from each other.
So, the hat with cat ears is already knitted. So proceed to the option that is crocheted. To get started, select the threads and pick up the hook. If you are not a very experienced knitter and do not know which hook to pick, do not be discouraged. Examine the label on your yarn with special care. Typically, the thread manufacturer indicates which hook number is best for them.
Crochet process. Start
Crocheting caps begins with the fact that five air loops are closed in a circle and knit rows in a circle, performing at the beginning of each row a lifting loop. This will be the bottom of the future cap. Since this circle should be flat, then in each row it is necessary to increase the columns. Knitting continues until the resulting circle will not satisfy you in size. After the desired value is reached, additions in each row are no longer needed. And, starting from this moment, they should be carried out through one row. Do not forget to constantly try on a hat to make sure that additional expansion is not required.
Crochet process. Completion
As soon as the upper part of the head is covered, the increase is completely removed, and one number of loops all the time fits to the required length. Now on the sides we knit out details that will cover our ears. To do this, outline, using threads of contrasting color, those places where these details begin and end. Knit in columns, moving in one direction or another, until the desired length is reached. At the end of the work, tie the edges of your product with half columns. This will give the hat a neater look. Now it remains to tie and sew the ears and that's it - the hat with cat ears, made using the crochet technique, is ready.
Here are the hats ready. In such winters it is cozy and warm, as well as fun. Please such things not only yourself, but also the kids. And they, like no one, will appreciate the charm of this idea. Connect all your imagination. Decorate your hats with applique, embroidery, sewn items or even pompons. Make them funny ties or interesting buttons. Use bright and unusual yarn, as well as patterns and ornaments. And then you are guaranteed to get a warm, fashionable, and most importantly, a unique piece of winter wardrobe.