Installing a warm floor in the apartment significantly increases the comfort of the home, improves the quality of life of the family. But a significant amount of energy is consumed for heating. Therefore, you should accurately calculate the parameters and design of the floor heating system . Despite all the difficulties, it is possible to arrange a warm floor on your own. But in order not to make mistakes, it is necessary to learn the rules of engineering calculations, the technology of work, carefully read the instructions from the manufacturers of heating systems.
Some general recommendations
In an ordinary apartment of a typical multi-storey residential building, it is advisable to install electric heating elements in the floor. Installation of electric underfloor heating does not require fuss with the receipt of numerous permits and approvals from regulatory authorities in the field of housing and communal services. Therefore, repairs can be carried out quickly and efficiently, without delay, without excessive bureaucratic red tape, while saving considerable money. Types of heating elements of an electric heat-insulated floor differ from each other in the principle of action (how electrical energy is converted into heat). Such an element can be a conductor of electricity with high resistivity, the so-called mat and infrared film. Installing a warm floor under the tile using such heaters has worked well. Each of the species has certain advantages and disadvantages, which will be discussed later.
Increasingly, people prefer a water heated floor. The installation of such a system is fraught with the solution of numerous problems (both engineering and legal). Such a system can be autonomous (then the installation of boiler equipment is necessary), and can be connected to a centralized heating system. As in that, and in another case, you can not do without the design of the required documentation. Often, all documents are very problematic. On the other hand, the monthly expenses for heating such a floor are much lower than for heating an electric underfloor heating. Such floors are usually mounted in private homes, where it is necessary to heat a very significant surface area.
For self-assembly, you should carefully read the instructions for installing a warm floor from the manufacturer. The whole course of work, which is strictly observed, will depend on the choice of type of coolant.
Accessories and products necessary for floor installation with electric heater
The main element of the system is the coolant itself (cable, mesh with a fixed cable (mat), infrared film). Installation is not possible without fasteners (staples, wire, special tape). Connecting wires, floor temperature sensor, ground wire are required. Without a thermostat, installing a thermal floor loses all meaning and is inappropriate: such a surface will either burn, or it will be very cold.
Installation methods for electric heaters
The most common screed pouring over the heater. As a rule, this principle is used to install a warm floor under the tiles in the bathroom, bathroom, or kitchen. A cable (spiral) is used as a heater.
It is also possible to install heating elements on a screed under a tile or under a laminate. But in the case when the room below is not heated, this method is not suitable.
Another variety is possible - laying under the floor covering (installation of an infrared thermal floor). It is mounted under linoleum or under a laminate. You can do this kind of work yourself. Installing a warm floor does not require the involvement of specialists. Also do not need to fill the screed.
Spiral floors as a heating element
With the passage of electric current through a conductor having a large electrical resistivity, the material emits a significant amount of heat. The action of such a sex is based on this principle.
Externally, the heating element resembles an ordinary electric cable. A spiral is hidden under the cable sheath.
The industry produces cables with one core, with two wires, as well as the so-called self - regulating cables.
The number of cores, of course, has a direct effect on the heating parameters, as well as on the cost of the cable. For obvious reasons, the most expensive is a self-regulating cable that can adapt to a given temperature.
The type of cable also determines the circuit for connecting it to the mains. So, a single-core cable closes at the connection point. This condition is not met when using other types.
Preparatory work before installing the floor with a heating spiral
It is extremely important to plan in advance, in a calm environment, all the details and nuances of the design. So that at the minimum cost the maximum effect is observed, and at the same time the operation is ensured.
The material used as a decoration also plays an important role. Basically, the heating structure is laid under the tiles and under the laminate. Installing a warm floor under these coatings provides good operating conditions.
Installation works are carried out in strict accordance with generally accepted technology. Installation of a warm floor is possible only after carrying out all the necessary preparatory operations:
- Surface alignment. It is very important that the surface for laying the cable is perfectly flat. If the floor has a strong slope, significant potholes, it will require pouring cement screed. Minor defects are eliminated by puttying.
- Thermal insulation is laid on the screed. Moreover, the material should protrude onto the walls by about 20 centimeters. This will increase the efficiency of the system, minimizing the loss of thermal energy. The thickness of the insulating material is from 2 millimeters or more.
- If it is supposed to install a warm floor in a room with a high level of humidity (for example, on a balcony, in a bathroom, in a kitchen), then laying a heat-insulating layer is preceded by a waterproofing floor. Otherwise, the heating elements will be exposed to aggressive moisture and will quickly fail, and possibly even pose a threat to life.
- After laying the hydro and moisture insulation layers, the screed is poured once more.
- The screed is covered with a layer of temperature-control foil. This increases the reliability of the entire system, provides heat distribution over the entire surface of the floor, eliminates the possibility of overheating of the spiral.
- A special tape is glued on the foil in a certain way (according to the adopted and approved project). The distance between the strips of the tape is usually 0.5 meters. In the future, using special fasteners, a heating spiral is attached to the tape.
- Now you can start laying the heating coil. Upon completion of this work, it is necessary to put and fix the temperature sensor between the cable turns. Wires from the sensor must not cross and come into contact with the heating element.
Before final filling it is necessary to thoroughly test the system. The spiral is poured with a layer of cement with a thickness of 5-8 centimeters. After the solution has hardened, you can safely proceed to the floor decor.
In the above-described way, the underfloor heating is installed under the laminate (hall, bedroom, hallway) and under ceramic tiles (bathroom, toilet).
Use of thermal mats as an alternative to spiral heaters
Installing a warm floor based on a heating spiral is fraught with a number of difficulties. Filling the screed will inevitably reduce the height of the ceiling, visually narrow the space. And besides everything else, it requires a significant investment of time and money on design training and implementation.
Installing a warm floor on the mats is a good alternative. Such a device is all the same cable (only a much smaller diameter), mounted on a grid of synthetic fiber. Installation time is significantly reduced.
It is required to provide a place on the wall for installing a thermostat for a floor heating. Access to the device should not be difficult. This is the main condition.
Laying mats is preceded by thermal insulation flooring and, if necessary, waterproofing. The synthetic base of the mat can be cut for optimal styling and maximum surface coverage. The main thing is not to damage the cable itself. To fix the mats to the base, you can use glue or a special adhesive tape.
The screed over the mats, as already mentioned, does not need to be poured. It is enough to cover them with a thin layer of a special adhesive composition, upon drying of which you can proceed to surface treatment with the selected material.
Infrared underfloor heating
When voltage is applied to the film, it becomes a source of powerful infrared radiation. It should be said that this is a rather expensive solution. But it saves space as well as installation time. The rays of the infrared spectrum are absolutely harmless to humans.
Installing an infrared warm floor is elementary and simple for everyone.
Useful tips for installing an electric floor heating
- Do not feed the floor directly from the wall outlet. This is a violation that can be followed by a very severe punishment.
- On the plan of the apartment, it is necessary to mark the place where the floor wiring is connected to the power system. This information will be useful when conducting repairs in the apartment, when replacing wiring, and will avoid unnecessary time spent on searches.
- If the floor for laying is more or less even and has only minor defects, then it is not necessary to fill the screed. It is enough to lay insulation in two layers.
- The temperature sensor should lie on the substrate. Otherwise, it will give false readings due to accelerated cooling at the place of contact with concrete.
- A damper tape is installed around the perimeter of the wall. This measure will extend the life of the screed, prevent its premature cracking and destruction.
- It is recommended that the heat-reflecting backing be fixed to double-sided adhesive tape. All joints must be glued with Dacron adhesive tape with a thin coating of metal. Foamed polyethylene or expanded polystyrene is used as a substrate (when the floor is warm and the room is heated from below). If the room below is not heated, or if there is soil under the floor, it is advisable to use mineral wool as a heater.
Water floor heating and the main elements of the system
A floor heated by hot water circulating through pipes has a number of advantages compared to a traditional floor with electric heating. First of all, it is economical and safe.
It is better for the design organization to calculate the laying density, pipe diameter, and flow rate. At the disposal of specialists there are expensive software products that will calculate all the parameters of the heating system.
Pipes are used seamless polypropylene, or welded polyethylene. Preference should be given first. Such pipes are reinforced, so they do not deform and do not change cross sections under the influence of temperature and pressure. The pipe must withstand a pressure of 10 Bar, a temperature of 95 degrees Celsius. Diameter varies from 16 to 20 millimeters.
The water that is supplied through the floor-mounted pipes is heated in the boiler. The volume and power of the boiler is directly dependent on the surface to be fed (on the total length of the pipes). To ensure the circulation of water along the circuit, a pump is needed. Some equipment manufacturers integrate the pump into the boiler, so that it is not allocated as an independent element of the system. At the inlet of the boiler, ball-type water supply valves are installed. Floor temperature control is carried out by the so-called collector. The main element of the entire system is the pipes through which water circulates. Pipes will be connected to the boiler and to the collector by means of fittings.
Procedure for installing a water floor heating
Installation of a hydraulic (water) floor is carried out in the following sequence:
- First of all, a collector block and a mixing unit are installed . Installation is carried out at an equidistant distance from all circuits.
- Directly the collector is installed in the housing. Case dimensions may vary. They depend on how complex and extensive the heating system is (the number of sensors, drain holes). The body and the collector itself are mounted strictly above the level of the heated floor. Otherwise, the system will constantly be airy, and the air exhaust mechanism will not function properly.
- The old screed, if any, must be dismantled. In the presence of differences of more than 10 millimeters, the floor surface is leveled.
- The leveled surface is covered with a waterproofing layer. A tape is glued to the walls around the entire perimeter, the purpose of which is to compensate for the thermal expansion of the screed (concrete layer).
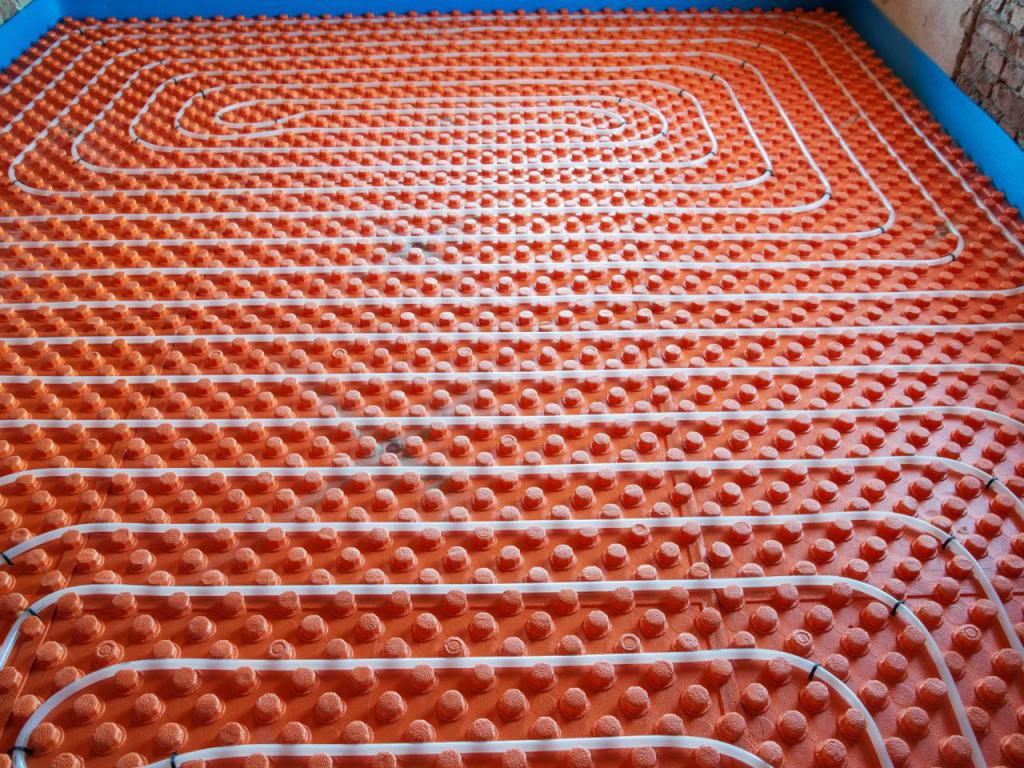
- The floor is insulated. Depending on whether a private house or apartment is in a high-rise building, various types of insulation are used: expanded polystyrene of different thicknesses, expanded clay layer, etc. Moreover, many plates of insulation material have grooves on the outside for laying pipes in them.
- The reinforcing mesh is laid on top of the insulation.
- The tightness of the entire system is checked, after which the concrete screed is poured. It is necessary to wait a month after installing the underfloor heating before starting to operate the heating system.
Useful tips for installing a hydraulic floor
- Pipes begin to be laid on the outside of the walls around the perimeter and in a spiral to the center of the room. This method of laying allows you to evenly distribute the temperature over the entire surface.
- Open pipe sections must be insulated, insulated.