Family celebrations are associated with troubles for everyone: buying gifts, preparing a feast, a script and, of course, decorating an apartment to create a festive atmosphere. For the New Year, the decoration of the apartment is greatly simplified, because you can hang garlands and "rain". But the rest of the events need to make a lot of effort, especially for children's birthdays. You can, of course, buy ready-made jewelry in the store, but you need to be prepared that their cost will occupy a significant part of the celebration budget. Therefore, you should not spend a lot of money, but make a festive surroundings yourself: confetti, garlands of colored paper and voluminous stars. To do this, it is enough to stock up with colored paper, glue, fishing line and a stapler and use your own imagination. And if even children can cope with confetti and garlands, then how to make a star out of paper can be found in this article.
The preparatory phase does not take much time, it is enough to prepare 5 sheets of A4 paper, scissors and glue. For those who make jewelry for the first time, plain white paper is also suitable, and when the technique is worked out, you can use double-sided color. When the necessary materials are prepared, you can begin to work.
Before you
make a star out of paper, you need to make a square from each sheet. In this situation, you do not need a ruler, just bend the sheet diagonally so that the top and side are connected. The remaining lower part is carefully cut with scissors and we get a square folded diagonally. This will be a blank for our first star angle.
Further, in order to understand all the manufacturing techniques, it is necessary to recall the lessons of geometry. We have got an isosceles triangle, which must be folded again to get the same isosceles triangle, but smaller. But, before we can make a three-dimensional star out of paper, the above steps must be repeated with four more sheets.
At the next stage of our work, we will need scissors and glue (you can use a stapler). So, we take our triangle and carefully make cuts from any of the equal sides, which do not reach the opposite side by about 1.5-2 cm. The distance between the slots can be different, but should not be less than 10 mm. It all depends on the desire of the master, but the more slots, the more interesting the voluminous star made of paper will look.
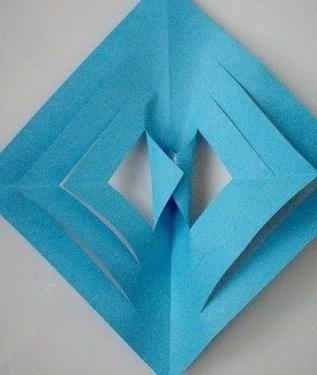
When all the constituent parts of our creation are prepared, we proceed to the formation of each “petal”. We unfold the leaf, take it so that the cuts are on the sides, and an uncut fold goes vertically in the center. We take the glue and begin to glue our strips one by one. First you need to connect the smallest corners, just take them and glue them with an overlap. Next, turn the leaf over so that our first glued corners are on the table. From this side we take the following strips and also fasten them with glue or a stapler. Again, turn the leaf over and repeat the steps with the following corners. So we continue until we connect the largest corners. Before you make a star out of paper, you will need to work so hard on the rest of the details.
The last step in the work will be the union of our star. To do this, all the “petals” must be connected by a stapler at the tops, and the last connected side corners of each part are connected in turn to each other. Decoration is ready!
When the technique is mastered, you can use a smaller paper size, and before you make a star out of paper, consider the possibilities of decorating it. On New Year's holidays it can be decorated with "rain", and on other significant dates - with ribbons, butterflies and other various decorative elements.