Wonderful crafts "mushrooms" with their own hands will be interesting to do for both children and adults. Therefore, we suggest you familiarize yourself with several workshops on creating such wonderful products.
Paper mushrooms
Funny children's crafts "mushrooms" with their own hands can be made of paper and a wooden stick from ice cream.
You will need:
- colored paper;
- scissors;
- PVA glue;
- wooden stick from popsicle.
Sequencing:
- Take a red sheet of paper and fold an accordion out of it. The size of each step should be about five millimeters.
- Cut off the top of the accordion so that you end up with a dome.
- Spread the leaf and glue a wooden stick to its back side in the center.
- Flip the craft.
- Cut a few circles of white paper.
- Glue the rounds on the mushroom hat.
- Make the mushroom's eyes. This can be done in several ways. The first is to glue the finished eyes (sold in special stores for creativity). The second - cut circles of white and black color from paper. Third - draw with a marker.
- Cut a small crescent from red paper and glue it to a stick under the eyes. This is the mouth.
The fungus is ready!
Disposable Plate Mushroom
Such crafts "mushrooms" for kindergarten fit perfectly. Indeed, their production requires a minimum of material, and the process itself will be very exciting for children.
The following is required:
- one disposable paper plate;
- one cardboard roll or a sheet of cardboard;
- paints and brushes;
- pin;
- cotton wool;
- PVA glue.
Operating procedure:
- Take a plate and make a small fold on it, giving it a more convex shape.
- Lubricate the crease with PVA glue and fix it with a clothespin until the plate dries.
- If you do not have a finished cardboard roll, then it is easy to make. To do this, take a sheet of cardboard and cut from it a third of the width. Roll paper and glue it.
- Let the glue dry on the plate and roll.
- Take the red paint and paint the plate with it.
- Before it has dried, tear the cotton wool into small pieces and randomly stick it on a plate. As a result, you will get a fly agaric hat.
- Paint the cardboard roll with white, beige or brown paint.
- Coat the top of the roll with glue and glue a plate to it.
- Let the mushroom (craft) dry.
All is ready!
Clothespin mushroom
These crafts "mushrooms" for the garden are not only interesting to do, but they will be very useful. For example, you can make a garland and hang photographs or children's drawings.
You will need:
- wooden clothespins;
- glue (it is better to take a glue gun);
- dense colored fabric (e.g. fleece);
- white buttons or beads;
- thick rope.
Workshop on making garlands of clothespins:
- Take a cloth and cut out a shape that resembles a mushroom hat. It is better to use red fleece.
- Decorate the hats with white dots. There are several ways to do this. The first is to sew white buttons. The second - cut circles from white fabric and glue them. Third - sew on white beads.
- Take PVA glue or a glue gun and glue the finished hats to the part of the clothespin that we take to open it.
- Pass the thread through the holes in the clothespins.
- Tie bows at the ends of the thread.
A garland of bright mushrooms is ready! It remains only to hang it somewhere and fasten photographs, postcards, drawings and notes to them.
Mushrooms from the bags
To create such a mushroom requires a lot more effort than in previous workshops. But this craft looks very beautiful, and the process of its creation will appeal not only to the child, but also to the adult.
You will need to take:
- burlap (you can buy pieces of fabric at the store or take a clean bag);
- paints and brushes;
- buttons
- thread and needle;
- PVA glue;
- filler (cotton wool, synthetic winterizer, pieces of fabric, etc.);
- scissors.
Master Class:
- Cut three circles out of burlap.
- Paint one of them in some color (for example, red).
- Take another piece of burlap and cut a rectangle.
- Sew a tube from the rectangle. To do this, fold it in half in length.
- Turn it inside out.
- Fill the tube with any filler.
- Take one of the two unpainted circles.
- Place the tube in the center of the circle and sew the two parts together. To do this, cross stitch outside.
- Cover the half of the fabric that is not sewn with glue and press firmly to the tube.
- Add more filler to the leg of the mushroom.
- Take the colored circle and sew buttons on it.
- Take two circles - one dyed the other no - and sew them with each other also with cross-shaped stitches. Before stitching, place a little filler inside.
- Sew a hat to the leg.
- Make some decorative stitches on the hat.
- Take the needle and make the fringe of the fabric that remained free on the bottom of the leg.
A beautiful soft fungus is ready!
Plasticine mushroom
The wonderful crafts "mushroom" with your own hands for kindergarten is made of such material as plasticine.
To do this, take the specified material and soften it by holding it in your palms for several minutes. Roll it into a tube. Cut a thin ring from a plasticine with a plastic knife - about one centimeter somewhere. Roll the circle into a pancake. Cut a little plasticine from the tube. Roll up the leg and stick it to the hat. Take a toothpick or match and make on the inside of the groove.
To give the mushroom texture, slightly bend the hat. You can also take pastel or chalk of a dark brown color, grind into powder and sprinkle on top of the hat.
Salty Dough Mushrooms
In a similar way, a mushroom (craft) is made from salt dough. This product has its advantages:
- it can be painted;
- it is stronger than a plasticine product.
Salt Dough Recipe:
- In a large bowl, mix flour and salt in a 4: 1 ratio (e.g. 4 cups flour and 1 cup salt).
- Pour in water gradually. If the proportions are 4: 1, then water needs one and a half to two glasses.
- Stir everything and knead the dough.
- Blind the fungus in the same way as they did from plasticine.
- Place the finished product in the oven, preheated to 180 degrees. Mushroom (craft) is baked for about 30–45 minutes.
- If you want to paint the mushroom, then wait for the product to cool.
Original mushrooms
The simplest and at the same time, the original crafts "mushroom" with their own hands for kindergarten is made from a cardboard egg tray.
You will need to take the following materials:
- the most common cardboard egg tray;
- scissors;
- paints and brushes.
Workshop on making mushroom:
- Take the egg tray and carefully cut one cell and one partition from it.
- Turn the cell over and colorize it. It will be a hat. Therefore, the type of mushroom depends on its color (for example, if you want to get a bright fly agaric, then paint the hat in red, and put white dots on top).
- Take the partition-cone and place a hat on top of it.
The original mushroom (craft) is ready!
Origami mushroom
Such colorful mushrooms can be used not only as crafts, but they can decorate postcards, make garlands and many other interesting things.
To create them, you need to take only two sheets of A4 paper - one white, the other red, and scissors.
Master class on creating origami mushroom:
- Make sheets of paper square. To do this, wrap one corner of the leaf and make a triangle, and cut off the excess part.
- Fold two sheets together.
- Fold the paper diagonally two times, and then flatten them. As a result, you will get two intersecting lines forming a cross (Figure 1).
- Put paper in front of you without disconnecting it. The white sheet should lie on top.
- Fold the top, right, and left corners of the two sheets (Figures 2-4).
- Fold the sheets in half (Figure 5).
- Turn the left and right top corner back (Figures 6 and 7).
- Turn the figure over with the back side (Figure 9).
- Wrap the left and right corners and turn them around again (Figures 10–12).
- Lift the upper triangle slightly and tuck in the corners (Figures 13-15).
- Fold the bottom corner under the wrapped parts of the craft (Figure 16).
- Fold the top corner (Figure 17).
- Turn the craft over and shape the hat. Everything is ready (Figure 18).
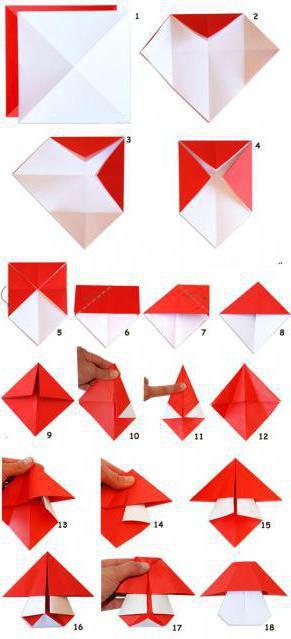
To make the fly agaric more like a real one, cut out circles from white paper and stick them on a hat.
DIY DIY glass mushroom for the garden
This figure is very bright and original. To make it you need to take:
- any glass jar with a lid;
- multi-colored felt fabric;
- PVA glue or glue gun;
- scissors;
- paints and brush;
- cotton wool or synthetic winterizer.
Master class on manufacturing:
- Paint the jar white or beige. Wait for it to dry.
- Take the green cloth and wrap it around the can. Mark how much felt is needed, and cut the rest.
- Cut grass blades from one side of green felt.
- Glue “grass” around the can.
- Take the lid and place a red cloth on top of it, under which push cotton or synthetic winterizer. The edges of the felt should be wrapped under the cover.
- Glue or screw the lid on top of the jar.
- Cut circles from white felt and stick them on the hat.
- From different felt (for example, pink, yellow, blue) cut out figures that look like flowers.
- Cut a few circles that will serve as the core of the flowers.
- From green felt, cut thin stripes - blades of grass.
- From a fabric of different colors, cut a few circles. It will be a caterpillar.
- Glue flowers and a caterpillar onto the jar, as in the picture above.
So your fabulous craft is ready!
Natural mushrooms
Another very simple craft is mushrooms from natural resources. The only drawback of such a product is that the material can only be found in early autumn.
So, you need to take acorns and chestnuts, as well as a glue gun or plasticine.
Craft "mushrooms" from natural material are made as follows:
- Caps are removed from acorns.
- In place of the hat with a glue gun or plasticine, the chestnut is glued in the middle.
- In order for the mushrooms to be stable, on the other hand, you can glue his hat to the stomach, the convex side to the bottom. Either put sawdust, straw or something else on a plate or board, and set the mushrooms there.
Environmentally friendly crafts ready!