Easter eggs from beads are a wonderful gift for a bright holiday for loved ones and relatives. Only good thoughts, warmth and a piece of your soul are invested in such a gift, because such gifts are always made with love. These souvenirs will give only pleasant memories. At Easter, it is customary to give eggs to each other, and how nice it will be to get such a beautiful handmade egg! Today we will figure out how to make an Easter egg from beads. What are the ways and options for performing such souvenirs.
Egg base or blank
The most important thing in beading Easter eggs is the blank. That which will be the basis that we will braid.
Now in stores selling goods for needlework, you can find various blanks for such eggs, they can be both wooden and plastic. You can also take forms from children's toys. They can be different in shape, can be small both from kinder surprise and large. If there are no eggs made of plastic and wood, then you can make an egg from papier-mâché.
There are many options for making such eggs. From the simplest to the most complex options. The simplest options are suitable for beginners and for children. After all, a child cannot cope with work that is not subject to every adult. The photo of Easter eggs from beads in this article will serve as an example for independent work.
There are many ways to make a bead egg. We will analyze some of them.
Egg Beading
The first way to create an Easter egg from beads is pasting. If you never wove anything from beads, then it does not matter. After all, if you really want to, then everything will work out! So, Easter eggs from beads, for beginners this method will be a great start in creating such masterpieces.
We will need such materials:
- chicken eggs or finished wooden workpiece;
- food coloring, if a wooden base is used, it is better to take acrylic primer and acrylic paints;
- PVA glue;
- toothpick;
- beads;
- vinegar.
Manufacture:
- Place the washed eggs in a bowl of vinegar, which was added to warm water and left for a minute. Due to this, the paint will lie evenly when stained. Then boil the eggs in cold water for 10 minutes.
- While the eggs are boiling, we will dilute the dye, as indicated in the instructions, and already cooled eggs will be placed in a container with dye and left for staining. The longer the egg is in the container with the dye, the better the color will be.
- After the eggs have completely dried, after coloring, you can proceed to decorating the eggs with beads. To do this, mark our egg and imagine where it will be decorated with beads.
- If you have a wooden base, first apply acrylic primer. We let it dry, then we apply acrylic paint, and after drying it will work. For acrylic paint, the use of Crystal glue will be more reliable. PVA glue may simply not give any result.
- According to our idea, we apply PVA glue. Drawings can be invented by yourself or find them on the Internet. Then with the help of a toothpick we apply prepared beads. This work does not like rush.
If you use a real egg as a billet, then its significant disadvantage is a short shelf life. But maybe someone just this option will come to taste. Again for children, this will be a great way to decorate eggs for the bright Easter holiday.
But if you take a wooden egg as a blank, then this minus can already be avoided. Many people ask why to paint eggs, if they are glued with beads anyway. We paint the eggs, because the beads shine through. If you have a pattern of dark beads, then the base will be visible, and it will distract the eye. If the finished pattern is, for example, red, then the wooden base must be covered with red acrylic paint. Then our egg will not shine through the bead weaving. The work will look more harmonious. Therefore, the best solution is to pre-color the egg before gluing such an egg with beads.
But in any case, you pay attention to your drawing, to what kind of work as a result should turn out.
Bead egg option number 2
In this method, the egg is also created by gluing, but here we will use the finished thread, on which we first string the beads. Then such a thread is glued to the glue. This option is also suitable for both children and beginners.
Materials for work:
- dense or kapron thread for sewing;
- plain or multi-colored beads;
- PVA glue or "Moment" / "Crystal";
- needle for beads (it will be so convenient to string beads on our thread, if there is none, then it is possible without it);
- boiled egg, or wooden base, eggs from children's toys or papier-mâché.
Everything is very simple here. Take a kapron thread or fishing line. And we string beads on it: plain or multi-colored according to our personal taste and idea.
And glue the thread with beads in circles on our base. Longer, of course, will be a base made of papier-mâché wood or eggs from children's toys. Most conveniently, such a thread will stick to a wooden base. It makes sense, as in the previous method, to coat the preform with pigment or acrylic paint, as described above, in the previous method.
The most important rule is to keep the thread under tension, not to give slack, gradually moving in a circle, and then fix the end of the thread with glue.
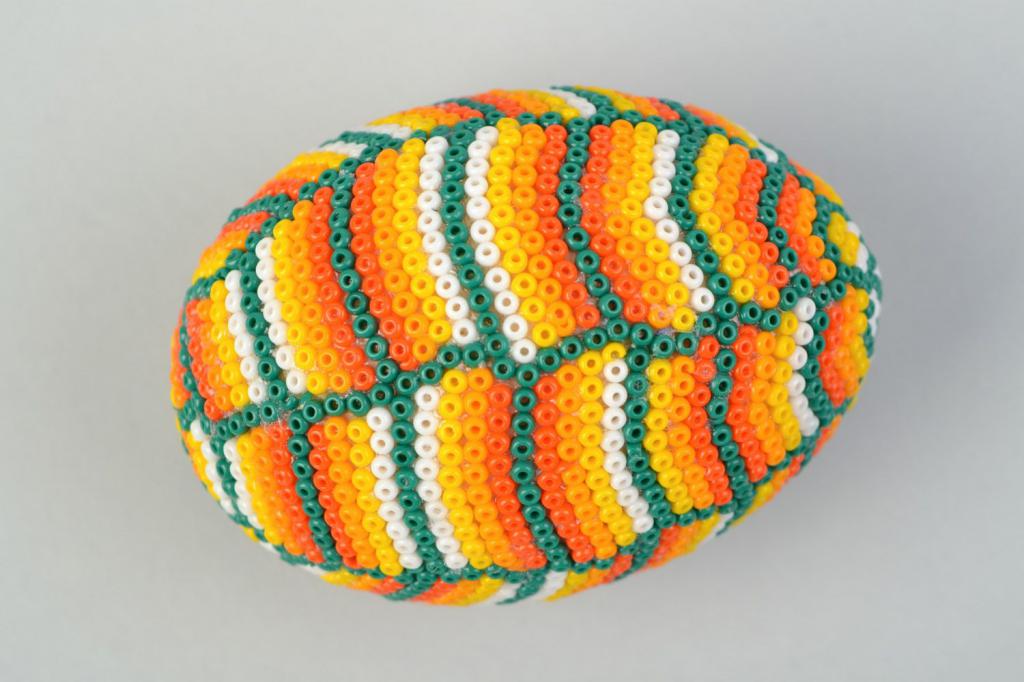
Easter Egg Beadwork
We will need materials:
- wooden egg;
- beads, in our workshop there will be 4 colors;
- kapron thread;
- needle for beads;
- acrylic paint in the color of beads;
- paint brush.
And in this version we cover wooden eggs with acrylic paint to the color of our work. This method of weaving Easter eggs from beads for beginners is also suitable, but it would be better to do the first or second work described above first, so that your hands get used to working with the base, with beads, but in any case, the choice is yours.
Now we need to measure our egg in the widest place by stringing beads on a string.
The number of beads you need to record, so as not to forget. Now take 5 beads and connect them with a thread in a circle.
It was a zero circle. On the first circle add 1 bead between the beads of 1 row. We work with a needle.
On the second row, we add yellow beads, but already 2 beads between blue beads.
On the third row, we add 1 yellow bead.
It turns out here is such a pillow.
Now we will add white beads. It is as if we are sewing with a needle and thread, we are just adding beads to our sewing.
We alternate in a circle weaving 1 bead, then 2.
And so weave until we reach the amount that we measured at the very beginning. Measuring the "waist" of our testicle. You can try on work on our “model”.
The color of the beads alternates, depending on the pattern. There are a huge number of them on a variety of topics.
Approaching the middle of our work, we must begin to evenly reduce beads. But you need to do this smoothly, so that the work does not lose its appearance, it looks harmonious. You need to decrease gradually, as they added.
In order to reduce the amount of beads, you need to go through the beads of the previous row with a thread, passing them. Thus making a decrease.
You can try to make this type of weaving first with plain beads, it will be beautiful and will not have to be confused with the pattern. Then, when experience appears, you can try the drawings.
Weaving patterns
You can find many similar patterns for weaving Easter eggs from beads.
Video on the topic of the article:
In this video you can watch a master class on pasting eggs with a thread, on which beads are strung.
Another technique for weaving an Easter egg.
Ideas for kids
Very young children may find it difficult to work with eggs. And adults can help them with this. To create such works you will need beads, cardboard, glue and scissors. Parents plan an oval, children can cut out if they have enough strength, and they can work with scissors. If you don’t know how or don’t trust, then it’s better to cut out the base for some of the adults. Good mood, patience and desire are what you and your baby will need to create such handmade souvenirs. Children can give such Easter eggs from beads to their grandmothers and friends on a bright Easter holiday.