Embroidery is the oldest type of needlework. The art of sewing with decorative stitches on woven fabric is popular throughout the world. There are many different techniques and types of seams.
Simple handmade seam for needlework.
The main tools and materials for embroidery and sewing will be needles and threads. Craftswomen apply all kinds of work methods. The seams are simple and universal, in which the movement of the needle is directed forward. They can be used to perform manual work when sewing clothes or soft toys, decorating finished products, or as auxiliary methods.
How to sew a “forward needle” stitch?
It’s easy to learn how to sew regular stitches. At the beginning of the work, the thread is fixed on the right side of the fabric. The seam runs from right to left. During operation, the needle always moves forward. Make sequential stitches along the contour line. They should be the same in size and spaced at equal intervals.
The length of the stitches and the distance between them can be different. Assume that the stitch length is 5 mm. The gap between the stitches can be 2 mm or 5 mm. Moreover, the front and back sides have the same appearance. As if the dotted line looks like a seam “forward needle”.
The diagram shows the sequence of its execution. Such a seam is called estimate. It is used when sewing to connect individual parts after cutting. It also serves as the basis for other embroidery and sewing techniques.
Connecting seam
More durable stitching of the fabric can be done by sewing stitches in two steps. The seam “forward with a needle” is performed in the following sequence:
a) sew the first row with small stitches;
b) turn the main fabric one hundred and eighty degrees;
c) stitch stitches in the gaps made in the first row.
The resulting joint seam provides reliable fastening of individual parts. From the front and the wrong side it looks the same. It is used for sewing soft toys and clothes.
Stitch or contour seam
When embroidering various patterns, it is often necessary to highlight the contours of the picture. At the beginning of the work, the selected sketch is sewn with simple stitches. After completing the entire contour, the needle is placed at the starting point.
In the opposite direction, fill the remaining spaces with stitches. As a result, the outline of the pattern for embroidery is completely circled.
Single-line stitch seams
Simple stitches are easy to convert. By simple movements of the needle with the thread get a decorative seam. At the beginning of needlework, simple stitches are made. Next, we change the thread in the needle. The new thread may be the same as for simple stitches. If necessary, it can be any other color, and may also vary in thickness. Due to this combination, the embroidery will turn out to be slightly convex. To sew a zigzag, a second thread is passed through the embroidered stitches. To do this, from top to bottom, the needle is carried out sequentially in one direction. Passing through the stitches, the needle does not capture the main fabric. The seam “forward needle” with a rebound - “zigzag” - is ready. A simple series of stitches turns into beautiful and decorative. Changing the direction of the grafts, embroider different variations of the seams.
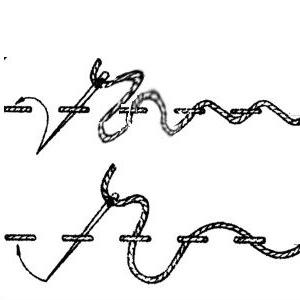
A little change the movement of the needle with the thread and get a new version. The technique of this seam is similar to the "zigzag". One row is embroidered with a “forward needle” stitch seam. The next step is to thread a needle of a different color. With careful movements, without piercing the main fabric, pass it through a row of stitches. In this case, the needle movements alternate. First, it runs from top to bottom, and then from bottom to top. The thread is laid on a sinusoid in the form of a wave.
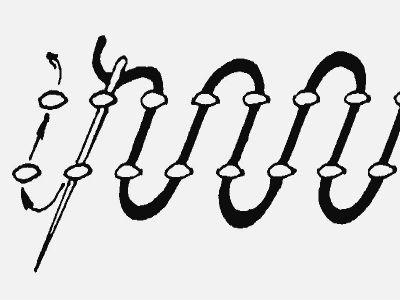
Embroidery "forward with a needle", described above, is easily converted to a different type of seam. In order for the “wave” to become a “chain”, one more row is added. It is performed in the same manner as in the previous case. But at the same time, the movement of the needle will be the opposite, namely, first from the bottom up, and then from top to bottom. A two-sided sinusoid is obtained in the form of a “chain”.
Having slightly changed the direction of the re-grafts, we get a new version, called the “ringlets”. How to embroider a seam “forward with a needle” with intertwining “rings”? Getting started is a series of simple stitches. Next, embroidery "rings". The thread is fixed near the last stitch. They let him through. A needle and thread goes through the penultimate stitch from bottom to top and then through the last stitch from top to bottom. In the same way, all the grafts to the end of the stitch line are performed.
Seam consisting of several lines of stitches
We examined the transformation of one line of simple stitches into various types of decorative. The multi-line stitch “forward with a needle” is a parallel or alternating stitch stitch that is staggered. The technique is the same as in the single-line version.
A parallel seam “forward needle” is laid from left to right a simple row of stitches. The second line is embroidered parallel to the first. Identical stitches are placed strictly below those located in the top row. If necessary, the following parallel lines are likewise carried out.
The technique of performing stitches based on several lines of stitches
Consider the implementation of a double seam "tape". First, two stitches of simple stitches are embroidered. A thread of a different color performs simple grades. The needle should not capture the main fabric. The thread is passed through the stitches of the upper and lower stitches only once. Work starts from the bottom row. The thread is passed from top to bottom through the extreme stitch. Next - from bottom to top, in the penultimate stitch of the bottom line. The needle is moved to the top row. The thread is passed from bottom to top through the stitch of the upper line. Thus, they pass the entire row, receiving a decorative “ribbon”.
By changing the direction of movement of the needle with thread, you can embroider a double seam “forward with a needle” with an eight-shift. Start with a few lines of simple stitches. Having replaced the thread, they begin to carry out the grafts. First, it is passed from top to bottom in the extreme stitch of the second row and from bottom to top in the adjacent one. Move to the top row, moving back. In it, the movement of the needle allows the thread to pass through adjacent stitches. First, in the first - movement from the bottom up, in the second we go from top to bottom. The steps are repeated in the same sequence. As a result, the thread is laid between the stitches in the form of a figure eight.
What is "understatement"?
Stitches made with a “forward needle” stitch form a geometric pattern. This type of embroidery is easy to perform. Embroider with simple even stitches without pulling the thread. It should be long enough.
The geometric pattern is easier to perform on fabrics with a clear weave. Threads for embroidery should be thick and untwisted. They are selected in accordance with the fabric selected for work. Mostly they are black, red, blue or white. Embroidery can be single-color or multi-color. The
geometric patterns used are from ten to fifteen centimeters wide. The pattern is embroidered by moving from one row to another. As patterns, ornaments for cross-stitching can be used. In this case, instead of crosses, the drawings are performed using the “forward needle” stitch.
The photo shows patterns of ornaments for this type of needlework. Tablecloths and bedding decorated with bright ornaments look beautiful. Quite often they can be found on paths and pillows. Embroidery (seam “forward needle”), made by this technique, is perfect for decorating napkins and towels.
Sewing beads
This type of embroidery is performed in various ways. For fastening the beads, the seam “forward with a needle” is used. Needlework is performed according to a pre-selected pattern. A needle with a strong thread or thin fishing line is located on the front side of the needlework.
Pierce the fabric from the bottom up. String the first bead. The next stitch is made close to the bead. After fixing it, the next bead is strung on the fabric. Again pierce the fabric from the bottom up. Fix the next bead. The operation is repeated. In this way, all the beads that make up a certain pattern are fixed.
Several techniques for embroidering ribbons
Skilled needlewomen use all kinds of materials in their work. For this needlework, various types of seams and techniques are used. When using ribbons, a beautiful three-dimensional embroidery is obtained . The seam “forward with a needle” is carried out with interruptions. However, the second thread is replaced with a tape.
Initially, a simple series of stitches is performed. They should be wider than the ribbon used in this embroidery. To the right of the first stitch, fasten the tape. They entwine the stitches with it in the same way as the interlacing was carried out with ordinary thread. Embroidery is ready. At the end of the row, the tape is fixed.
In addition to the described technique, embroidery can be done with tape. She is tucked into a needle. On the front part of the work, the first stitch is performed. Next, go to the wrong side. We perform the second stitch. Repeat the operation. We align the tape and make sure that it does not twist. A seam “forward with a needle”, made with a ribbon, is used in embroidery for processing the contours of a pattern, as well as for decorating various products.