Crocheting needle beds is not only a useful thing, but also a pleasant one. The result is interesting soft toys that are small in size and interesting in shape. From knitted needle beds you can create whole compositions that will fulfill their intended purpose and at the same time please the eye. On the plus side, such products, due to their small size, can be placed in a handicraft box or even taken with you when traveling in a special container.
What you need to prepare for making a needle bar with a hook
Crocheting needle beds requires other supporting materials besides the main tool and threads. In order for the needle bar to acquire attractive forms and be convenient during operation, you need to prepare the following materials:
- A synthetic winterizer that will add volume to the product.
- Beads that give the needle bed an attractive look.
- The base is a stand on which the knitted needle bar will be fixed.
- In addition, you can pick up a small magnet, which will increase the safety of the device.
The needle bar knits with a do-it-yourself crochet fast enough, since an object of this purpose should not be too large. The product should not consist of small parts and elements, which also significantly reduces manufacturing time.
What can be knitted needle beds
There are a lot of designs for crocheted needle cases. You can create an original figure, which will become a very convenient device for storing needles.
What can be a knitted needle bar:
- Indoor or Mexican cactus.
- To the turtle.
- A flower of any design.
- The doll.
- Hat male or female.
- The spider. Fits well tarantula.
- Mushroom - porcini mushroom, fly agaric.
- The fruit. The best options will be an apple, pumpkin, pear.
- Any "round" animal.
- Cake. Muffins are considered relevant, as they are stable.
- Bug. Ladybug is especially common.
Having shown imagination, you can create any masterpiece into which needles will be stuck. It is better to choose those options that can be interestingly finished. This way of decoration will help to zoning the product, and this will help to conditionally separate, for example, ordinary needles from safety pins.
Crocheted Cactus Needle
The most common option is a cactus. It can be knitted in various patterns. Crocheting needle beds in the form of cacti suggests the presence of such materials:
- A glass or a small plastic pot.
- Threads of green, brown and black.
- A few beads; needle and thread for sewing.
Cactus manufacturing principle:
- To collect 6 air loops from a brown thread, close in a ring and knit a circle. In each row, make uniform additions, increasing the number of loops by 2 times. You need to knit until the circle completely covers the bottom of the pot.
- Next, the walls are tied without additions. To get the distinction between the bottom and the walls, you need to continue knitting in the opposite direction from how the bottom was knitted.
- From a green thread, dial a chain of 20 loops. The first row should be knitted as follows: 1 air loop (vp), single crochet (sbn), half-column, 2 double crochet (ssn), 10 sbn, 2-crochet column, 2 ssn, half-column, sbn. The following rows are knit the same way. Get a ribbed cactus. Need to knit 30 rows.
- Attach a black thread to the bottom of the cactus. Start knitting a circle on the same principle as a pot. When the black circle in diameter becomes the same as the diameter of the pot, finish the job.
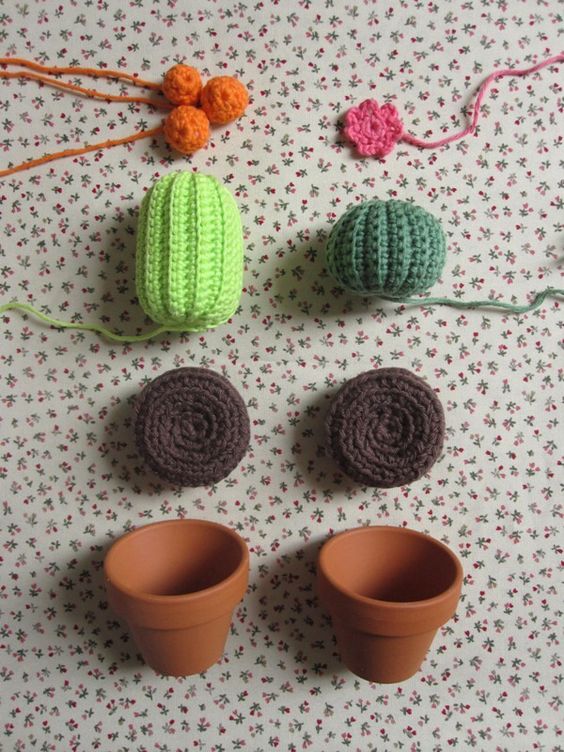
First you need to sew the cactus itself. Through the hole where the black circle passes into the cactus, fill the artificial plant with a synthetic winterizer. Put the brown case on the pot. The container itself can be filled with tissue residues or padding polyester. Sew a black circle and a brown case. Along the perimeter of the cactus you can sew several beads.
Crochet needle doll
The result of crocheting doll-needle beds can be funny cartoon characters, a lady in a hat, an old woman with a curved back. But the easiest way to tie a voodoo doll is for needles. Such a design will look original and even slightly intimidating. The advantage of this option is the ease of manufacture. To create a needle bed, you can use any thread of gray, brown, beige or white.
The sequence of crocheting a voodoo-style needle-doll doll is as follows:
- From 6 air loops make a ring that tie 8 sb.
- In the 2nd row, make 4 additions through each loop. The addition is carried out as follows: in every second loop you need to knit 2 loops in one.
- In the following rows do as many additions, but after 2, 3, 4 and 5 loops.
- After a certain number of additions, knit several rows without additional loops to form an oval.
- Further, the reduction is carried out according to the same scheme as the addition.
- When 8 stitches remain, you need to knit 3 rows, and then knit another ball.
- Separately knit arms and legs. They need to be done on the same principle as the head with the body. Initially, you need to dial only 6 loops and make 3 additions.
- Fill the trunk and legs with padding polyester with hands. Sew limbs with black thread to the body, making large stitches.
- Make buttons out of buttons.
A voodoo-style doll-needle is ready to use. You can create a more complex exhibit, which will consist of many elements.
Crochet needle-needle from simple motifs
It is very convenient to use a needle bar, which has a wide field for threading needles and a horizontal arrangement. An ideal option would be a crocheted needle-turtle. For the manufacture it is necessary to prepare acrylic in two colors, synthetic winterizer, black beads, and a hook.
Crocheting a needle-turtle begins with a shell:
- Create an amigurumi ring from 6 sc.
- In the second row, make one addition in each loop. It should be 12 loops.
- In the 3rd row, make additions through one loop.
- In each following, up to the 8th row, make additions through 2, 3, 4, 5, 6 loops.
- From the 9th to the 13th row, knit without additions.
Continue to crochet the needle-turtles by making the bottom of the shell:
- From the amigurumi ring, make 8 columns.
- Add to each loop.
- From 3 to 6 rows make additions through 1, 2, 3, 4 loops.
Fill with a padding polyester shell and sew the bottom to the hemisphere. Tie the edges of the stitching with a ruffle according to the scheme: knit 3 double crochet (ssl), skip the loop, sbn.
We knit a head with a neck:
- Tie the amigurumi ring to make 6 loops.
- Make an addition from the 2nd to the 5th row in each loop through 1, 2, 3 loops.
- From the 6th to the 8th row, knit sbn without additions.
- 9th row: make a decrease through one loop.
- In the 10th, perform 6 decreases.
- Then do one more loop to decrease.
- From the 12th to the 18th row, knit sbn. Fill the blanks with synthetic winterizer and sew up.
- Sew on bead eyes. Attach the head to the shell.
Decorate the turtle according to personal preference. You can make a hat for a turtle or embroider on a shell.
Elegant crochet needle-hat
The needle bar in the form of a ladies' hat will look very elegant. You can make this item in the form of a men's hat or a children's panama. Crocheting a needle-cap can be done according to this scheme:
- Collect 6 loops by locking them in an amigurumi ring. Associate 6 sc.
- Next, you need to add to each loop.
- From the 3rd to the 6th row, make additions through 1, 2, 3 loops.
- Next, knit 8 rows without additions.
- On row 9, make an addition in each loop.
- Then do the addition through 1, 2, 3, 4, 5, 6 rows. So the fields are formed.
- To make the design of the hat margins more attractive, you can use an openwork pattern to knit them.
- Cut the cardboard according to the diameter of the hats. Fill the hat itself with a padding polyester and sew the blank to the cardboard.
- Instead of cardboard, you can make a regular circle, which is knitted from the same threads as the hat itself.
You can decorate the hat with flowers, ribbons, beads or a brooch. The main thing is not to overdo it with decorative elements, so that there is a place for sticking needles.
Needle box in the form of a mushroom from different threads
To make a fungus for needles, it is worth preparing threads of gray, green and brown. Crocheting mushrooms for a needle bed is made in accordance with such a scheme:
- Tie a ring of 6 sbn using gray. It will be a leg.
- In the next row make an addition to each loop. Then you need to make a gap between the increments of 1, 2, 3, 4 loops.
- Next, change the direction of work in the first row, grabbing one thread of a loop, knit a row without additions. Then knit ordinary sbn until the necessary length of the leg is formed.
- According to the principle of knitting the shell of a turtle or hat, knit a fungus hat from brown yarn.
- Fill the leg and hat with a padding polyester. Sew the parts together.
- Tie a circle of green yarn and sew also on the mushroom blank.
An interesting option would be the fly agaric mushroom. Bright colors and the ability to experiment with flowers will make the mushroom an interesting addition to the interior.
Amigurumi hedgehog for needles
The easiest way to create a needle bed in the form of a hedgehog, when the basis is an amigurumi ring. The product is more accurate and attractive. It is worth choosing pink threads for the muzzle, gray or brown for the body. Beads are suitable for the eyes and nose. The remaining elements of the muzzle can be embroidered.
Crochet amigurumi hedgehog-needle beds is as follows:
- Make an amigurumi ring from 6 sc.
- Divide the ring in half. In one half, the addition will be constantly carried out, and in the second - no.
- First add loops to each loop, and then through 1, 2, 3, 4, 5, 6, 7, 8. Between rows with additions knit rows without additions
- After the formation of the elongated part of the muzzle, you need to add to each loop. So knit 5 rows.
- Then, using a gray or brown thread, tie the body of a hedgehog.
- Knit about 8 rows without changes, and then make a decrease on the same principle as the addition.
- At the end of the addition, you need to fill the form with syntepon. Sew a hole. On the face, fix the beads that will be the nose and eyes.
The figurine can be decorated with ribbons, decorative apples or beads. An ideal option would be the additional manufacture of a platform for fixing the hedgehog.
Needle chamomile in several ways
The most common variant of the needle bed is a flower, or rather chamomile. There are several options for making daisy needles:
- The easiest workshop. A crochet needle needle in the form of chamomile can be made as follows: prepare white, orange and green threads, a hook. Make an amigurumi ring, which will count 6 sb. In the next row make an addition to each loop. Second: add loops through each single loop. In the third, add loops through two columns. Make the same additions in each turn through 3, 4, 5, 6 columns. Finish knitting. Next, make ruffles from a white thread. In the loop, knit 5 scs, skip, then knit sbn. According to the same scheme, tie the required number of petals. Next, you need to connect the circle, which will close the bottom of the middle of the flower. Start the same way as the top, only in the second and third row do additions to each loop. Fill the middle of the daisy with a synthetic winterizer and sew the bottom circle. You can add a few leaves, knitting them from green threads.
- There is another option for creating chamomiles, in which the petals will be additionally functional. The middle fits in the same way as in the first case. White thread petals should be knitted in the same way as the middle. Fill all the details with padding polyester and sew to the central element.
- There may be another option, when the petals will serve as a place for sticking needles, and the middle will be a decorative element. If the petals are sewn to each other, you will get a kind of basket for needlework, where the central part will serve as a container for small things, and the side elements as pads for needles.
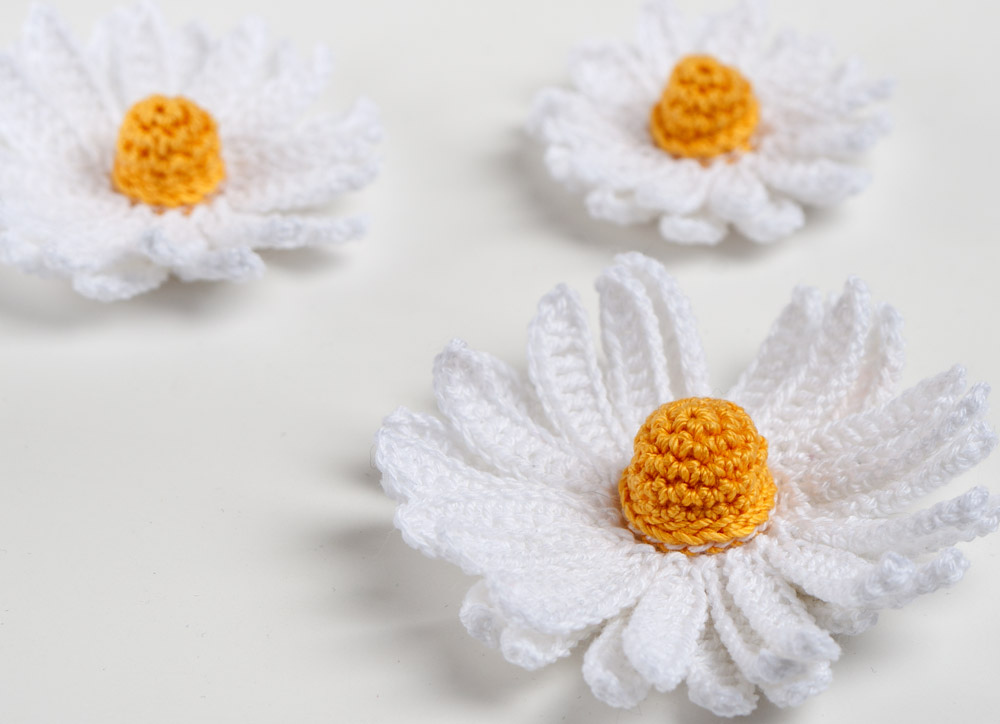
Crocheting a daisy-needle bed takes a minimum of time, and such a little thing looks original. If an elastic wire is attached to such a flower, which will play the role of a stem, then the needle bar can be installed in a vase.
Needle Pig
Crocheted pig-needle, can be the face of an animal, the whole animal or its individual parts. Knitting needles for pigs are shown below:
- Tie up the pig’s muzzle, where a spot will become a place for storing needles. It is advisable to use pink yarn for knitting, but you can use the brightest colors that you like most. It is necessary to tie a chain of 8 air loops, tie a chain sbn. At each turn in the last loop of the chain knit 6 sc. In the following, in each loop of the fan - 2 more sc. The 3rd row is knitted according to the same principle as the first two. Then knit without adding 10 rows. The result is a cylinder, at the base of which lies an oval. It is necessary to tie the base, it can be a canvas in the form of a circle. Next, a nickle should be filled with padding polyester and sew to the bottom of the circle. On the basis of the circle, you need to sew the eyes, and above the ears. Embroider a mouth under a nickel.
- You can completely crochet a needle-bed-piglet. You need to make an amigurumi ring and tie 6 sc. The beginning of the patch is laid, in the next spiral you need to make an addition to each loop. You should get 12 columns. From the 3rd to the 6th row, make increments through 1, 2, 3, 4 loops. The result should be 36 loops. Then knit the following 2 rows according to the same principle. Then, after every 4 columns, make reductions. Get 30 loops. The next spiral needs to be knitted without changes, and then after every three loops do reductions. Then you need to do the addition after 3, 4, 5, 6 loops. After knitting 3 rows unchanged. Next, make additions through 6, 7, 8, 9, 10 loops. Then you should knit the head-body without changing the number of loops. Need to knit more than 10 rows. Then make the decrease according to the same scheme as the addition. At the end, fill the figure with a padding polyester. Sew on the ears and tail. Buttons or beads will become eyes.
In any case, you will get a beautiful unique item that will help keep the needles intact.