It is believed that block houses have very good performance characteristics. Such buildings have only one drawback - they do not retain heat very well. Indeed, unlike logs, the thickness of the beam used to assemble residential buildings rarely exceeds 20x20 cm. Therefore, in most cases, the walls assembled from it must be insulated. Of course, this procedure should be followed in compliance with certain rules.
What materials should be prepared
To warm the walls of a wooden house, you can use both mineral wool and polystyrene foam. But the first option is still considered preferable. The fact is that polystyrene foam does not allow air to pass through very well. And wood, as a material susceptible to decay, needs good ventilation. In addition to the insulation itself, it will be necessary to purchase a vapor and waterproofing film. As a final sheathing, you can use absolutely any material. But at the moment, siding is still considered the best option. The fact is that this type of decoration often imitates wood. Thus, the general style of the house is easiest to maintain by using just such material as “under the beam” siding. Photos of houses decorated by him are presented on the page and clearly demonstrate its neat appearance.
You will also need to prepare lumber. To assemble the frame, you need a beam, boards and slats. Of the tools you will need a screwdriver, clerical knife, hacksaw, construction level. You will also have to purchase masking tape, a stapler, brackets and screws (or nails).
A bar for siding is installed and sheathed with insulation materials using a special technology. Since such panels are really very popular, then we will consider the method of decorating a house with their use.
Preparatory work
Before proceeding with insulation and casing, you should carefully inspect the beam. Under siding, the walls should go carefully prepared. Cracks in the timber can be left intact. All the same, they will be covered with an insulating “pie”. But rotten places must be cleaned.
Also, before assembling the "pie", you need to treat the walls with an antiseptic composition and a means to prevent rot. Under no circumstances should this recommendation be ignored. Under the “pie” ventilation of the beam will not be too good in any case. And therefore, the processes of decay can begin very quickly. If bugs get into the walls, to destroy them, the “pie” will have to be taken apart, in whole or in part, which, of course, is very expensive.
Main stages
Actually, the very procedure of warming a cobblestone house before sheathing with such material as siding “under the beam” includes the following steps:
vapor barrier walls;
installation of the main frame;
installation of insulation plates;
installation of waterproofing material;
siding lining.
Markup
This operation before installing the insulation and wall sheathing with a material such as “under timber” siding, must be performed. The markup is done in such a way that the frame elements for the future "pie" are located with a step slightly smaller than the width of the insulation. Install the crate when sheathing a wooden house vertically. In this case, moisture that accidentally gets inside the “pie” will flow down freely.
Of course, marking should be done using a building level. The bars of the frame should be placed strictly vertically. Otherwise, gaps will appear between the insulation plates and the lathing elements in the future. As a result, insulation will be ineffective.
Vapor barrier walls
At the initial stage, this procedure is usually performed only if an ordinary dried timber was used to assemble the walls. Under the siding and insulation, the vapor insulator in this case should definitely be pulled. Profiled material practically does not allow moisture from inside the premises. The fact is that such bars are adjacent to each other very tightly, without gaps. In any case, to perform vapor barrier, it is best to take an expensive air-permeable membrane. Sheathing is performed as follows:
Under the vapor barrier, the frame is stuffed on the walls. It is best to assemble it from a 15x3 cm board. In this case, in the future it will be easier to fix the bars of the main frame under the insulation.
The walls are sheathed with vapor barrier itself . Pull it horizontally. It is possible to fix the film both immediately with a beam of the main frame, and with the help of a stapler and brackets.
Sometimes the vapor barrier is also mounted without a frame - directly on the walls. But to do so is allowed only in the case of using really high-quality material, which allows air to pass outside and moisture vapor from the inside.
Mounting the main frame
Next, let's see how the crate is filled under the insulation and siding. Under imitation of a bar of this type, as well as under such sheets of any other design, it is worth filling a wooden frame on the walls. The “pie” collected on it will be better to keep warm. The width of the beam used for such a frame should be equal to the thickness of the insulation. The latter is better to lay in two layers so that the top overlaps the seams of the bottom. Therefore, insulation is usually produced with mineral wool 10 cm thick. Therefore, the width of the beam should be equal to 20 cm.
Installation of insulation plates
Mineral wool between the elements of the assembled frame is mounted by surprise. That is why it is better to install the beam at a distance slightly less than the width of the insulation sheets. This material is very elastic, and therefore does not need additional fastening. When installing the second layer, the upper plates are cut in half. Thus, it will be possible to overlap the seams of the first.
Installation of waterproofing
Not very good resistance to moisture - this is what distinguishes houses made of timber. Under siding, therefore, it is imperative to pull the waterproofing film. They attach it to the rails with a thickness of at least 3 cm. As a result, a ventilation gap will be obtained inside the “pie”. It is necessary in order for moisture that accidentally gets under the finish to dry as quickly as possible.
Fix the hydroinsulator in horizontal stripes. The overlap between them should be approximately 15 cm. Mineral wool very quickly picks up moisture and at the same time loses most of its heat-insulating qualities. Therefore, the installation of waterproofing should be performed as carefully as possible. The joints between the stripes of the film must be glued with masking tape.
Siding installation
The installation technology of this material is relatively simple. For cladding a cobblestone house, you can use both metal siding "under the bar" and vinyl. The latter is characterized by good performance and low cost. Metal sheets of this type are more expensive, but they are more durable, and therefore last longer.
Mounted siding "under the beam" (the photo below shows the installation process) as follows:
The initial level is fixed. It should be placed strictly horizontally using the building level (according to the previously stretched twine). If there are any irregularities along the edges of the base, put a special gasket under the bar. This is done in order to avoid its wave deformation.
Mount external and internal corner elements. On the initial bar they get about 6 mm.
Finishing strips are installed around the door and window openings.
Mounted finish strip under the roof.
The actual siding itself is installed. The first sheet is put into the initial bar. Its upper edge is attached to the wall. The following rows are mounted in the same way. But in this case, the crest of the upper panel winds up in the groove of the lower. Sheets of the last row are connected to the finishing strip and snap.
How to make spotlights
Of course, when covering the house with such material as metal siding “under the bar”, you can do without this element. However, spotlights give the finish a finished look and make the exterior of the building more solid. It is installed elementarily, and therefore it is certainly worth assembling it. This procedure is performed as follows:
A base is laid under the spotlight. To do this, a timber is packed at the top of the walls at the top. Then it connects to the ends of the rafters with rails of the corresponding length. The beam on the walls must be filled in such a way that the slats are located in relation to it at an angle of 90 g.
Around the perimeter of the wall is attached J-Trim. All additional elements, including this one, necessary for the assembly of spotlights are included with the siding.
On the edge of the cornice, a finishing strip is mounted. Then, a chamfer is inserted into it. Both planks must be strictly opposite each other.
Next, the spotlight itself is cut and inserted into the grooves of the planks. At the joints at the corners of the house, the panels are cut at an angle of 45 g.
Useful tips for installing siding "under the beam"
So, using metal or vinyl sheets of this type, you can beautifully finish absolutely any house, including a wooden one. Siding "under the beam" in the latter case will look especially impressive. But only if, during its installation, the following recommendations are observed:
All additional elements of siding during installation are installed not end-to-end or overlapping, but with a small gap (about 6 mm). The fact is that with temperature fluctuations this material can expand or contract.
For the same reason, do not attach the sheets to the frame too tight. Sheets in additional corner elements also need to be inserted loosely.
Installation of siding "under the beam", like any other, it is better to start from the middle of the wall, and then move to the corners. The first is usually sheathed in the back of the house. In the process, they are moving towards the facade.
What you need to know
The technology described above is suitable for warming an old wooden house. New buildings of this type are sheathed using a slightly different technique. The fact is that the newly built wooden houses give a strong shrinkage. If the siding “under the bar” will be used for cladding the building immediately after its construction, the consequences can be unpredictable. Most likely, the frame is skewed, and the plates are deformed. Sheathing new timbered houses with siding is allowed. But at the same time, special movable elements are used as fasteners.
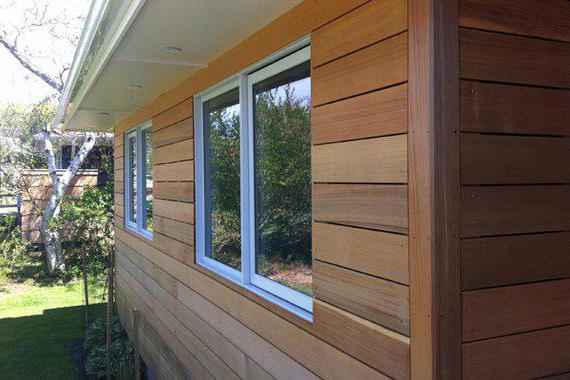
Actually, the decoration of the newly built paving blocks is usually trusted by specialists. When doing the do-it-yourself plating, you can make all kinds of mistakes, which in the future will lead to problems. Therefore, in the event that you do not want to overpay and decide to mount such material as metal siding “under the beam” (the photos presented on the page, by the way, quite clearly demonstrate its beauty and practicality) yourself, you better still wait until that moment when the house shrinks. The walls of the timber dry out, depending on the quality of the latter, during the year.
As you can see, cladding a block-stone house with siding is quite simple. This is done in approximately the same way as in the case of insulation of a building erected from any other material (except for the need to install a vapor barrier). When preparing a bar for siding and insulation, remove all rotted places. When assembling the pie, it is important to check the frame elements for vertical and horizontal, and when installing sheets - to withstand temperature gaps. If all these recommendations are observed, the casing will turn out to be high-quality and accurate, and the insulation will be effective.