Roofing from corrugated board is currently quite popular. To build it is quite simple, having even a little experience in construction work and guided by the recommendations of specialists. Why is DIY roofing so popular? Testimonials from many residential property owners show the various benefits of coverage. The most important advantages consumers consider the actual durability and strength of the material. The undoubted advantages of the material are a very attractive appearance, safety and environmental friendliness. Laying can be done in many ways. Next, we will consider how to cover the roof from corrugated board with your own hands.
Mounting Features
In the process of designing the rafter system, it is necessary to take into account the weight of the finishing material. If a roof will be constructed from corrugated board with their own hands, the structure and frame can remain without reinforcement. The angle of inclination is selected in accordance with the appearance of the building and personal preferences. The pitched roof looks very attractive. With your own hands, laying a corrugated board, in general, is not difficult. The material is successfully used on structures with an inclination angle of 12 °. Stacking is also possible with a smaller angle. In such cases, all overlaps must be treated with sealant. The vertical overlap of the sheets should be in two waves. In the course of work, the following should be considered:
- If the slope is up to 14˚, overlap of sheets is from 200 mm.
- At an angle of 15-30 degrees. - 150-200 mm.
- If the slope is more than 30˚ - 150-100 mm.
During installation, it is necessary to carefully check the reliability and strength of each fixture and element.
Choosing the Right Material
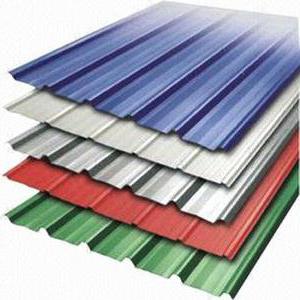
Roof made of corrugated board, made by yourself, must be reliable and durable. In this regard, you need to know which brand of material to use. For the roof, a wall or supporting corrugated board is used. With a sufficiently large slope angle, it is best to use material of the S-44, NS-20, NS-35 grades. With a slight slope (about 5-8 degrees), it is necessary to additionally install a self-supporting profile of N-75 or H-60.
Do-it-yourself roofing: the order of work
Conventionally, the whole process can be divided into several stages. The very first is preparatory. During it, it is necessary to ensure the integrity of the evenness of the sheets. During transportation, when planning the lifting of the material, a system of fasteners should be carefully prepared. Each sheet is delivered to the roof separately. The rise is not carried out in gusty winds. After the material is delivered to the roof, it is necessary to additionally measure the straightness of the plane of the roof and the corrugated board itself. Deviation up to 5 mm is allowed.
Additional space insulation
A necessary stage of work is the laying of hydro-, steam- and heat-insulating layers. For this, special materials are used. Laying each layer has its own characteristics. The vapor barrier membrane is fixed on the inside of the rafter system with an overlap. A special tape is used for the connection. There should not be any defects on the film (tears, holes, etc.). All gaps that remain after installation must be carefully treated with sealant. Insulation is of no small importance. With proper installation, the roof provides about 25% heat. At this stage, remember the design of the "cold triangle". It provides free air circulation. Its flows must pass through special gaps in the cornice and ridge, thereby creating natural ventilation. It prevents condensation. Additional protection to the insulation will provide a waterproofing layer. With a sufficiently high moisture content (from 5%), ice crusts form, which negatively affects the quality of the material. In addition, in constant dampness, the fungus spreads quite quickly, rotting of the wooden elements of the rafter system begins. To prevent these troubles, a waterproofing layer is laid on top of the insulation.
Some recommendations
How is roofing done with a do-it-yourself decking? Laying sheets starts from the bottom edge. As fasteners, self-tapping screws with rubber seals are used. Laying of material is carried out with an overlap. The screw should be screwed into the bend of the wave. For cutting sheets, you can use a jigsaw, a hacksaw, an electric saw, a circular saw with a small tooth. Do not use a grinder with an abrasive wheel. After cutting, all edges of the sheets are treated with special enamel. It will prevent rust.
Working process
Do-it-yourself roofing is equipped in a certain way. Exact compliance with the sequence will ensure the quality of the structure. A dense flooring is made under the endov level at the level of the crate. It is located on both sides of the groove at a distance of 60 cm. The lower boards are laid with an overlap of 200 mm. The bottom plank is fixed on both sides with nails. Its final fixation is carried out together with corrugated board. On a gentle slope, sealing mastics should be used. The bottom plank must be placed under the ridge for 250 mm. A universal or profiled seal is installed between the corrugated board and it. Endboard fasteners are best done above the battens. In this case, subsequent fixation of the slats will be facilitated. So the wind corner is arranged. Next, the installation of the cornice strips. It should be mounted below the profiled sheet. Along with this, ventilation should be provided in the under-roof space.
Stacking Options
Do-it-yourself roofing can be equipped in many ways. The choice of one or another option will depend on the type of structure. If a flat roof is equipped with a professional flooring with your own hands, then the overlap is done in one wave and a longitudinal sealing strip is used. The material is laid on the hip structure from the middle of the hip. In the process of laying the sheets are aligned on a cord stretched along the cornice. With a vertical mounting method, the first sheet at the bottom is first fixed. Following it, an element is attached at the top (above it). Next, lay the second sheets of the lower and upper rows. The result is a block of four elements. The next one is docked to it. This installation option can be used if necessary, laying material with a drainage groove. A block can also be composed of three elements. In this case, the order of work is as follows: the first 2 sheets are laid in the first row and fastened to each other; the third element is then docked to them. This block can be aligned on the ledge and fixed. Thus, the installation of the entire roof is carried out. Regardless of which installation option is chosen, it is necessary to carefully check all fasteners for strength.
End and ridge levels
How are these products installed? As a rule, the length of the end strips is 2 m. If it is necessary to build it up, then laying is carried out only with an overlap. Installation is made from the overhang towards the ridge. At the same time, it is necessary that the end plate overlap at least one wave of corrugated board. Fixation is carried out using self-tapping screws. The bar is attached to the profiled sheet and the end board. The step between the screws is a meter. After arranging this roof unit, you can proceed to the next work step. The process of laying material is not complete without the construction of a ridge. It is considered one of the most responsible and basic units of the roof. In the process of equipping, ridge elements with smooth surfaces are used. Between the parts, experts advise laying an additional ventilated seal. Many use corrugated sheets. In this case, a ridge seal is used.
Final stage
Recent installation work involves the installation of abutment strips. These elements have a length of two meters. Abutment planks are laid with an overlap of up to two hundred millimeters. Fixation is carried out with self-tapping screws (19x4.8 mm) from the side of the profiled sheets. The distance between the fasteners is at least 400 mm. The technology of arranging adjacency to the roof wall requires the master to carefully follow the recommendations. The connection uses a special insulation (ridge). It must be laid between the joint strip and the upper edge of the corrugated board. For lateral adjacency, the longitudinal seal is laid. This will prevent the penetration of precipitation (rain, snow and others) into the cracks. When arranging steep roofs, such seals are not used.
Finally
As can be seen from the material of the article, the installation of a profiled sheet on the roof can be done independently. However, extra hands will always come in handy. At least in the process of lifting the profiled sheet to the roof. It should be said that the material is quite different from the others. Decking is more durable and reliable than many other roofing. Its service life can be several decades. It is also important that the material is easy to care for. However, it should be remembered that the durability of corrugated board is provided by a number of factors. First of all, it is a competent choice of material brand. Compliance with the sequence of work is important. Equally important is the quality arrangement of heat, hydro and vapor barrier. All this together will ensure structural strength and preservation of all operational characteristics of the material.