The needlewomen in their work each time seek new ways of self-expression. Crafts from ribbons presented in the article will help diversify creative ideas and develop new skills of working with different materials. Ribbons in the work can be used both satin and satin, thin and dense, narrow and wide.
All presented crafts from ribbons can be made by beginning masters, school-age children. It is important to carefully read the step-by-step instructions and review photos of the work performed in the article. For work you will need colored plain ribbons, scissors, pins, an adhesive gun or transparent Crystal glue and other related product elements (beads, rhinestones, pebbles and other trifles).
Simple herringbone
For beginners, such a simple DIY craftsmanship of ribbons for beginners can be offered to be done with children before the New Year holidays. You will need a dense ribbon of any color, you can take green, large beads of one or different colors, fishing line or strong nylon string. The top of our crafts from ribbons can be invented any, but the Christmas star is considered traditional after all.
First, we thread the needle into a needle and tie a large knot, then the first bead is put on and the needle is threaded to the beginning of the ribbon. It’s better to singe her edge right away so that the threads do not crumble during operation. At the last turn, repeat the procedure for the last edge of the tape.
Then we gradually thread the needle through the loop of the tape, each turn of which is smaller than the previous one. It is necessary to try so that the left and right loops are the same size so that the Christmas tree looks symmetrical. After each stringing of the loop on the needle, you also need to put on a bead. You can alternate them in color, as in the photo above.
When the loops have reached the minimum size on the top, you can tie a knot, leaving the edges of a 10 cm long thread free. Next, work is on attaching the top. An asterisk can be made of cardboard or thick colored paper of the corresponding color. You can cover it with a layer of PVA glue and sprinkle with sparkles. Then you need to attach the star itself to the thread. This is done in two ways. Firstly, you can simply stick the thread on one side, and secondly, you can make two stars and when gluing them with the backs in the middle, insert the thread. On the upper beam of the top, you need to make a hole for the eyelet, and you can hang an craft from ribbons on the window.
Volumetric Christmas tree
The next Christmas tree will turn out to be voluminous, it can be put on the festive table or on a shelf above the fireplace, if you have one. A foam cone or dense foam will be required. This will be the basis for crafts from ribbons. Read on for a step-by-step job description. But first, you need to prepare the necessary materials: thin ribbons of two colors, pins with a bead head, a lush bow made of a gold ribbon to the top.
Work begins from the bottom of the cone. First you need to cut the tape into identical segments with a length of 8 cm in green and red. It is more convenient to lay out the segments by color. Then they are folded with a loop and attached to the foam with needle and bead ends. The next loop is located right next to the first. After the first circle is fully framed, step back 3 cm and begin the design of the next, but from segments of a different color.
Alternating the colors of the ribbons in rows, we get to the top, which is decorated with an attached magnificent bow of a golden ribbon. So that a light craft made of satin ribbons, made with your own hands , does not fall, you can glue the bottom of the cone onto a square piece of thick cardboard.
Elegant bracelet
You can offer do-it-yourself crafts from ribbons for beginners in the form of a delicate feminine bracelet. For work, you need beads of "pearls", fishing line or strong nylon thread, a dark blue dense ribbon. We retreat 10 cm from the end of the fabric and tie a knot. This is the beginning of the bracelet. A dark blue thread is drawn through the knot so that its knot is hidden in the fabric and it is not visible.
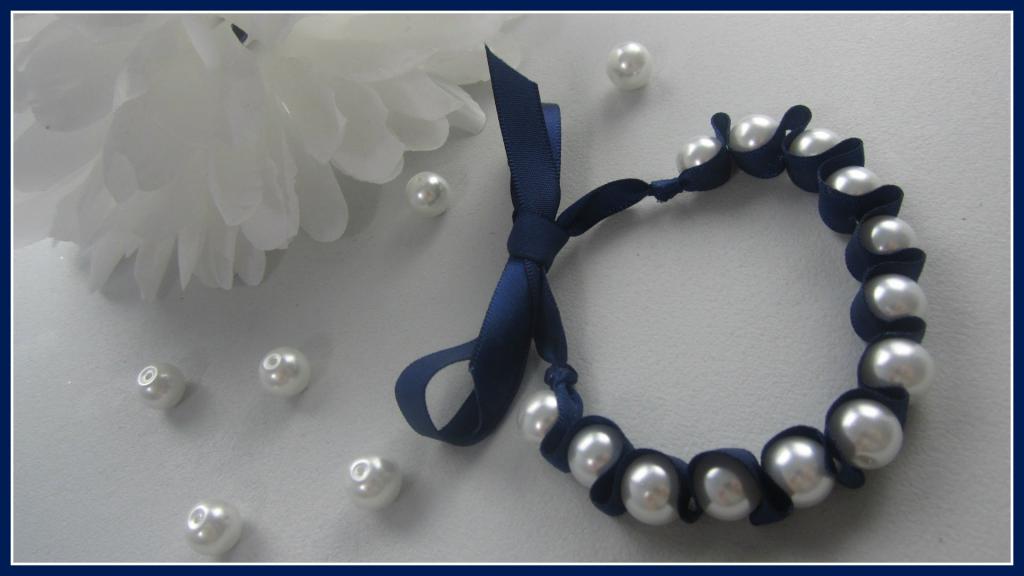
Then the first bead hangs in. The ribbon fabric is bent by a loop and pierced with a needle, followed by a second bead. This should be done until the size of the bracelet matches the length of the ribbon with beads. You can put it on your hand and try on the length as you work. At the end, a tight knot is tied on a ribbon and a knot from the thread is hidden in it. The thread is cut at the same distance as at the beginning of the work, that is, 10 cm. The edges need to be scorched so that the threads do not crumble. After putting on the arm, the bracelet is tied to a beautiful bow.
Tulips on the fabric
As a simple craft of satin ribbons, you can offer to make a wall panel "Tulips". First you need to find the right material for the background of the picture. It is desirable that it be dark, then the flowers will appear brighter. It should not be too tight, the needle with ribbons should pass freely between the plexus of threads on the fabric.
You also need to prepare satin ribbons 2 cm wide. The green ribbon is the leaves and stems of the flower, and buy colored ones for buds. For sewing you need a needle with a very wide eye so that the tape fits comfortably. On the fabric shallow, you can draw the contours of tulips in order to more conveniently perform the elements of the composition.
A needle is threaded from the back and, stepping back by the size of the flower, is pierced on the front. For each tulip, this action is performed three times, you can make the petals of different sizes. The stems are performed by twisting the tape and sewing them along. Then flower leaves are made. A method similar to the petals, only the tape does not tighten much so that the leaves look natural, without tension.
The voids of the composition can be filled with finer details from thin satin ribbons. The picture is then attached to the frame and hung on a hook on the wall. She will delight you for a long time.
Wicker pillow
From multi-colored satin stripes, you can make an interesting sofa cushion using the weaving method. This is a painstaking thing, it requires attention and perseverance. The back side of the pillow is made of material, only the front side is wicker. The work begins on the manufacture of crafts from ribbons with their own hands from the upper left corner. Different vertical strips are sewn in turn to the upper side of the pillow. Then, from the same angle, all horizontal ribbons are sewn down.
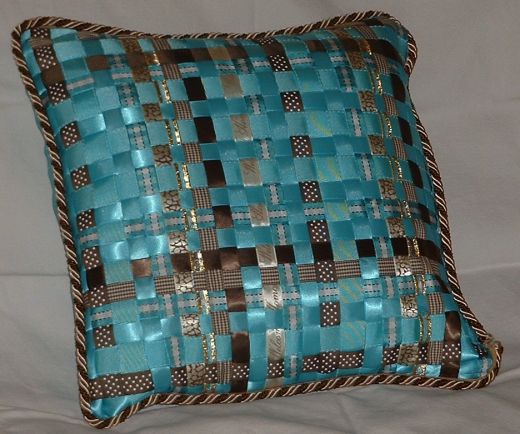
Next begins the alternation of ribbons when sewing. First, the upper strip is laid out on the fabric and sewn from the bottom. Following are laid out all horizontal. The second vertical strip is threaded through one horizontal. This continues alternately until the end of the product. The edges of the ribbons are sewn in, starting from the upper right corner, and gradually drop down. In order not to see the seams on the sides of the pillow, it is sheathed around the perimeter with a colorful edging, matched to the main fabric color.
Wicker picture frame
Using the method of weaving described above, you can arrange a craft from ribbons for beginners in the form of a frame for a picture or photograph. As can be seen in the photo below, weaving is performed only on the left and right sides of the frame. Above and below are simple strips in which ribbons of different colors alternate.
The cropped edges of the bound satin ribbons are glued to the back of the frame. They can be hidden by attaching a layer of fabric or cardboard over them.
Hair hoop
If you liked the way of weaving from ribbons, then you can arrange for yourself a beautiful woven hoop on your head. A fabric or simple plastic base can be purchased at the store, as are three-color ribbons. It is better to take not satin, but from a simple fabric.
Weaving begins at an angle on one side of the hoop. The beginning of all tapes is attached to the edge with a glue gun. The weave is tight so that the base does not peer out. At the end, the edges of the tapes are also glued to the base, all the endings are hidden under the tapes inward.
A bow on a "star"
Before starting according to the scheme in the photo to make a beautiful and magnificent bow, you need to cut out a star-shaped figure from thick cardboard, only it has more angles - 7 pieces. If you want to make a layered and more magnificent bow, then you can make several pieces of different colors according to the scheme and sew them together.
The middle of the bow must definitely be decorated with something interesting in order to hide the seams and knots of fastening parts. You can take half beads, pebbles or a button with a beautiful top.
Bow from the corners
This complex bow consists of three different quality ribbons. The bottom layer is a dark blue wide ribbon, which is cut into identical segments stitched so as to obtain a right angle. Having created 4 corners, they are held together in the shape of a cross. Another same part is sewn over the first with a shift.
The next color of the tape is light blue. This tape is also cut into small segments, which are stacked with a fold in the center around the previous layers. At the end, a strip of light lace is taken, picked up and sewn into the center. The middle is made out with beads or other original accessories.
The article gives only a few of the simplest options for making crafts from simple and satin ribbons. Start small, and you will succeed!