Those who have deteriorated the surface of the ironing device need to know how to sew the cover onto the ironing board. It turns out that this device can be created independently with minimal material costs. The manufacturing instruction is quite understandable and simple, so even a beginner needlewoman can cope with the work.
What material and additional accessories can be used in the process of creating an ironing board cover
Before stitching the cover on the ironing board, you need to prepare the appropriate materials and accessories. To create the simplest textile device on an elastic band, just select them from the following list:
- Thick material. Such a cover will be used for a long time, since the canvas does not deteriorate from exposure to hot iron temperatures.
- A little sintepon or batting, which will be used to create a soft surface.
- A construction stapler is needed to secure a soft substrate.
- A wide elastic band designed to fix the cover on the surface of a wooden base.
To do the work, it is necessary to additionally prepare scissors, chalk, measuring tape, needles and threads. The product will turn out to be neat and durable if you sew the blank on a sewing machine.
How to prepare a tool for decoration
First you need to perform the preliminary stage, and only then turn to how to sew a cover on an ironing board. How is the preparation made:
- It is necessary to determine how the old coating is attached to the ironing board.
- Remove the fabric and remove the soft backing.
- Using sandpaper to clean small chips, scratches.
On this, the preparatory work of the board is completed. Additionally, you can paint the legs and other metal elements.
The principle of creating a cover for an ironing board
It is difficult for inexperienced needlewomen to imagine how to sew a product on an ironing board if the old base has deteriorated or has worn out. It is necessary to carefully consider and complete each stage of manufacturing:
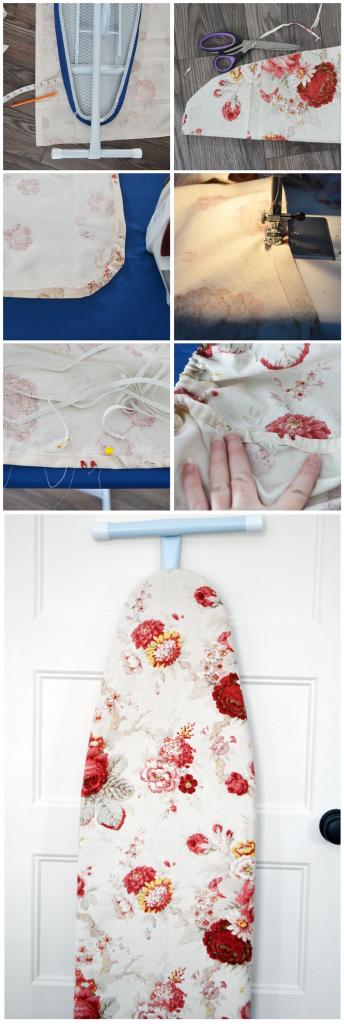
- First of all, you need to take measurements from the base. Separately determine the parameters of the upper surface, then the thickness of the board. Add the last digit to the results of length and width. In addition, throw 20-35 cm to fix the cover from the bottom.
- In order to figure out how to sew a cover on an ironing board, a pattern is simply necessary. Therefore, measurements are transferred to the fabric using chalk and the surface shape of the device is recreated.
- Next, you need to tuck the edges and smooth them. Then wrap and iron again. Sew hem on a sewing machine.
- Then make a wider inversion, which will accommodate the width of the elastic. Hem him.
- Insert the rubber into the resulting “pocket”. Leave the edges free.
- Put batting on the surface. Secure along the perimeter with a construction stapler.
- Put on the prepared cover on the board. Pull the elastic and tie it to the knot. So the fabric cover is fixed on the surface.
It turns out that it is very simple to sew a cover on an ironing board with an elastic band, and if there is a sewing machine - also quickly. Home-made work will save money on professional replacement of the old coating.
A simpler option for making a removable elastic cover
It is much easier to sew a cover on an ironing board with your own hands. The product will be very functional, namely to serve as a cloak. This option is relevant, since when removing the old coating, you can significantly damage the base. There is also the opportunity to simplify the process and facilitate the work due to the rejection of the manufacture of patterns.
To do this, you need such tools and materials:
- Running meter of dense fabric. It is advisable to use textiles for the manufacture of bed linen.
- Elastic band of any thickness.
- Chalk or pencil.
The principle of manufacturing a removable cover without a special pattern:
- Expand a piece of fabric and lay it on the surface of the ironing board.
- Circle the shape of a hard surface with a pencil.
- You can simply lay the folded ironing board on a piece of fabric and circle the silhouette.
- In addition to the resulting sketch, add 15 cm from all sides.
- Wrap the edges two times. In each doorway you need to hide 7.5 cm.
- Smooth these 2 fold fabric. Use a sewing machine to sew a stitch.
- Using a tape, measure the width of the board in the places where the gum is supposed to be fixed. Two points at the edges are enough.
- Transfer the parameter to the rubber. Then twist 2 cm from the ends to sew the elastic to the cover. Thanks to this, the gum will stretch a little, fixing the cover on the surface of the board.
You can wear the product at any time. And you can not remove it at all.