It's no secret that in the origami technique you can make many different crafts. Flowers are no exception. We invite you to learn how to make rose in the origami technique . Assembly diagrams can be seen in the workshops below.
Flat rose
Instructions on how to assemble a simple rose:
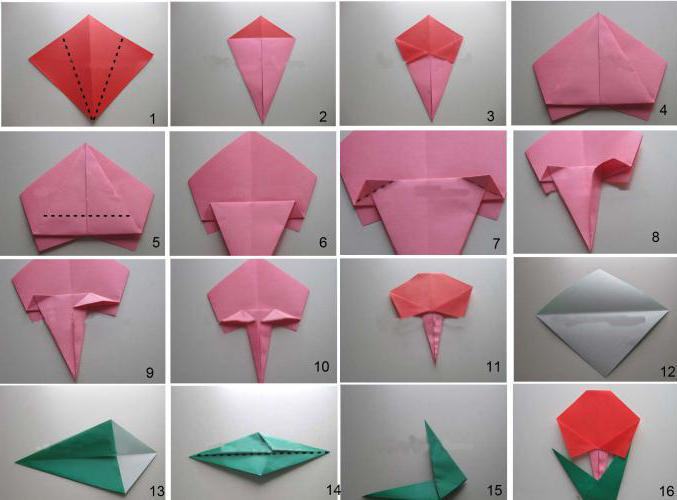
- Take colored paper and make a square out of it.
- Then bend the square in half to make a triangle.
- Expand the sheet and place it as in illustration 1.
- Wrap the left and right vertices of the rhombus to the fold line (Figure 2).
- Fold the edges of the wrapped sides in different directions, as in Figure 3.
- Bend the figure in half by lifting the lower top up (Figure 4).
- Step back a few millimeters from the bottom edge and bend the top half (illustrations 5 and 6).
- Wrap the “ears” slightly, as in Figure 7.
- Then spread the “ears” and smooth them out (Figures 8 and 9).
- As a result, you will get a figure, as in Figure 10.
- Bend the top of the figure and turn the part over (Figure 11).
- Take a square sheet of green paper and bend it in half (Figure 12).
- Wrap its right and left sides to the fold line (Figure 13).
- Turn the left and right sides again, as in illustration 14.
- Bend the part in half lengthwise.
- Bend the part as shown in Figure 15.
- Insert one part into another.
You got a simple origami craft - a rose.
Schemes for assembling a wreath of roses
A way to make a volumetric flower:

- Take a sheet of colored paper and bend it two times in half in parallel.
- Expand the sheet and bend in half, only on the other side.
- Expand the sheet again and turn it over with the back side.
- Now bend the sheet two times diagonally.
- Expand the sheet and lay it in front of you so that the diagonal fold lines are the convex side at the top.
- Fold a sheet in a rhombus.
- You have a blank to make a volumetric origami "rose". The assembly diagrams of this part are the same for the flower and the butterfly.
- Now wrap the left and right sides of the upper half of the rhombus.
- Turn the part over.
- Wrap the right and left sides of the second half.
- Lower the top of the part.
- Now bend the top and sides of the figure.
- Stretch them and fold the boat.
- Smooth the sides. You got a flat boat.
- Fold the shape in half, folding the top and bottom vertices together, and flip.
- Turn the part upside down.
- Fold the figure first in half in length, then lift the lower part, then fold it diagonally.
- Fold a new shape along the resulting lines. With tulips, this part of the origami scheme is similar . Rose flowers are not ready yet.
- Take the part in one hand, and with the other pull the edges of the figure to the sides. Expand your flower. As a result, you get a detail, as in the diagram.
- Fold all four corners to the middle and twist them.
- Spread the petals.
Make a lot of such roses, fasten them together and get an original wreath.
Compact roses
Master class on how to make an origami rose:
- The assembly scheme is quite complicated. First you need to prepare a piece of paper. To do this, fold it into the accordion diagonally on one side, then straighten and do the same on the other.
- Then lay in front of you and wrap each corner a bit (picture 1).
- Pull the left corner slightly and fold it (Pictures 2 and 3).
- Do the same with other angles (picture 4).
- Then straighten the middle so that you see an even square (picture 5).
- Turn the figure over (picture 6).
- Now fold one side of the part along the lines marked in pictures 7, 8 and 9.
- Do the same with the other parties (picture 10).
- Wrap the part as shown in pictures 11, 12 and 13.
- Spread the rose.
Other assembly options
There are many options for how origami rose is made. Schemes of some of them are presented above. For example, you can collect one flower head or a rosette on a leg.
From ready-made crafts, you can collect bouquets, make cards, hairpins and much more.