How often are there situations when a dress is already bought, but there is no suitable handbag? Often enough. And here you can choose 2 ways: either start an endless shopping trip, in search of the very handbag that fits exactly this dress, or sew it yourself. In this case, you can not only select the desired color, but also the style, size, number of pockets, as well as decor. However, you may encounter such a problem: how to fasten a bag? Sewing zippers is difficult for many, magnetic or simple buttons are difficult to install without special equipment, like other specific mounts. However, there is a way out of this difficult situation - to use a clasp. What is it and how to work with it?
Clasp
This type of fastener was invented in the fifteenth century in France, and the name literally means "close." It looks like two semicircles connected at the edges of the arc and with two beads in the center, which keep the clasp closed. Over time, the form acquired many variations, but the meaning remained unchanged. Most often, this type of fastener can be found on wallets, clutches and scissors, and these attributes can still be seen on fashion shows.
Types of Mounts
At the moment, there are many types of clasps. They can be classified according to the following criteria:
- In shape. Arcuate. Rectangular Stepped. Wavy.
- To size. Small (for wallets). Medium (for cosmetic bags, clutches). Large (for bags, valise).
- By location. External Hidden.
- By the method of fastening. Sew on. Clamping (more often they are glued). On the locking bolts (usually the bolts come complete with a clasp).
- On the area of fastening. Around the perimeter. On the upper contour (convenient for small items, such as wallets).
- By the presence of decor. Simple. Decorative (carving, stones, etc.).
- By volume. Single Double.
- By the method of closing. Classic (two beads or plates). Rotary. Push-button.
As you could see, there are a lot of types of clasps, so it’s easy enough to pick them up both to a strict business suit, and to a romantic outfit or wedding dress. In addition, sewing products with this mount is quite easy.
Materials
To make your own handbags with a clasp you will need:
- Paper.
- Pencil.
- Ruler.
- Material for the outside.
- Material for lining.
- Non-woven.
- Doublerin.
- Clasp.
- Threads.
- Needles.
- Scissors.
- Glue.
- Decor
Flizelin and doubler from this list are optional, but it is better to use them. Both non-woven adhesive materials serve to strengthen the fabric, the first, thin, for the backing so that it does not tear during the operation of the product, and the second, thicker, for the main fabric, so that the bag keeps its shape well. It is also convenient to use curly scissors for fabric (zigzag). The edges of the fabric trimmed with such a tool do not need to be additionally treated with an overlock;
Stages
And yet, how to sew a purse with a clasp? In fact, it is quite easy and does not require any special skills. The process can be divided into several stages:
- Choosing a style and creating a pattern.
- Cutting and sewing details.
- Decor
- Assembly.
To better understand the principles of manufacturing such accessories, you need to consider each of them in more detail.
Style and pattern
The pattern of a bag with a clasp primarily depends on the chosen style of the product. In addition, the purpose of this product plays a large role.
Most often, the style is chosen, taking into account the features of the already existing clasp. Less commonly, this is done in reverse order. Therefore, at this stage it is necessary to decide what the bag with this type of fastener will be. It will be voluminous or flat, have sharp corners or a rounded shape, what will be the material of the top and lining, how many departments and pockets will be in it, and also what the decor should be.
Since it is very easy to build a pattern for a purse with a clasp, we will consider only the basic principles. They are based on the advice of craftsmen who manufacture such accessories:
- It is necessary to begin the construction of the drawing from above, from the fastening zone of the fastener.
- So that the top of the bag fits well on the clasp, it must be circled along the outer contour and already from the resulting line to build a pattern.
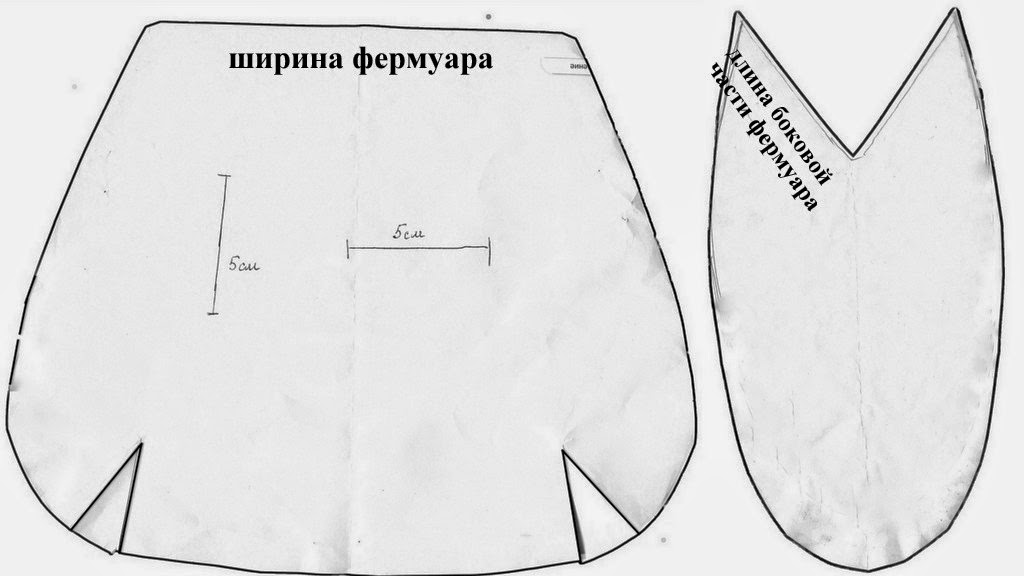
- If the product is flat, it is enough to just note the height of the clasp (the location of the ends of the arc), cut out 2 details of the top and the pad and sew them to the marks. You can see an example of a bag with a clasp clasp in the photo. The pattern in this case will be 2 rectangles with rounded lower corners.
- To make the product more voluminous, it is necessary to add an additional element, which will give the width of the bag. Its width should be equal to the two sides of the clasp (for semicircular or wavy fasteners, the side height is 1/4 of the arc length), and the total perimeter of the top of the bag should be the perimeter of the fastener.
- To add volume to the upper part of the accessory, the clasp contour on the pattern needs to be straightened out a little, moving the lower edges upward by 1-3 or more cm. The higher the edges on the pattern are raised relative to the fastener contour, the more voluminous the product will be. It is important to ensure that the final length of the arc coincides with the original.
- If the volume is needed only at the bottom of the bag, there is no need for an additional part, it is enough to make tucks in the corners of the bottom area, connecting the side and bottom at an angle of 90 °. It is important to ensure that the edges of the tuck in the area of the side seam match. It is convenient to make them after two parts have already been sewn together.
- For rounded accessories, it is better to make the side part whole or consisting of two parts, the seam of which will be located in the middle of the bottom of the product. But for bags with sharp corners (rectangle, trapezoid, polygons), the length of the side part should correspond to the length of one side of the main figure. In this way, sharper product contours can be achieved.
- If it is necessary to expand downwards, not only along the front, but in the side, then the pattern of the additional part will be in the form of a trapezoid or lens.
- After the pattern of the bag with the clasp is ready, it is better to duplicate it on paper, cut it and glue it. Thus, it is possible to check the conformity of the dimensions of the parts, the appearance of the future accessory, as well as the correctness of the pattern in the fastener area. Then you can make adjustments to the main pattern.
Cutting and sewing
After the pattern of the bag with the clasp is ready, you can proceed to the cutting. It is necessary to carve the following details:
- From the lining fabric - 2 parts of the front surface, side parts, all without allowances for seams. If necessary, also cut out pockets.
- From the non-woven fabric, cut out the same parts for the lining, but 0.5 cm less on all sides.
- From the main fabric, cut out the details of the top with allowances of 0.7-1 cm.
- From doublerin - details without allowances.
After all the details are cut out, it is necessary to glue them by connecting non-woven materials with an iron.
Important! It is necessary to arrange the adhesive materials so that the same distance from the edge on all sides.
Next, you need to sew all the details of the top and pad. In the resulting blanks, iron the edges in different directions, if necessary, make notches on the bends.
If you knit a handbag with a clasp or crochet, then the process is similar to the one presented above, but instead of cutting, the details of the top are knitted according to the developed pattern. Lining is best left out of fabric.
Decor
You can decorate the product at those stages when it is convenient to do. It is more convenient to embroider patterns with threads, beads or ribbons, it is more convenient to sew applications before sewing on the glued part, to sew beads and other volumetric elements - after the upper layer of the bag is sewn, and to paste rhinestones or other decor - when the product is completely ready.
Fastener fastener
Since the fasteners are different, their fastening will be slightly different among themselves:
- Sew on. They are of two types - open and closed. The open bottom frame is one-sided, flat, with needle holes. In order to fix such a clasp, you must first sew the lining and the outer part of the bag, placing them with their faces to each other, then turn them through a small hole and sew it. Thus, the top edge of the bag will be neat and sturdy. After that, you can sew the clasp by laying it on top of the product. For closed fasteners, the frame is double-sided, with a groove, completely covers the perimeter cut. The holes for the needle are located only on the front side of the clasp. In this case, it is enough to combine the edges of the pad and the top, sweep, then place the cut inside the frame and carefully sew on the holes in the fastener. This method is suitable for handbags made of thick or bulk fabric, since the dimensions of the inner groove limit the maximum thickness of the edge. If the fabric is thin enough, it is better to pre-treat the edge in the same way as for an open fastener.
- Clamping. These fasteners are similar to closed fasteners, but they do not have holes for the needle. Ideally, they must be gently squeezed, fixing the edges of the fabric inside, but in this case, you can deform the mount. Therefore, there is an easier way - to stick them. Depending on the thickness of the material, sweep or stitch the edges from the wrong side, then evenly apply a small amount of glue into the frame, then carefully tuck the edges into the clasp with a flat screwdriver. And so that the material fits snugly to the fastener on the front side, it is necessary to additionally lay a twine inward from the lining side.
- The clasp with locking bolts is fastened in the same way as a sewn bolt, but instead of a seam, bolts are used that clamp the material inside the frame. But it is better in this case to also use glue.
Important! Before attaching the clasp, you must first mark the center of the top of the bag on both sides, and then begin fastening, moving only from the center to the edge. This makes it possible to avoid distortion of the product and the appearance of unnecessary folds in visible places.
The pattern of the handbag with the clasp of partial fastening differs from the rest. In this case, the top of the product will not be equal to the perimeter of the fastener. Its length should be equal to the length of the part to be sewn, and the width should be equal to the distance between the arcs at maximum opening. Before fixing the clasp, the edge of the product must be flashed from the wrong side.
Conclusion
The simplicity of making do-it-yourself handbag patterns with a clasp, a large selection of clasps and a low level of manufacturing complexity make the product creation process fascinating, and the finished accessory will serve more than one day. And if the accessory loses its appearance or gets bored, you can always sew a new one using the same clasp, because this type of fastener will not go out of fashion soon!