Colored boiled eggs are a traditional attribute of Easter. However, preparation for the holiday was not limited only to them. At all times, craftsmen designed artificial eggs, which became artistic masterpieces. The most striking example is the famous works of Faberge. Of course, not everyone is given the opportunity to be jewelers. Therefore, both before and now, eggs were decorated with paints, decoupage, braided with beads. There are many similar creative techniques. But it is beads and beadwork that make it easy to create spectacular souvenirs, which can be an excellent gift for the Holy Resurrection of Christ.
At first, painstaking work with small beads may seem complicated. But in fact, with little experience, it is available even to a child. Naturally, you should not immediately swipe at complex patterns. To understand how to braid an egg with beads, you should start with simple compositions. For example, it can be an elementary geometric pattern or a combination of two or three colors. Or, as in our example below, you can take advantage of the "gas" color. Indeed, before creating unique works, you just need to master the technique.
Choose a form
Most often, for such crafts, special wooden forms are purchased, sometimes connected to a stand. But the blanks are also made of polystyrene foam, plastic, papier-mâché, polystyrene. Some needlewomen also braid a real shell, having previously removed the contents through small punctures. But this form is too fragile for beginners. Therefore, we recommend nevertheless to look for exactly wooden discs.
Professional technology
Professionals begin to entangle eggs with beads by creating a “girdle”. From the simplest chain, a patterned web is woven, which in size corresponds to the "equator" of the workpiece. The finished belt is fixed on the disc (the edges are connected). After that, the upper and lower parts are alternately braided. The craftsmen create the drawing themselves or use patterns for beadwork or cross-stitching.
When deciding how to braid an egg with beads, you can use this technique if you already have some experience with this type of needlework. If there are no skills, start with simpler options.
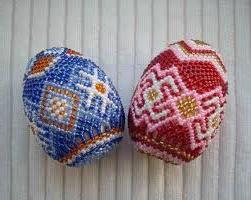
Weaving for beginners
In the second photo you see how to braid an egg with beads using a minimum of material. Begin to perform this work from below, with a chain closed in a ring. Then a simple mesh is braided. In the upper part, it is compacted to complete the work, using a combination of shades imitating a flower. A strong nylon thread or thin fishing line is taken as the basis for weaving. Small beads in this case can be partially replaced by bugles. This will greatly speed up the work.
Master Class
An even simpler technique is our step-by-step master class. It is ideal for beginners who want to please their loved ones with a unique souvenir.
For work, in addition to beads and shapes, you will need: a thin wire for weaving, small scissors or tweezers, ordinary and double-sided tape, a small piece of braid or satin ribbon, if you want the finished egg to be hung somewhere. It is most convenient to pour the beads into a small bowl, placing it on a tray. This trick will help you easily collect beads that run away during the operation.
First of all, with the help of ordinary adhesive tape, we fix the loop-pendant on the workpiece. Then glue the upper half with small strips of double-sided adhesive tape.
We take a length of 50-60 cm from the wire. If it is inconvenient to work with such a length or it is not enough (it depends on the size of the mold), you can grow the wire by carefully twisting the ends of the segments. We string one bead onto the wire and twist the loop, securing the end.
Next, we string 10-12 pieces, gradually laying in rings on an egg glued with adhesive tape. It is necessary to ensure that the rows and beads lay flat, without gaps.
As work progresses, glue new stripes of double-sided tape to the mold. Surely you have already guessed that this is necessary for reliable fastening of the bead spiral.
Gradually, the series are reduced. To fix the wire, make a loop around the last bead, skipping the tip into the previous 2-3, and then hide it, putting it under the already finished rings. Carefully stroke the egg with your hands, straightening the rows and pressing the beads to the sticky tape.
Your easter souvenir is ready! Now you know how to braid an egg with beads. With each new job, you can complicate your task using a different weaving technique or creating a special pattern.