Before you start laying brick, you should familiarize yourself with the nuances of this process. You can see from the photo of bricklaying with your own hands that it is quite easy. And to really simplify this task, the steps of self-laying a brick will be given below.
Brief terminology
Brick is one of the most popular building materials. Every person has been familiar with his appearance since childhood. But the names of its faces should be considered:
- long side faces are called "spoons";
- short side faces - “pokes”;
- upper and lower faces - “beds”;
- the intersection of faces is called the "edge".
The brick has standard sizes: single - 250 x 125 x 66 mm, and a half - 250 x 125 x 88 mm.
Versta - the outer rows of brickwork. It is divided into external (front) and internal.
Zabutka ( zabutovye bricks) - these are products that are placed between the front and inner versts.
The spoon row is bricks that are laid with long side faces. And the tychkovy row - bricks laid with short side edges.
A wall is a part of a wall that appears between two openings (window, door, arched).
What is needed for bricklaying
Where to start laying brick with your own hands? Naturally, with the preparation of the necessary working tool. Consider a do-it-yourself brick masonry fixture:
- Trowel (trowel) - a flat metal spatula with a triangular-shaped handle. Serves for applying and leveling the solution, as well as for removing excess mass.
- Pickaxe hammer - different from a classic hammer. On the one hand - a dull rectangular hammer, and on the other - the pointed part, in appearance resembling a chisel. The pointed side is designed to break away small parts of the brick, and the dull side is used to level the surface. If available, you can use a grinder with a stone disc.
- Building level - is necessary to control horizontal and vertical masonry.
- Square construction - a kind of ruler. Used to control angles.
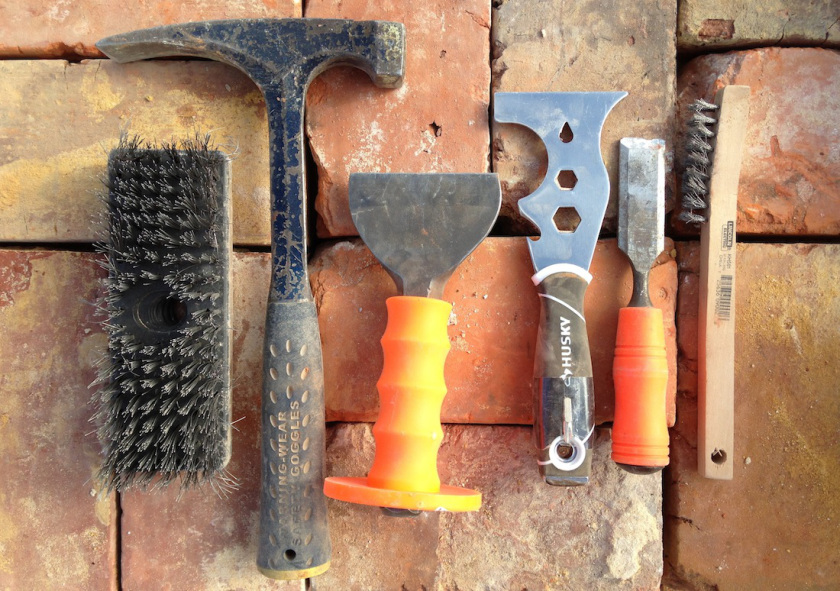
- Plumb bob (with a rather heavy weight). It is necessary for measuring the verticality of masonry and angles.
- Mooring cord (mooring cord) - twisted cord with a diameter of 3-5 mm. It is necessary to ensure horizontal and straightforward laying of rows.
- Stitching - used at the final stage of work. It is necessary for the formation of seams and their sealing.
- Ruler-ordering - used to align the thickness of the seams.
- The rule is a wooden or aluminum ruler. Applied to control the plane of the masonry rows.
- Shovel - for kneading the solution and stirring it periodically.
- Concrete mixer or other container - for kneading masonry mortar.
- Buckets for carrying the solution. Usually 2-3 pieces are needed.
- Construction mixer - for homogeneous mortar. But it is possible without it.
Usually a set of these tools is enough for construction.
Solution preparation
Not only the safety of the building, but also its strength depends on the masonry mortar. Therefore, this process of preparing a mortar for bricklaying with your own hands needs to be given special attention.
Advice! For beginners, it is better to make a small amount of solution to exclude the possibility of premature solidification.
For a high-quality solution, good cement of the M300-M500 brand, dry sand (river or quarry), water and a plasticizer are used. If necessary, create a contrast with the brick add dyes, soot or graphite.
The standard proportions of cement and sand are 1: 3-1: 5, depending on the brand of cement. It is worth considering that the more sand, the stronger the connection, but lower elasticity. The amount of water is often calculated by experiment and is approximately 0.4-0.6 parts. For plasticity, lime, clay, liquid soap or, in extreme cases, laundry detergent in a proportion of not more than 0.1 part are used.
First you need to sift the sand so that it does not contain impurities from stone, soil and debris. Next, we combine the dry components in the required proportion and mix until the color of the mixture is uniform. And only then add water. This sequence is necessary for uniform kneading.
Important! Curing of the kneading begins after about 45 minutes, and ends after 2 hours. The solution becomes full strength in almost a month - in 28 days.
The ready-made solution should resemble a thick porridge. You can check with a trowel. You need to hold them through the solution. If the trace of the trowel does not float, and the solution does not break, then the amount of water is normal. If the solution floats away - a lot of water, and if it breaks - not enough.
The Importance of Proper DIY Brick Laying
First of all, the safety of the building depends on the correct brickwork. This process consists of several steps. Before starting the masonry, a beginner should train in the performance of individual objects - corners and pillars. Below is a step-by-step instruction for bricklaying with your own hands. For convenience, it is painted in steps.
Dry brick laying
The essence of the step is laying the brick "dry." This is necessary for computational work and verification of the correct installation.
- Preparation of necessary tools.
- Unpacking and checking the brick. You need to pay attention to both the color of the material and its size. It is better to take a brick from one batch.
- Ensure that the foundation or base is protected against moisture. That is, waterproofing is laid. This is necessary so that the brick does not draw moisture.
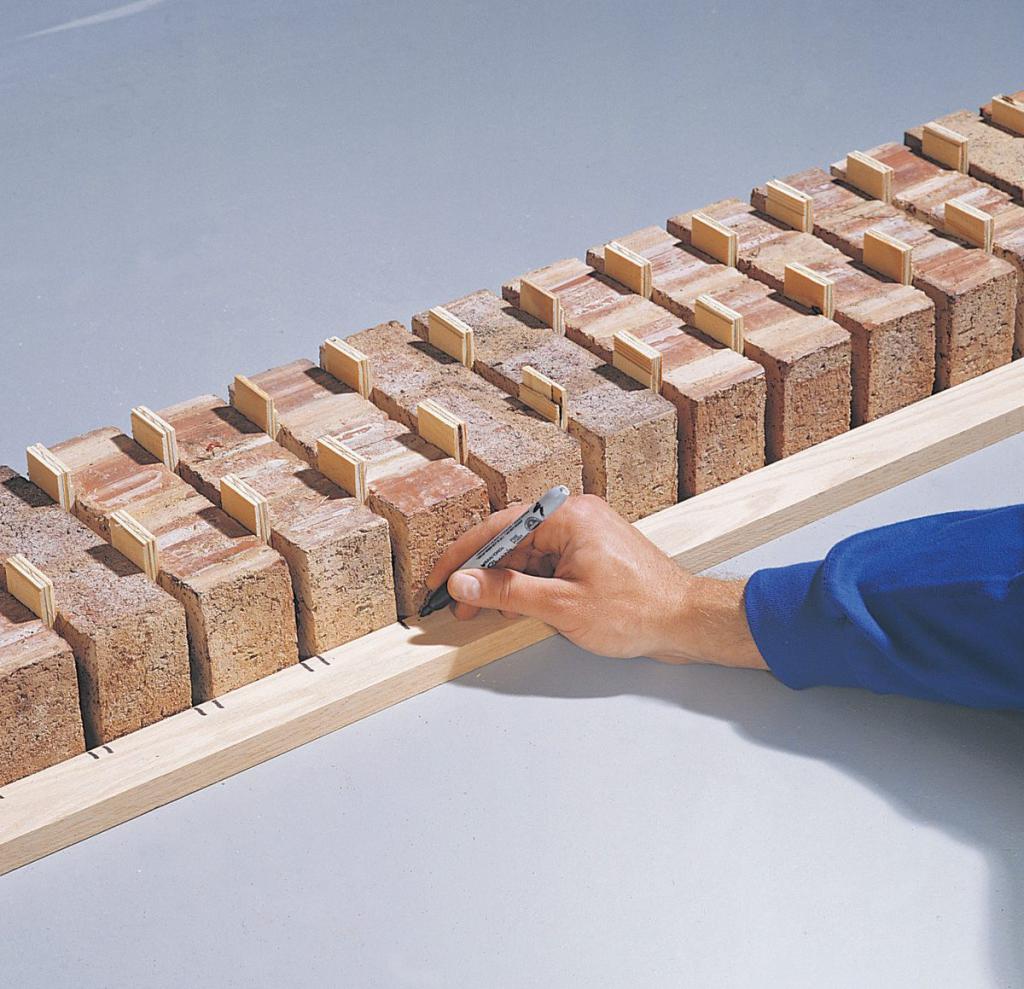
- Now you need to lay out the first row of bricks without using mortar and scrupulous accuracy. It is necessary to use an object with a diameter of 8 mm (this may be a piece of reinforcement, for example). Such a diameter is needed, since it is equal to the thickness of the mortar between the bricks.
- Now you can proceed to the calculation. Carefully lay the brick around the perimeter of the basement, while carefully observing the clearance and evenness of the masonry. Particular attention should be paid to the corners.
- Now measurements are taken from corner to corner, and then diagonally. All data is recorded and verified with the data of the construction project.
- At the corners, it is recommended to mark the base with a pencil where the edges of the bricks will be placed. If desired, and the availability of time, such markup can be done around the entire perimeter of the building.
Advice! So that the brick also does not "draw" moisture from the mortar, it is recommended to pre-soak it in water for a while.
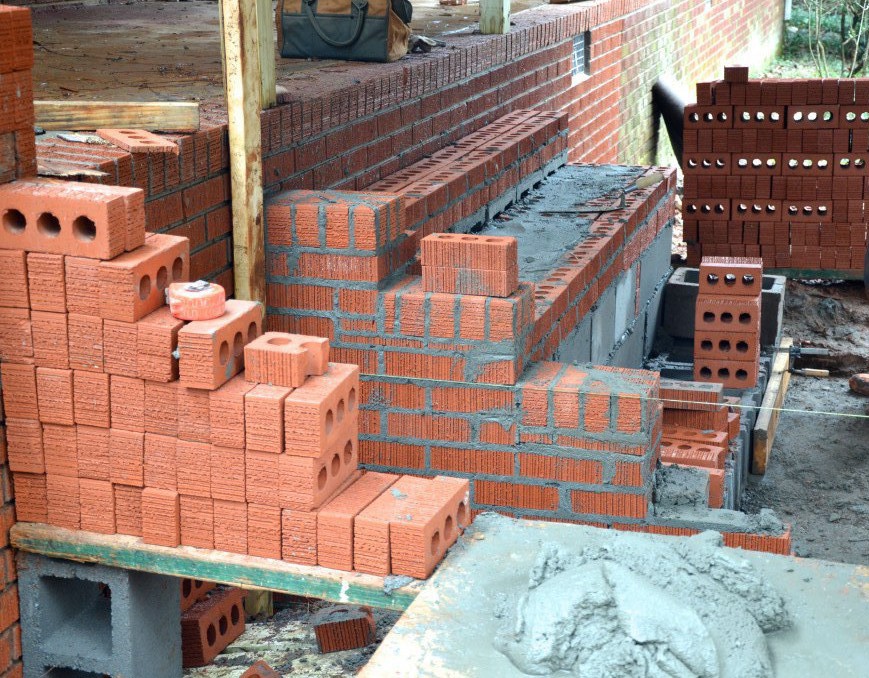
First row
We can say that this stage is the most crucial. And all because the rest of the layout depends on the correctness and quality of the laid out first row.
Steps of the second step:
- At the earlier made marks, the corners are laid out. Their masonry begins with two bricks placed at an angle of 90 ° (checked by a triangle).
- Bricks placed on the mortar must be carefully adjusted in height using a trowel or the blunt side of a pickaxe. It is important to use the level in order to make sure that the blocks at the two edges of the walls are placed at the same height.
- In the same way, you need to lay out bricks on the other corners of the building.
- Now you need to pull the mooring cord between the corner blocks. It will align all other blocks of the first row (both vertically and horizontally). The thread can be fixed both in order and with the help of corners. It is important that the cord does not sag.
- Then you can proceed to the calculation of the remaining blocks of the crown. Using a trowel, a solution is applied, it is leveled to a height of about 1.5 cm, a brick is laid and must be leveled both horizontally and vertically (using a mooring thread). Above you need to check the building level. If necessary, it is possible to correct the brick by lightly tapping the blunt end of the pickaxe or the handle of the trowel. As a result, the thickness of the seam horizontally should be about 8-10 mm, and vertically - 8 mm. Excess solution is removed with a trowel.
- In the same way, all other blocks of the first row are stacked.
- When the last brick of the crown is laid, a check is done. The height of all bricks should match, there should be no bulging in any direction relative to the foundation.
- If everything is in order, then you can start laying out the corners of the second row, moving the mooring thread and the rest of the work.
Masonry Methods
After laying the crown, the principle of operation does not change. But the masonry technology is different and depends on the plasticity of the solution. Consider two main ways:
- "Close on." This method allows you to work faster. It is mainly used for laying walls. On the outer and inner side of the row, mooring cords are pulled. The cement-sand mixture is poured and trowel smeared over the previous row. The thickness of the solution should be slightly larger than planned. It is important that the solution also fills the joints of the previous row. Now a block is taken, it is tilted slightly with a jab, immersed in a mortar and moves to an already laid brick so that the mixture “gets” to the edge. Thus it turns out to form both horizontal and vertical seams. Other bricks are laid out in the same way. Blocks are adjusted with a light tapping of a trowel or a pickaxe, and the excess solution is removed. If necessary, the vertical joints are filled where there is not enough solution.
- "Press". For its use, a hard solution is used. It is more time-consuming than other methods, but here the most durable seams are obtained. As in the previous method, the mooring cord is pulled, the solution is laid out and leveled. Next, you need to turn the trowel to the side and carefully draw along the surface of the solution, raking part of it to the vertical side of the block to which the new one will fit. As a result, an even side seam should form. Next, holding the mortar with the trowel on the vertical side, lay the new block in the right place and press it to the poke (spoon) of the neighboring block and the bed with the solution. Then gently pull out the trowel. By the same technology, the following blocks are stacked. If necessary, you need to trim the rows with light strokes with a trowel handle. Excess solution is cut off with a trowel.
DIY brick pillars
Masonry pillars made of brick with your own hands has certain features. For example, a brick needs to be impregnated with a special tool that will prevent the appearance of white spots (efflorescence). Necessary materials: brick, mortar, 4 metal rods with a diameter of 8-10 mm (15 cm longer than one side of the support), level, trowel, hammer and small stone (crushed stone can be).
DIY masonry steps:
- On the foundation, lay an insulation layer. Next, lay out the first row in 1.5 or 2 bricks.
- Then a half-block offset is made. This is necessary to create a dressing.
- Pieces of the rod are laid on the solution. This is necessary for even seams. As soon as the block is leveled, the rods are pulled out.
- Excess mortar is removed with a trowel. Every two or three rows, rubble is poured into the void of the column. It is recommended to perform wire reinforcement.
- Each row must be carefully laid. If necessary, trim with a hammer and check with a level.
Facing brick masonry
To give a harmonious and respectable look, use a facing brick. Do-it-yourself bricklaying is a bit more complicated than laying walls. The tool remains the same, except that a template is added for a more accurate masonry. The solution consists of cement, sand and water in a ratio of 1: 3: 1, respectively. So that the color of the cement-sand mixture does not differ much from the color of the brick, coloring pigments are added. Before laying out the material must be soaked in water.
Important! Facing brick masonry is performed at a temperature of +5 ° .
The first step is to make a calculation without a solution. This is necessary in order to calculate how many bricks need to be cut, which blocks will go to the laying of door and window openings, and also to exclude marriage.
When all the ceramic products are selected and trimmed, you can proceed to the calculation.
Important! In no case should you use a metal disc or hammer. This may damage the material.
It should be borne in mind that the size of the horizontal seam should be no more than 10 mm, and the vertical - no more than 12 mm. The calculation of the first row is done completely - from one side to the other. The solution must be applied indented from the edge of 1.5 cm. But the masonry of the following rows is different. Flat masonry is required here, and therefore measurements are required.
First you need to form corners to a height of 5-6 rows. Then, between the blocks, pull the thread so that the calculation is even. And now you need to do the jointing. That is, using a special device, perform such actions so that the seam protrudes several millimeters from the outside of the masonry. Next, the calculation of the rows is performed. For accuracy, a template is used. It is important not to forget to wipe the lining with a damp cloth every 4 rows to remove dirt. Best of all, if there is pollution, remove it immediately.
DIY bricklaying may seem difficult for an inexperienced person. But if you adhere to technology, and even better, invite an experienced master to help, then everything will work out.