This article will focus on the design of the water floor. Here you will find answers to questions about why it is needed and how to properly implement it. Also detailed is a diagram of a water heated floor.
Design Features
In some cases, its presence is desirable, and in others - mandatory. It is better that it be if the warm floor is an auxiliary (that is, not the main) system. It is also advisable to make a project when it occupies a small area (up to 20 sq. M.). If this floor is the main heating system (or auxiliary), but affects a larger space, then drawing up a diagram is a prerequisite.
What is all this for?
When installing a system of such a floor in a new building, as well as in some other cases, official commissioning is required. If the project is not drawn up, then you can get a refusal. Therefore, it is recommended to take care of it in advance. Otherwise, you still have to deal with the drafting of the project, only already in hindsight. If we are talking about installing a water floor heating system with the employment of professional builders, it is best to resort to the execution of a contract. It is based on the project. The latter is a mandatory part of the contract.
Price policy
If there is no project, then the cost and terms of work in any case significantly increase. The fact is that in such a situation, the installation or construction process will be unorganized. According to experts, the acquisition of the system and its installation requires up to 60 euros per 1 sq. m. Based on this, on a house with floor heating up to 100 square meters. m., have to spend up to 6 thousand euros. Thus, the installation of the system and the price of equipment are commensurate with the cost of the structure itself. In this case, you have to start saving. This applies to work performed, equipment and materials. Reducing the costs of the latter is possible. This requires an accurate technical calculation. The scheme of a water heated floor is already drawn up on its basis. This eliminates the unjustified overstatement of the heating power. In addition, it is guaranteed to ensure comfortable conditions in the house. The layout of the water floor heating allows you to take into account all the important details, as well as save on the purchase of the necessary equipment.
Features of technical calculation
As practice shows, do-it- yourself water heating floor schemes are rarely compiled. Design requires some knowledge. In addition, you need to have an idea about the properties of various materials, the principle of operation of the heating system, as well as the norms and rules of installation. The scheme of the device for warm water floors should contain a technical calculation. The designer is engaged in its implementation. In order for the thermal calculation of the house to be made, you need to provide the following information to the specialists:
- Information about the PSO rooms (the type of coating and the installation location of the furniture are indicated).
- The location of branches and risers inside the structure.
- Information about the required indoor temperature.
- Information about the material of the external walls (the type of doors and windows is also indicated here).
- The location of the boiler and its height above the floor.
- Floor plan of the house (dimensions of external walls, doors and windows are indicated).
The laying scheme for warm water floors is based on a technical calculation.
Important information
The laying scheme of warm water floors includes many elements. It is worth paying attention to ensuring that important points are not missed by the designers and are agreed with the owners of the house.
Breakdown of the premises into fields
The process of dividing into plots is a very important point. If you ignore it, then, most likely, the screed will break. It depends on its thermal expansion. The division into fields is just for its compensation. The number of sections obtained depends on the geometry and area of the room. Moreover, the maximum area of the formed field is not more than 40 square meters. m
Expansion joints
They are provided along the boundaries of the fields that are obtained after the breakdown of the premises. This is done so that the screed does not crack. In fact, expansion joints are a kind of gaps. They can be filled with damping tape, foamed polyethylene or EPS. In order to lay the pipe through the expansion joint, it is placed in a protective hard casing. The latter is a corrugated tube, the length of which is up to 500 mm. It is necessary to pay attention to the fact that only the return or supply line of the circuit can pass through the expansion joint.
Installation technology
It is imperative to coordinate this point with the designer. The selection of materials used for laying pipes will depend on the method chosen. Currently, the most common two technologies for installing underfloor heating: "dry" and "wet." The choice of topcoat depends on the required pipe heating temperature. For example, the maximum parameters allowed by the manufacturer are 25 degrees. The indicated floor heating temperature may not be enough. In some cases, a change in the top decorative coating is required. A wall heating system can be installed.
What should happen after the design is completed?
It is assumed that the owner will have a floor plan of the heating system in his hands. It should clearly reflect information about all components of the system:
- Automation settings.
- Pipe placement (length and diameter of sections are indicated).
- Information about the required power for each room (floor or radiator heating).
- Placement and size of radiators.
- A complete pipe laying scheme (the diameter and length of each circuit of the system, the temperature of the coolant, the step of the location of such a warm floor are indicated)
The drawing should reflect the full layout of the water floor heating. The thickness of the concrete screed is also indicated here. The owner should be provided with all the information about the specifics of the materials and equipment with which the underfloor heating will be installed. The installation scheme will avoid errors in the process of work.
Necessary tools and materials
In accordance with the information that contains the technical plan and the connection diagram of a water heated floor, before starting work, you need to prepare:
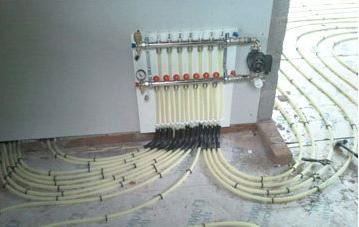
- Distributor with flow meters.
- Manifold cabinet.
- Plasticizer (added to concrete, designed for filling the floor).
- Pipe fasteners.
- A complete set of tools for expansion joints.
- EPPS strips or damping tape.
- Thermal insulation material.
- Special pipes that are designed for floor heating configurations (must be oxygen-tight, resistant to temperature and pressure).
The layout of the collector of a warm water floor should also be attached to the main plan.
Additional questions
At the design stage, you need to know the following:
- Variations of finishing coatings.
- Variations in pipe laying patterns.
- Fluids for the system.
During the installation process, it will be too late to determine this. It is better to take care of this in advance at the initial stage of design.
Water underfloor heating: wiring diagrams
The distribution of pipes on the base can be carried out in various ways. Currently, two options are used: a spiral and a snake. Any other arrangement of warm water floors is a variation of one of the above.
Snake
This installation is suitable for most rooms that have a medium or small area. It should be noted that the initial pipe segment will have the highest temperature. For this reason, installation should begin from the side of the wall, which has the greatest heat loss. This area is called a boundary or edge zone. Here, the laying step is reduced in order to be able to compensate for heat loss. Most often, the distance between the pipes does not exceed 300 mm. The fact is that with a larger step, a “temperature zebra” can form. In the marginal zone, the distance decreases to 200 mm. It is permissible if it is even smaller. In this case, the minimum bend radius of the pipe plays a large role. The serpentine contour is characterized by an uneven distribution of heat. In order to get rid of this, it is necessary to make double styling.
Spiral
Such a scheme of a water heated floor involves a parallel arrangement of the supply and return pipe sections. Due to this, the temperature decrease is compensated. The spiral is excellent for rooms with high consumption or large area. Such a connection scheme for a water heated floor is recommended when the pitch is less than 200 mm. The reason lies in limiting the minimum bending radius of the structure.
Features of edge zones
It must be remembered that here the pitch of loops is reduced. This is done to compensate for heat loss. There are only two types of such zones: separate and integrated. The latter is included in one loop. Its formation occurs due to a decrease in the laying pitch at the outer walls. In this case, the distance must be increased in the zone of stay. The boundary region is formed using a separate loop. If the length of the latter is more than 100 m, then several similar elements will be required to heat this section. If there is a boundary zone, this option is most relevant. This is due to significant hydraulic losses in the circuit if the loop length exceeds 100 m.
Top Finish Details
This is a very important participant in the heat transfer of the entire floor system. The coating material must be selected very carefully. In this case, it is worth paying attention to its thermal resistance. It is recommended to use the following:
- Laminate.
- Linoleum.
- Wooden board (recommended thickness - up to 15 mm; this is due to the low thermal conductivity of this material).
- Parquet.
- Ceramic tile (recommended thickness - up to 30 mm.).
Features of wood coating
In this case, a large number of questions may arise. Wood is a hygroscopic material. In most cases, the coating somewhat reduces the relative humidity directly above the floor. This is due to the fact that the temperature of the latter increases. For relative humidity, "self-leveling" is unusual. If in a specific zone an increase in temperature occurs, then it will necessarily decrease. For water underfloor heating can not use Canadian maple. This also applies to beech. With changes in relative humidity, the geometric dimensions of these varieties of wood strongly jump. All the rest can be used in water floor heating systems. Recommended air temperature when laying a wooden coating - +20 degrees. In this case, the relative humidity should be in the following range: 30% -60%. The use of any type of coating implies a mandatory limitation of the temperature that is supplied to the coolant system. As a rule, all recommendations are in the attached manufacturer's instructions. The scheme of a water heated floor with a thermostat involves the installation of equipment to maintain a constant temperature in the system.
Fluid Information
Distilled or plain water, as well as antifreeze, can be poured into the underfloor heating system. The latter is best used when there is irregular heating of the room during cold periods. This should be reflected in advance in the system design.
Where is best to use?
As a rule, a water-heated floor scheme is used in a private house. When installing the system on limited areas of the premises (bedroom, kitchen, bathroom), the easiest way is to use the electric variation. This is due to the fact that it is more difficult to arrange pipes in a small space than a cable. In the event that such a heating system becomes the main, it is best to use a water type design. It is worth noting that in a high-rise building with centralized heating, it is forbidden to use a water heated floor. The system diagram from a separate circuit is necessarily agreed with the relevant authorities.
Layered construction
The scheme of the device for warm water floors is approximately the following:
- Thermal insulation (EPS is used or expanded polystyrene).
- Waterproofing is coated or glued.
- The main plate.
additional information
In a particular case, it is necessary to calculate the thickness of the thermal insulation that a water floor will have. The scheme should contain this information. As for rolled insulation having an aluminum surface, it is recommended to use variations with the content of lavsan. Thanks to him, the interaction of concrete screed and aluminum will not happen. It is also worth noting that it is allowed to lay pipes directly on expanded polystyrene or EPS. Thus, the intermediate layer is skipped. It is necessary to pay attention to water-heated floor pipes and concrete screed with the addition of plasticizer. In this case, it is assumed that there is a reinforced mesh with cells. Recommended wire diameter - up to 4 mm. The thickness of the screed of a similar floor (taking into account the presence of pipes) is up to 10 cm. There are certain recommendations for the use of plasticizer. It is believed that if you add it to the screed, it can be made so that its thickness is 3 cm, while its reinforcement is optional. This opinion is not true. The use of a plasticizer does not eliminate the need for reinforcing screeds. At the same time, its minimum thickness should reach 5 cm. In the case of using a plasticizer, it is put into the mixture in strict accordance with the attached instructions. Its excessive amount will lead to the "burnout" of the system. Thus, cracks may appear. The reinforcing mesh must be located above the pipes. Due to this, the operating load will be evenly distributed. At present, one can often find recommendations that supposedly the grid can be located directly above the pipes. However, in this case, the implementation of its constructive role is not possible. The fact is that it is convenient to fix pipes to the grid. This is done using plastic clips. So, we can conclude that the presence of a mesh under the pipes does not eliminate the need for its location directly above them. As for the floor finish, this material must be marked on the possibility of its use in a floor heating device.