Patchwork was widespread back in the mid-19th century, when machine production of chintz and cotton fabrics began. Thrifty housewives with shreds left from sewing clothes decorated shirts, women's sarafans and dresses, sewed blankets and pillows, and other household utensils. Craftswomen in the villages made three-dimensional pictures of the remains of the fabric by folding the figures in half or four. Crafts from braids of fabric laid in a spiral looked interesting.
In the 20th century, the art of patchwork in our country was not very popular, but now everything has changed dramatically. Masters from the United States turned sewing from shreds into a whole art. Many patchwork techniques have appeared, each of which has its own distinctive features.
In the article, we will consider several patchwork master classes with a detailed description of the work. You will learn what types of patterns exist, how to prepare fabric, how image elements are sewn together. We will also tell you how shaggy patchwork is done. These are original and voluminous crafts, mainly in this way either do rugs or blankets.
The basics of technology
The patchwork quilting master class for beginners will begin with an introduction to the materials and tools for the job. If you use the remnants of fabrics after sewing clothes or old things that are in the wardrobe, you need to sort them by texture and match by color. Then, from the existing shades and fabric pattern, a sketch of the picture for sewing is made. To work already on the shreds, they make a drawing of one of the image blocks. We will consider this issue in more detail later in the article.
If you decide to embody the drawing you like in the product, then when choosing fabric in stores, start from the color scheme of the picture. It is necessary to carefully consider the combination of the thickness of the fabric so that the craft looks homogeneous. Typically, for patchwork, cotton, linen or calico, thin chintz or satin are used, that is, natural fabrics that do not stretch. This is an important aspect that cannot be ignored, because the seams in the finished product must be smooth and clear.
Materials for work
Before studying the patchwork quilting master class, you need to familiarize yourself with the materials necessary for such delicate work so as not to be distracted during the sewing process, running to the store for missing trifles. First of all, you need to have a large working surface for cutting and folding small parts into a drawing. In addition to the prepared fabric and threads selected in color, you will also need such tools:
- Roller Knife. If you are sewing a product for the first time, then you can use large sharp scissors to begin with. However, if you like this technique, and you will often make patterns of shreds, then it is more convenient to work with a roller knife. The cut is smooth, without steps, which greatly facilitate the stitching of elements together.
- Pins with beads at the end for connecting small pieces together before sewing on a typewriter.
- Sewing needles with thread.
- Pencil.
- Chalk for transferring a pattern to a fabric.
- Cardboard or durable paper to complete the template.
- Pattern outline.
- Scheme of one block.
- Sewing machine for stitching parts into one fabric.
Sometimes in needlework stores you can find ready-made quilting kits for beginners with a master class, photos and diagrams. But if this is not the case in your city, you can find a wide variety of patterns on Internet sites. Basically give a sample of one block. These are a few details of a repeating pattern inscribed in a square of a certain size. Its value depends on the figure and composite figures. Using this method, it is most convenient to fold the overall pattern, because most often the pattern is repeated on a patchwork quilt or other product.
If you are a beginner, we can advise you to watch several programs of Tatyana Lazareva with a patchwork sewing workshop. She talks in detail about the intricacies of working with fabric and describes sewing options from scraps of a wide variety of products. These are bags and purses, cosmetic bags and blouses, jackets and skirts, blankets and decorative pillows, rugs and simple kitchen potholders.
Fabric Stages
According to the drawn scheme, it is easier to draw a picture. A cardboard template is prepared for each element, which is transferred to the fabric with a pencil or chalk. Be sure to leave allowances of 0.5 cm on all sides for stitching parts. When the fabric is cut, the elements are laid out on the work surface in the selected order.
According to the patchwork quilting workshop, the small parts are connected first with pins, then with basting stitches and finally attached on a sewing machine. As noted earlier, work is performed in blocks of 3-4 parts in each, uniting into squares. When all the blocks are sewn, they are attached to one large canvas.
If the details consist of rounded parts, have a floral ornament or a complex large pattern, then the remaining corners at the edges are complemented with a plain fabric so that the canvas acquires a rectangular or square shape.
Varieties of elements and types of patchwork
Over the years, the patchwork technique (a master class for beginners is considered in the article) has been enriched by many varieties and combinations of small elements. We list some of them:
- Traditional patchwork. This is a stitching of a web of geometric shapes - stripes, squares, triangles and rhombs.
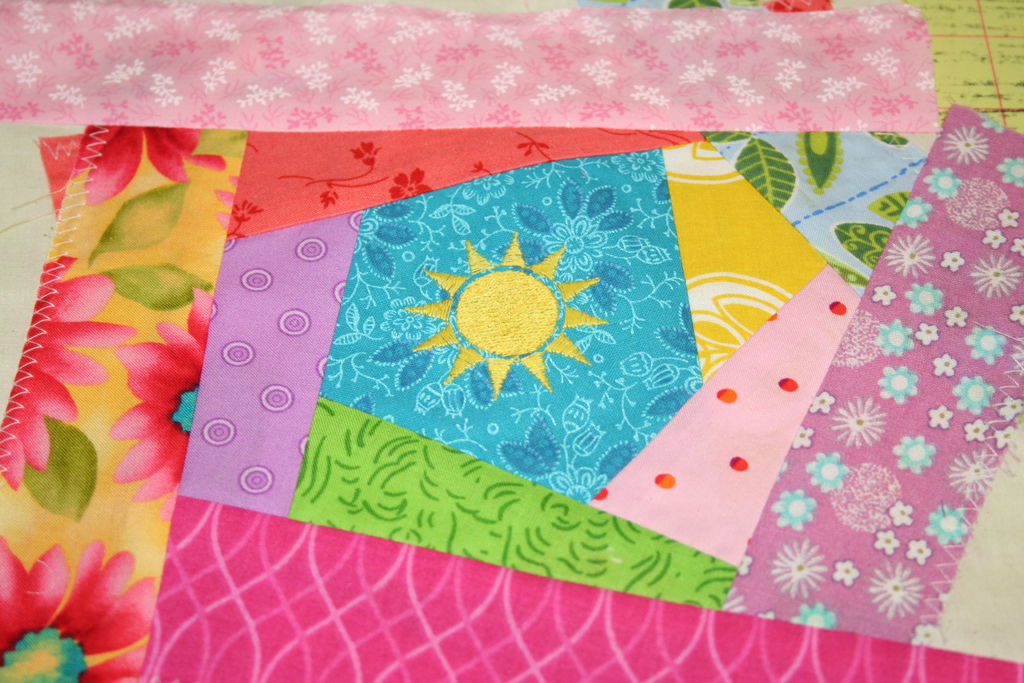
- Crazy, which is translated from English means "crazy." In this style, the drawing is done in different directions and has a non-standard shape of the parts. It can be curved stripes, trapeziums, circles sewn in any shape. Often the seams are hidden under the edges or thin strips of fabric.
- Snail. Of the small details, a twisted spiral shape is formed that resembles the structure of a "house" of a snail.
- Japanese patchwork. This is a very complex kind of patchwork. Product details are incredibly small, made of silk with decorative seams. Wall panels in this style look beautiful.
- Knitted patchwork. All parts are joined with yarn using a crochet hook.
- Quilting. This is a special style, mainly used for making blankets. All seams are made quilted and winding. The sewing machine performs lines of any configuration, for example, the shape of puzzles or rhombs, arbitrary twisty lines (popularly, such a seam is called “brains”).
- Shaggy patchwork. This is an original sewing of patchwork with seams outward. We will touch on the intricacies of this type of patchwork later in the article.
Crazy Patchwork
Let's take a closer look at the Crazy Patchwork sewing workshop. As you already know, this kind of patchwork has an arbitrary configuration of elements. Blocks are drawn on a sheet of square-shaped paper in full size. On each element, the number of the stitching sequence of the parts between themselves is placed. It is advisable to prepare a color template by painting with pencils all parts of the workpiece so that the correspondence of the color scheme of the picture is immediately visible.
The block diagram is transferred to cardboard, and all details are cut with scissors or a roller knife. Then each is circled in chalk, transferring the pattern to the fabric. Be sure to leave 0.5 cm to the seam allowances. Carefully sew the parts into even squares and then combine the finished blocks into a common pattern. You will get a large canvas, from which you can subsequently sew any product.
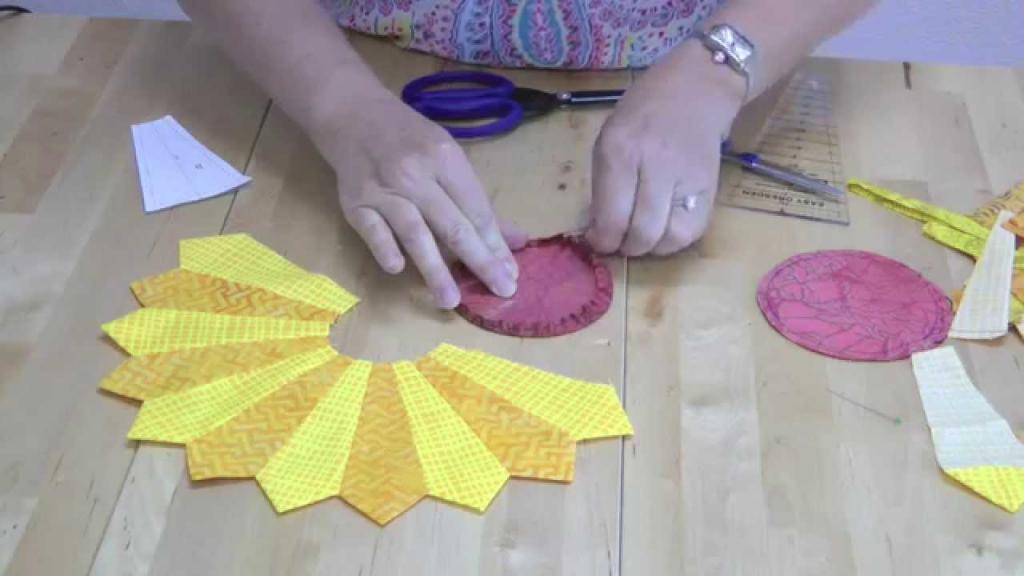
Spiral blocks
A patchwork quilting workshop - a variant of a snail - has similarities with the previous job description. The drawing is first drawn on the template. Each spiral of a snail has its own color. Three spirals of brown, beige and white colors, which are composed of several separate parts, are clearly visible in the photograph of the sample below. These are triangles and trapezoids, rhombuses and rectangles, combined together in a snail. Each detail in the figure is indicated by a Latin letter. An apostrophe with one or two commas indicates a similar part, only cut out of a fabric of a different color.
This patchwork sewing technique for beginners, the master class of which is described in the article, requires special accuracy and care in such painstaking work, because you need to make a lot of the smallest details into a single whole. Remember to leave the required strip on all sides for seam allowances. When all the blocks are assembled, they are sewn together into a single fabric.
Volumetric Cubes
So, the master class of patchwork sewing of cubes involves drawing up a drawing using a protractor. One volume cube is made of three multi-colored parts, combining the shades of the fabric - light, darker and darkest. All parts are represented by rhombs, the acute angles of which are 60 and the obtuse ones are 120. It is most convenient to draw one dense template, and then cut out all the elements from it. Be sure to leave fabric for allowances.

Lay out the rhombuses in the correct order on the table. Light and dark details create a volume effect. It is advisable to assemble cubes from different fabrics, although identical blocks will look beautiful. Many experienced craftsmen use white paper linings cut to the pattern to make seams correctly. The fabric is wrapped around the paper blank, and then stitched on all sides with stitches right through the paper. Carefully fold the matter in the corners of a rhombus or any other part. The finished element is attached to the neighboring one to see a more complete picture of the picture as a result.
Shaggy patchwork sewing workshop
The mats and blankets created in such an original way of stitching details as in the photo below in the article are unique. For sewing, not only fabrics for the front and back side of the product are used, but also several layers for internal filling. So, to sew a blanket with squares of different colors, lay out a bundle of details of cotton fabric. Between them, squares of flannel are laid on each other (4 layers were used in our sample). A total of 6 layers of fabric. According to the experience of many masters, the best products come out, in which the flannel acts as a filler. Some use batting or synthetic winterizer, but after washing, such rugs or blankets are covered with a layer of dangling threads or pieces of batting. It is necessary to manually clean the product with a brush. Flannel is a strong, soft and warm layer.
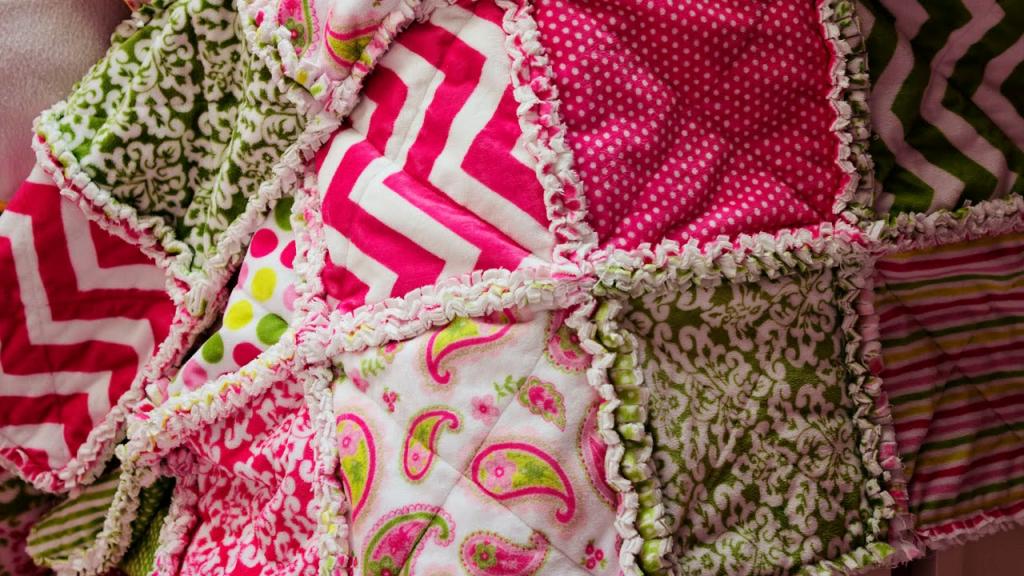
A pack of square-shaped parts for strength is first sewn diagonally. Then all the tight parts are seamed up, leaving 2.5 cm for allowances. To create the necessary shaggy by patchwork, all strips of the outer seams are cut with “noodles” with scissors. The back side of the craft is smooth. This multilayer blanket is very warm, but its cost is also high. Therefore, experienced craftsmen conduct a workshop on patchwork of old things, for example, using a flannel of diapers for a grown child, husband’s cotton shirts or old bedding.
How to sew a blanket
Next, we consider a master class patchwork sewing a warm blanket. As a filler, a rolled synthetic winterizer is used. First, they cut out according to the patterns and sew together the details of the pattern from shreds of fabric of different colors. You can work only on the front side of the blanket, and make the back side plain. To warm the product for stitching, lay out three layers:
- The first consists of flaps.
- The second is a synthetic winterizer cut to size.
- The third is the back of the blanket.
Next, the workpiece will be quilted over the entire surface, performing any selected seam. It is easiest to make seams with rhombuses or squares, but you can sew a quilt using the quilting technique, that is, cover the entire surface of the product with patterned stitches. When all the plans are completed, they make the final edging around the perimeter of the product. For this purpose, you can choose any material used for patchwork. It will be interesting to look like a blanket with a rim purchased edging in a contrasting color.
Cosmetic bag
Knowing how to connect patches using the patchwork technique, you can easily sew a fashionable bag or wallet. Let's look at a master class of patchwork sewing cosmetic bags on a pattern consisting of three parts. This is a rectangular shape of the side and the bottom in the form of a strip with rounded edges.
You can sew a cosmetic bag from any dense fabric or artificial leather. Draw a drawing on a piece of paper. It is advisable to use a long strip on top of the sidewall, in the area of sewing on the “snake”. Along the perimeter of all parts of the pattern you need to leave 1 cm of allowances for the seams. After completing the front part of the craft, make a similar pattern from a plain fabric for the inner lining of the cosmetic bag.
When all parts of the front part are connected, a lining is sewn. Check to attach it the right side. At the end, “zipper” is sewn and the cosmetic bag is decorated with small elements. In our sample, wooden beads and flowers of different colors were used.
In the article, we examined sewing products using the patchwork technique. As you already understood, this is a simple, but very time-consuming process that requires attention and accuracy.