From early childhood, we are taught to make a variety of paper crafts with their own hands. In kindergarten, we ineptly made a bouquet of paper flowers for mom, in elementary school we glued a voluminous house.
Even with age, the creation of interesting paper crafts can be a good leisure or a wonderful gift for the holiday. Mothers will especially appreciate a handmade gift, no matter how old their children are. What can be done from paper, and how to surprise and please your relatives, you will learn from this article.
Crafts from colored paper on March 8 do it yourself
The main holiday of all women, on which homemade paper crafts are most often presented, is, of course, on March 8th. Why not make women and girls of your family a paper bouquet? To do this, you only need:
- PVA glue or glue stick.
- Colored paper, instead of it you can use ordinary office color sheets for printing. They have a more pleasant, light shade.
- Thick cardboard.
- Scissors.
There are two ways to design such a bouquet: in the form of a card with opening buds or in the form of a volumetric bouquet glued to cardboard. In order to make voluminous crafts from colored paper (on March 8) with your own hands in the form of a picture, you need:
- Cut a flower template from thick cardboard and transfer it to colored paper. Make 6-8 flowers of different shades and sizes.
- Cut a vase from paper and stick it on a piece of cardboard. In order for the vase to be the same on both sides, it is better to bend it in half and cut out the shape.
- Now place the flowers on the sheet without sticking, create a beautiful composition.
- Fix the flowers on paper with glue.
- Glue the stamens inside all the colors. You can make them from finely chopped paper or small paper strips.
- From green paper you need to cut the leaves. It looks beautiful when greens are made of paper in different shades of green. Also, leaflets are best done in different sizes.
- Now you need to glue the leaves between the flowers.
- The final touch will be to add a beautiful bee or butterfly.
Such a craft will not leave indifferent any representative of the fair sex.
Volume paper crafts
Very impressive look products with volume. It is very simple to make them if you print in advance templates for paper crafts. It remains only to glue them along the specified lines and you can give or decorate the desktop. These are two templates with funny characters that need to be printed on a printer, cut along all lines, and then glued according to the scheme.
In addition to such a charming pink panther, you can make the main favorite of all anime fans, namely the fun Pikachu.
If it is not possible to print ready-made templates for paper crafts, you can go the other way and do voluminous work on the basis of sheets of colored paper folded into a cylinder.
Paper Crafts for Preschool Children
DIY paper crafts perfectly develop motor skills, a sense of taste, the ability to create a composition, as well as logic and thinking. What can be done so that it is not only very useful, but also interesting for the kids? For example, you can make a hairstyle, which you then independently and change. To do this, you need:
- Draw a head with a face on paper.
- Cut strips of paper. It looks interesting when the color of the paper does not match the actual hair colors, as well as when all the strips are of different shades.
- Now you can apply two methods: make harmonica from strips and stick them in this form or twist the strips with scissors.
- All strips should be glued on the head as a voluminous hairstyle and, if desired, give the child the opportunity to cut them with scissors.
You can also create a huge number of applications, which, with developed imagination, are limited only by the amount of materials. You can cut out all the details for crafts separately and stick them on paper in the form of a house, a man or, for example, a teddy bear. And you can cut geometric shapes of different colors and experiment: let the child himself add anything from them, and only then fix it on paper.
An excellent activity for the evening will be the creation of light paper crafts - a weirdo who loves to read books. In order to do it, you will need:
- A sheet of white paper.
- A sheet of colored paper.
- Glue.
- Scissors.
- Pencils or felt-tip pens.
Work Stages:
- Fold the A4 sheet in half and cut.
- Fold one half in half and ask the child to draw the cover of his favorite book.
- Now divide the sheet of colored paper into two parts along the long side. Cut it. You got the blanks for the body, arms and legs.
- Divide one of the halves of the sheet into three more strips along the long part. These are two strips for legs and one for two hands.
- Take a thick strip of colored paper, which serves as the body of the Freak, and bend a small section on it - a strip about 5 centimeters in size - it will be hair.
- Now glue one of the thin strips on the back of the body - the hands of the Freak.
- Glue the legs from below and bend each of them with an accordion, so that they hang out funny.
- Now draw a freaky face and cut the paper on the folded part to create a bang effect. You can stick there a bow cut out of contrasting color paper.
- Glue the book to the hands of your freak.
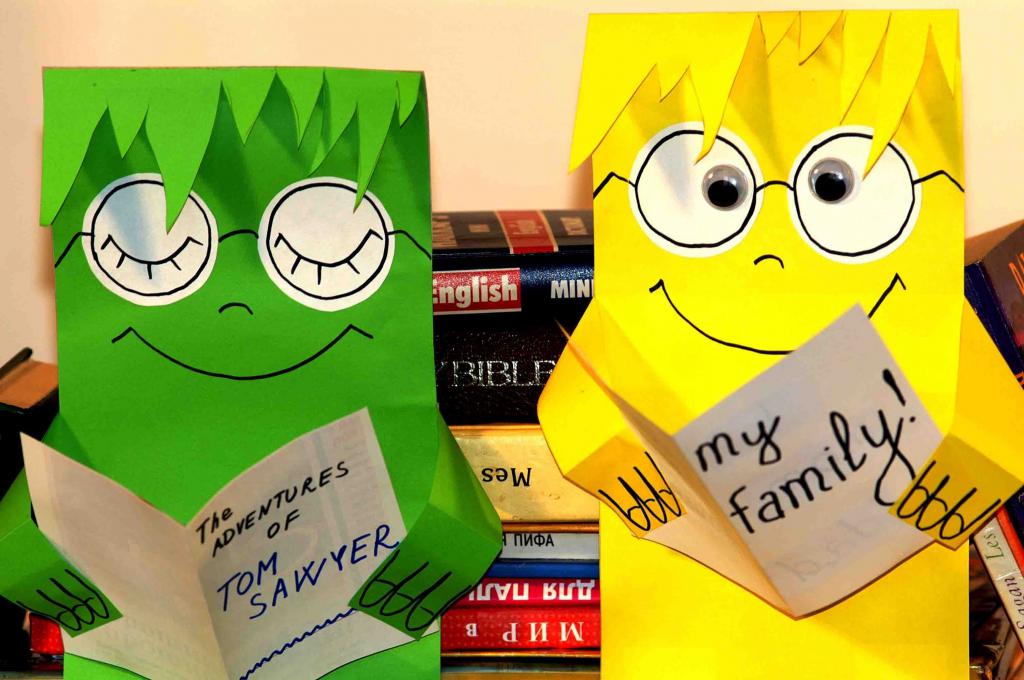
You have a charming and unique book lover that will remind your child that reading is good. Such a handmade paper craft can be hung on the wall or planted on the baby's desk.
Crafts from toilet paper bushes
An excellent material for light paper crafts are toilet paper sleeves. After the roll is finished, do not rush to throw the sleeve out, it can make an interesting and funny little thing. You just need to add some details. See what wonderful crafts come out when fantasy connects to the creation.
You can also make a craft - an animal with ears. To do this, simply bend the sleeve on one side to get the corners sticking up. Then color the sleeve in the color of the desired animal. Wait for the paint to dry and add a muzzle.
Wall panels and paintings
An interesting technique for paper crafts is quilling. It is made of thin strips of paper that are wrapped in all kinds of bizarre shapes. Crafts made in this technique can decorate any interior. And if you want, you can replace the paper with chopped sleeves from toilet paper. They can be useful not only for creating children's crafts, but also for such a wall panel.
Doll on a paper hand
If you want to make voluminous paper crafts, then you can try to build a doll for a home puppet theater. To do this, you will need paper bags, as well as colored paper, glue, scissors and felt-tip pens.
Instruction:
- To get started, find a ready-made paper bag or glue it yourself.
- Then cut out all the details of the future doll.
- Place the parts on the mug of the toy and fix it with glue. The muzzle of the animal itself should be at the bottom of the package.
Now put the bag on your hand and arrange a presentation for your household.
Here are a couple of do-it-yourself paper bag doll ideas for dolls. On their basis, you can create any character in a fairy tale or cartoon.
What can be done from white paper
Even if you have only white paper for creativity, this is not a reason to deny yourself the pleasure of doing something with your own hands. Crafts from white paper are a real space for creativity: if desired, they can be painted with paints or felt-tip pens or left as is.
White flowers look very tender, with which you can then decorate the room or use them to decorate gifts. The flower captured in the photo consists of small cones. In order to do it, you need:
- Cut circles of the same diameter. It is convenient to do this with an ordinary glass, circling its neck.
- Twist the cone out of the cup and fix it with glue.
- Repeat this with all the circles.
- Cut a large circle - the basis for the future flower.
- Stick the outer row of small cones.
- Moving to the center, glue in rows of petals.
Origami paper crafts
Origami is the addition of a sheet of paper into various shapes without the use of scissors and glue. To create such crafts, you do not need anything at all except paper, which means they are ideal for situations where you do not want to take away the consequences of creativity for a long time or there is simply nothing on hand but a paper sheet.
Here are some simple schemes according to which anyone can make simple DIY crafts from paper.
Such a charming dog can be made literally in 5-10 minutes, and to occupy yourself for another 10 minutes, you can create such a frog-hopper.
Crafts made of paper are a great way to entertain yourself, at the same time spend time with your child. They will help to remember childhood for yourself. You can master many techniques and ways to create interesting compositions to decorate your home or to please a loved one.