Modern plumbing equipment has a rather complicated design, so the most acceptable option would be to invite a qualified specialist. However, it will never be superfluous to know the technology by which the installation will be carried out. Thus, the installation of plumbing equipment is as follows:
1. The
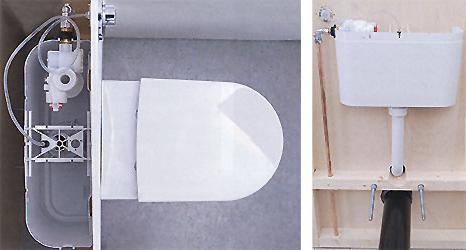
installation of the toilet traditionally begins with the installation of a frame on which this plumbing element will be mounted. It is at this stage that the height of the entire structure will be determined. The most common way of attaching to the floor and wall at the same time in the intended places. An important point is that the installation of a
hanging toilet is necessary only after completing all repairs in the bathroom.
2. The next step will be the installation of a drain tank. To do this, bring the water pipe to the tank. Specialists themselves choose the location of the input: side or top. Their choice is based on how it will be more convenient to bring the pipe to the inlet fitting. You should pay attention to the life of the tank and toilet. This is necessary in order to select wiring with a long service life. If the service life of flexible wiring is shorter, then it is forbidden to use them.
3. Next, you need to connect the sewer. Installation of the toilet implies ideal cases in which the sewer outlet is connected directly to the riser. Such cases are quite rare, so most often this connection is made using corrugation. At this stage, it is important to accurately measure the distance from the pipe cut in the wall to the surface of the tile. It is also necessary to ensure that the installers wrap it with duct tape before cutting the pipe. This will prevent possible line cuts. After the rough installation of the toilet bowl is completed and it is connected to the riser, it will not be superfluous to pour about three liters of water into the tank in order to check the serviceability and tightness of the structure. Only after these events can you proceed to
install the installation.4. Finishing work. They are produced by installing waterproof plasterboard sheet with a thickness of 12.5 mm in several layers. At the same time, installers use wall profiles, and also make an inlet on the entire sheet of drywall from 3 to 5 cm. All these measures are auxiliary, since it is quite difficult to connect drywall with an iron frame. A
soundproofing material can be laid between the wall structure and the wall
, which makes the operation of the toilet quiet.
5. The final stage of installation is the installation of plugs and drain buttons. Moreover, the latter can be of any design and configuration. Therefore, when assembling and installing it, you must be guided by the instructions that are attached to it. Traditionally, it is installed either in the upper part of the tank or on the side panel. This will provide quick access to the tank in case of repair. It is important to check the correct operation of the push rods, as well as the accuracy of their adjustments.
The most pleasant and crucial moment is checking the work done. To do this is quite simple: sit on the toilet, tear off your legs from the floor. Nothing falls off, no springy vibrations? So, the installation of the toilet was done correctly. Then drain the water several times and wait until it refills the tank. There should be no leaks.