Quilling technique is carried out by many experienced craftsmen, as well as people who have first tried themselves in this art form. This hobby captures the first time, I want to do one more craft right away, to master the ability to create new figures. What is quilling? This is curling paper strips with a metal hook. It would seem that it can be monotonous and monotonous. However, there are an incredible number of different types of crafts made in this way.
The shelves themselves differ not only in color, but also in the thickness and width of the paper. For crafts, you can find in the needlework stores many different sets, selected according to the color scheme. For starters, you can practice quilling colors. This is the easiest way to learn how to crochet and form parts from stripes. In addition, for the crafts you can choose from many.
In the article we will consider the quilling of colors for beginners with a photo, we will figure out how to make petals and leaves for flat and three-dimensional images. We also advise what materials you will need to get to begin with, how you can replace professional tools for crafts so as not to be wasted on the first samples.
Tools and materials for work
If you decide to try your hand at the art of flower quilling, then first buy a set of strips for your first job. You need to start training with the simplest winding of tight and hollow skeins. To begin with, you can not buy a metal hook, but use a toothpick or a wooden skewer with a slot made at the end of the knife.
A strip of paper is inserted into the slot and, by turning the stick, wind the desired length onto the skein. For flower quilling, you will need to twist many identical parts - petals or leaves. In order for them to be the same size, it is more convenient to use the template ruler. It has many holes in the form of circles of different diameters. How to use this tool, you will understand from the following story.
First steps in learning
To learn how to perform color quilling, for beginners, you can advise you to practice twisting tight tight hanks. Even in this way, you can make the first crafts, and voluminous. To begin with, we will use a simple toothpick. The middle of such a flower, as in the photo below, is made of yellow and brown stripes. The first strip is attached to the toothpick and, holding the paper with your fingers, begin to wind it tightly around the stick.
The flowers using the quilling technique will be neat if you evenly attach the edge of the strip to the last turn. PVA glue is used for work. Only thick and fresh material will do.
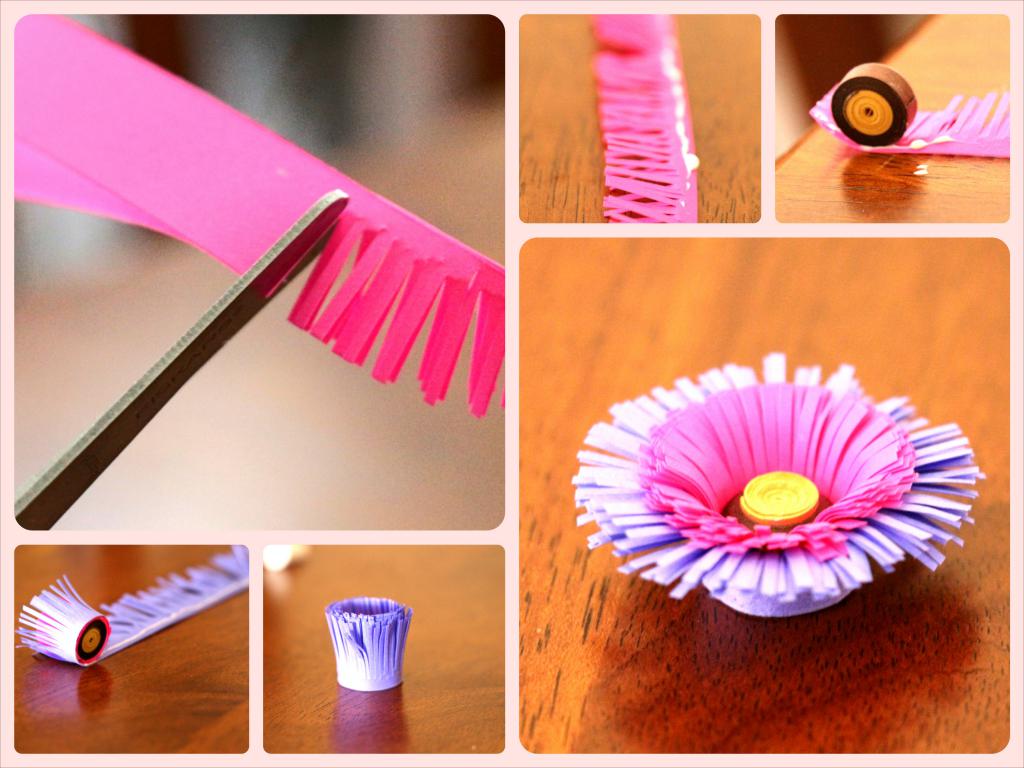
Then brown is glued onto the yellow strip and winding continues to the desired thickness of the part. If one strip is not enough, then the second is taken and attached to the edge already wound, and the movement continues. When the middle is ready, broad strips of pink and lilac are taken to create the petals. You will need scissors to work. If you are doing the quilling flowers with your own hands for the first time, you will have to prepare for a long and meticulous work, because you need to cut one edge of several strips with thin “noodles”. The action does not take place until the end of the paper, as there must be a small distance for winding. When you love flower quilling, you can purchase special scissors for this procedure. They have several blades and with one click on the handle a lot of “noodles” are cut at once.
Flower formation
After preparing all the details, work begins on twisting the wide strips. The edge of the wide paper is attached to the dense skein of the flower core and begin to rotate the toothpick around the axis, pressing the paper with your fingers.
Multilayer quilling flowers look beautiful (photo of the samples above), in which stripes of paper have not only different colors, but also strip widths. When pasting finished crafts on cardboard, they glue the back side with glue and gently press down with the palm of your hand so as not to wrinkle the "noodles". It is also carefully leveled around. You can supplement the image in the picture with a green stalk. To do this, you need to smear a green strip along the end part and put it on the flower from below. Surprisingly, the strip will remain “standing” in place. In the same way, you can put a few leaves, for the manufacture of which the paper needs to be folded in half.
Using the template ruler
Consider how to make flowers from paper quilling for beginners in another way. It does not require tight winding of strips, the actions are more relaxed, without tension. The photo below shows what a professional quilling hook looks like and a pattern ruler. The holes are designed to adhere to the same size in all components of the flower.
Consider the example of composing a flower, as in the sample below. It is necessary to create five identical elements. They must be clearly the same size and shape, otherwise the flower will look asymmetrical and messy.
For each petal, two strips are required. First, the first strip is loosely wound onto the hook, then another is glued onto its last edge, and the manipulation continues. Then you need to insert the craft into one of the holes in the template ruler. Only then can the hook be pulled out. In the hole, the paper spreads freely and becomes the size we need. Apply a drop of glue to the brush and gently apply it to the edge of the strip. Then we press down with our hand this place for fastening the elements.
Thus, the desired number of blanks is manufactured. To get elongated petals, the workpiece after gluing is pressed with two hands. For this, the thumb and forefinger of both hands need to be pressed down from the opposite sides of the workpiece. After squeezing, the paper will retain its shape until the end of the job. Then the petals are placed on the cardboard in the correct configuration and glued. PVA glue is spread on the back with a thin layer. The glue should not get into the middle of the skein so that the strips inside the craft do not stick together.
The middle of such a flower can be decorated with a dense skein (you already know how to do it according to the previous description) or marked with a bead, as in the photo.
Making a simple postcard
As an example of flower quilling for beginners, you can step by step offer to perform a holiday card with one flower. A double-sided colored sheet of A4 paper is folded in half and a white cover is pasted onto the cover side. It is made of smaller paper so that the burgundy base is visible from all sides.
For each petal we use only one strip, so the element will turn out to be less full and will look openwork. First, each strip is wound on a hook and lowered into a template ruler with a large hole. Then the skein is removed and the paper straightens. The edge of the craft with a brush is smeared with a thin layer of PVA and pressed to the last turn. Then the workpiece is removed from the template and pressed with two fingers on both sides. If you want to create a thinner petal, increase the finger grip force. How to do this, described in more detail earlier, will not be repeated.
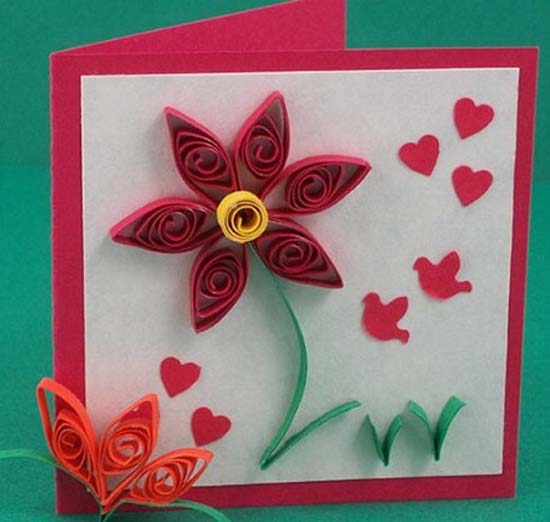
When six identical blanks are made, place them with sharp edges at one point and attach them, spreading PVA with glue. From a green strip by bending, we perform a stalk with a small leaf. Attach it, starting from the gap between the petals, and at any angle, if desired, you can beautifully bend the strip. You already know that glue is applied only to the end part. For the part to attach, you need to carefully press the palm onto the sharp edge of the strip with your palm. Never push the paper or push in order not to wrinkle the stalk.
The middle is created from one strip of yellow. The smallest template is used to make a small circle. The middle is glued on the second tier to the petals. If desired, you can decorate the corner of the postcard with a red shamrock.
Options for making petals
Quilling of flowers for beginners includes in its assortment a huge number of options for making petals. Consider some of them on the sample below. All the petals are initially made according to the standard procedure - winding one or more strips of paper onto the hook, then a template on the ruler is selected to the required size and the blank is inserted into the hole. Only after the edge of the petal is fixed, it is possible to begin to form it. Pressing with your fingers may look different.
How to make a flower from quilling, we will consider further in the article. You already know that the shape of the petal is created by pressing it with your fingers. Thus, you can create a semicircle and a triangle, the shape of a droplet and a heart, square and crescent-shaped. Shapes can be made equilateral and with an elongated one edge. There are elements that are often used by craftsmen, and there are rare details. Interesting quilling flowers are obtained from the unusual shape of the petals. For example, if it is necessary to create long and thin petals of an aster or chrysanthemum, then they can first be flattened into a thin strip, and then bent by a wavy line.
Looks nice petals made up of several colors. The middle is mainly created by dense skeins or from noodle-cut strips.
Inner filling of the petal
Petals look very impressive, the inside of which is assembled from several delicate details. The sample below shows that for the manufacture of such a flower, free blue hanks are first twisted, and then each droplet is shaped like a droplet. Having connected two "drops", they wrap the whole structure several times with a yellow strip. The petal is ready!
After all five petals are collected, you can begin to collect the flower together. To make voluminous quilling flowers, parts are glued with only one central part. The edges are straightened up. The inner hole between the petals is closed by a center made of a wide yellow strip cut by "noodles".
Volumetric flower
Even one beautiful flower can give a unique beauty to a greeting card. You are already familiar with the techniques for making petals. Leaflets in this sample are made on the same principle. Let us dwell on the assembly of voluminous crafts. After manufacturing, the first step is to place the flower petals on the cardboard. To make them look voluminous, a substrate is made of a large dense skein of blue. The quilling petals created are already pasted onto such a circle. After the glue dries, the edges bend a little outward. The central part of the flower is filled with three identical yellow skeins.
The stalk is made as usual from a thin green strip. PVA we smear only the end part of the paper. It remains to twist the three green leaves, crush them on both sides with your fingers, making symmetrical ends, and attach on the different sides of the stalk.
Placing parts on a cardboard sheet
Creating a floral arrangement of quilling stripes, you can arrange the details as desired. The easiest way is to make a flat picture in which all the elements are located on the same level. However, everyone understands that if parts are arranged in tiers, the image will become voluminous and more spectacular.
Flowers can be attached to each other with offset. To raise the flower above the level of the base surface, use the method described above for making a substrate of tight coils. Their shade should match the main color of the plant. The leaves near the flowers can also be glued either evenly or at any angle. If you worry that the part will not be able to stay in this position, it is better to use a glue gun.
Quilling basket
After you have learned the basic ways to work with quilling strips, you can try to create a light craft in the form of a basket. First you need to cut the base out of durable cardboard. Corrugated packaging material can be used, only for brightness it is necessary to glue it with colored paper. Then there will be painstaking work on the manufacture of tight hanks. You need to make a lot of them, with different colors and thicknesses. Combining the elements, the basket will look original.
After all the details have found their place on the cardboard mug, you need to cut a pen out of brown cardboard and stick it on the basket. It remains to decorate it with skeins of tightly curled paper, and flowers. Not for nothing that you and I learned to make them. You can dream up and try to create a butterfly. The principle of manufacturing parts is similar.
We hope that the article helped beginner craftsmen figure out how to make simple flowers from quilling stripes. As you can see, even inexperienced craftsmen can create beautiful crafts, postcards, and even voluminous interior items, knowing just a few ways to twist parts.