Hand embroidery is one of the indispensable participants in almost every model show. Having gained popularity centuries ago, this type of decorative needlework remains at its peak until now. Almost everything is embroidered with embroidery - from clothing to interior items. Apply a large number of stitches. Fashion designers and talented seamstresses spend more than one day figuring out how to embroider. Half-cross, cross, stitch, rococo, winding or stitches - each technique requires a lot of perseverance, attention and patience.
It is impossible to make mistakes in such works - each technique is specific in that even a small mistake will catch the eye not only of specialists, but also of ordinary consumers. For example, the technique of semi-crosses with uneven and incorrect location of oblique features can significantly spoil the appearance of the product. Instead of a neat, even picture, confusion will turn out, the work will look messy.
Types of Stitches
There are a lot of varieties of stitches in needle embroidery. Most of the canvas is usually filled with a classic equilateral cross. However, there are patterns in which, in addition to classical stitches, there is an incomplete cross, a bextich, 1/4 and 3/4 cross, and also French knots. Each type of stitch is directly related to cross-stitch, so each embroiderer has to master most of them over time. To understand how to embroider a half-cross, it is necessary in detail and carefully. The smallest mistakes in embroidery will cost hours of remaking the canvas.
Cross stitch technology
The cross-stitch was familiar to most from childhood - many grandmothers hung on the wall a carpet with deer, hand-embroidered. This is an incredibly painstaking work, which not everyone can appreciate. To learn how to embroider a cross, you need to master the skill of laying threads.
To work, you need a canvas ("Aida" or "Len-32"). Canvas is a type of base for embroidery. It is dense and durable, the holes into which the needle is inserted are clearly visible. Some craftsmen use canvas that is pulled out of work by a moto to work with fine-woven fabric. This is how they work, for example, with white fabric and white threads - the canvas is used in a contrasting color so that white on white does not tire the eye.
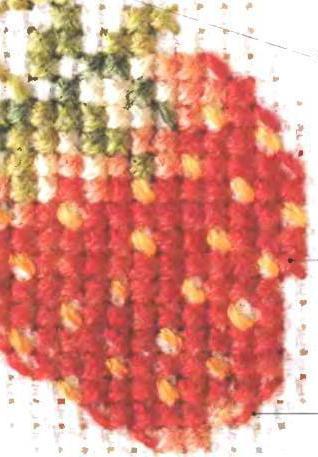
Needle direction
To perform a traditional cross, you need to take a needle for embroidery (it is thinner than a classic and sharper) and a thread. Embroider with threads specially designed for this. They can be purchased at needlework stores. It’s easy to figure out how to embroider a half cross. The technique is simple.
The first stitch is sewn on the selected canvas. To do this, a needle with a thread from the wrong side is injected into the lower left corner of the square. Then the needle tip is inserted from the front to the inside in the upper right corner. On the front part, a diagonal stitch is obtained, directed from left to right. From this point, from the wrong side, the needle is brought to the lower right point on the front side. Then the next diagonal stitch is laid - from the right lower point to the upper left. The needle is brought out. The result is a traditional cross.
Sewing a number of crosses
If it is necessary to embroider a series of crosses, then the number of oblique lines is first necessary, for example, to the place of the color change, and then stitches in the opposite direction are laid from above in the reverse order.
With this embroidery technique, on the seamy side only straight sticks with rare longer transitions will be visible - this is how row changes will be displayed. Most masters eventually come to the conclusion that sometimes you can sacrifice the beauty of the wrong side so that the front part looks beautiful. This can be especially true for embroidering half crosses.
Half Cross Stitch Technique
In fact, a semi-cross is obtained when the first stick for a full cross is embroidered. When the needle moves from the lower left corner to the upper right, an inclined stick is obtained, which is a semi-cross. The needlewomen of the whole world agree that each technique can be changed to the needs of the master. In order to deal with embroidery and not get messy in the pattern, you must carefully read the description of the scheme.
Half Cross Features
It’s not enough to figure out how to embroider a half-cross. For beginners, the method of work often becomes incomprehensible. Embroidery with this technique has many features and technological nuances, which are useful to know before starting work.
How to embroider in a half cross so that the work looks beautiful:
- For different parts of the pattern, different stitches can be used. Before starting work, it is important to carefully read the instructions. It is considered the main slope from left to right, this is the bottom of a full cross. However, there are drawings in which different inclinations are applied simultaneously.
- This embroidery technique shows the flaws of the front side very clearly. Do not allow flaws. The first and last stitches should be especially carefully embroidered.
Certain nuances associated with needle movements:
- Due to the frequent movement of the needle, interruptions may occur. In order to prevent the thread from twisting, it is sometimes necessary to release the needle to hang freely. So the wound thread will unwind, and the embroidery will look beautiful.
- To fix the thread from the wrong side, a larger number of stitches will be required than with classical embroidery.
You can embroider in this technique not only in a straight line, but there are nuances:
- Embroidery may be visible. In order to embroider one dark cross surrounded by light ones, it is better to make several stitches in the same place, but take the thread in a finer fold. In this case, the end of the thread, which will then be passed under the bright ones, will not be noticeable and will not spoil the pattern.
- Finding out how to embroider a half-cross is easy. It is important to ensure that the result of the work is not spoiled by the embroidery frame. At breaks or termination of the process, you need to remove the frame, hoop and any auxiliary tool. Even with a careless hand you can move the thread.
- The work may change shape depending on the pitch of the stitch. In a baguette workshop this can be corrected.
- When using a canvas, you should avoid over-tensioning the half-cross. Otherwise, holes will appear at the puncture sites.
Embroidery direction
Everyone will be able to figure out which way to embroider a half-cross. The main thing is that the front part should be even.
In order to advance diagonally with half-crosses, it is necessary to withdraw the needle not in a straight line, but at an angle, shifting slightly in the diagonal direction. Then you will get an even line from half-crosses directed in one direction.
Partial cross
In addition to the notion of a cross, there is also a combined half-cross. It is easy to embroider, but some skill is required. Depending on whether the upper half or cross is lower, the needle is inserted and the first stitch is made. Consider the upper half-cross. How to embroider it is easy to understand. There may be left or right upper or lower crosses. The first stitch is made from the upper left corner. The needle tip is pierced into the lower right corner. Then part of the cross is embroidered. To do this, the tip of the needle is displayed in the upper right corner and inserted into the middle of the cell.
The upper and lower half crosses should, like any cross, have the same direction of the upper stitch. If the first long stitch is made from the bottom corner, then all stitches in this row should start the same way. Often they try to embroider a small part first, and only then cover it with the long side. To do this, first do the same as embroidering in a half cross. For the upper combined cross, the needle is first inserted from the wrong side into the upper left corner. The tip is pierced not at the bottom point, but in the middle of the square, at the place of interlocking of the four strands that make up the canvas cell. Then the needle is withdrawn from the wrong side to the lower left corner. After that, the needle enters the upper right corner and is displayed in the middle or lower left corner of the next element.
Most of the fabrics that are used as canvas, do not allow you to closely monitor what part is embroidered in a combined cross. Due to the movement of the fibers, it turns out that the strands are shifted, and the large and small dashes are butt. An important point: you must ensure that a large line overlaps a small one and there are no spaces. If you stick the needle too far from the intersection of the fibers of the canvas cell, then a protrusion may form in the middle, which will be visible. Thus, in one cage, from which one traditional cross is obtained, 4 small ones can be embroidered.
Application of techniques
Having figured out how to embroider a cross and a half cross, you can start working on paintings with partial embroidery. These types of stitches are used in order to more realistically convey the texture on the image, to qualitatively draw facial features or to make the transition from one color to another smoothly.
The combined half-cross looks very nice. How to embroider it, you can see on the schemes. In combination with traditional techniques, such works look nontrivial and realistic.