Thinking of learning how to weave from beads, but don’t know where to start? Preferably with something simple. For example, from flowers. They can be used as room decor or decoration. Below you will find a scheme for weaving orchids from beads.
We prepare materials
In order to make a flower, of course, you need beads. Moreover, it is desirable to use high-quality material. What's the difference? In cheap beads, a lot of marriage comes across, that is, half the bag will have to be thrown out. Quality material will retain its attractive appearance for many years. But small, cheap beads will quickly burn out, fade and may even change their color, for example, from water.
We will make an orchid on a wire. Why not fishing line? The wire bends well, and due to this, it will be easy to give the finished product any shape. But the fishing line does not have such properties.
To cut the necessary pieces of wire, you will need wire cutters. It is better not to use scissors for this purpose, because they can be easily blunted.
To make an orchid from beads, a weaving pattern, of course, is needed. It needs to be printed and kept in front of your eyes. This will facilitate the work and help to avoid many mistakes.
Make a flower
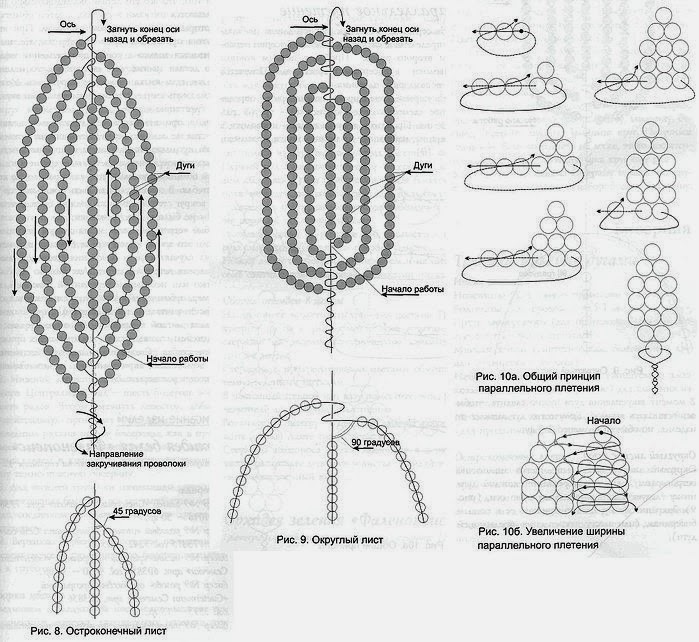
The scheme of weaving orchids from beads is given above. It is on it that we will be guided in the process of work. We start the creative process with making petals. First we make 5 large blanks, and then 3 small ones. Let's get started. We put 36 beads on the wire, divide this amount in half, through the central bead we thread the end of the wire. It should be an oval. Now we put another 18 beads on the working end of the wire and thread our working “thread” through the bottom of the workpiece. Now you should put on 22 beads and fix them on top, then 22 beads are fixed on the bottom. This creates a petal of the desired size. We make 5 large blanks according to this scheme, and then proceed to the production of small ones. In our scheme of weaving orchids from beads for beginners, detailed instructions are given. We put bead on the wire and fix it in the middle, threading the ends of the working “threads” crosswise. Now you should put on 2 beads, fix them with a wire crosswise. The next row - 3 beads, then again 3. Now, in the reverse sequence, we make a narrowing. Similarly, we make 4 petals.
Make leaves
This part is made according to the same pattern of weaving orchids from beads, which was given above. Only in this case, it is necessary to lay not the conical shape of the sheet, but round. The finished product should look like a long oval. Some needlewomen do not adhere to realism and make leaves according to the same pattern as the petals. Thus, the details differ from each other exclusively in color. But it’s better not to do that. Unless, of course, the needlewoman does not have to save on beads.
Collecting an Orchid
When all the parts are ready, you can begin to connect them. The scheme of weaving orchids from beads can be put aside, it will no longer be needed. The first step is to prepare blanks for work. To do this, two wires of each of the parts must be twisted into a bundle. Now collect the middle of the orchid. We twist the wires of small petals together, and then we add large details there. If you think that the resulting wand looks unreliable, and this may well be, if the wire was thin, then you need to strengthen the frame with a wooden skewer. Wrap a wire around it, and then decorate the stem with green threads. Now you should "plant" the flowers in a pot and attach leaves to the base of the stems. You can decorate the craft with twigs or artificial butterflies.