New Year decorations are made of paper very easily and as a result, a light and airy decor of the rooms is obtained. We offer you several workshops on creating holiday crafts.
Origami Santa Claus
We suggest starting with the manufacture of paper Santa Claus, which can be hung on a Christmas tree, used as decoration for postcards, and so on.
Instructions on how to make Santa Claus:
- Take a square sheet of tissue paper. It is advisable to take a leaf with one side of red and the other white. If this is not the case, then take two sheets and glue them together.
- Lay the paper with the red side up and fold it in half to make a triangle.
- Expand the sheet, turn it over with the back side and lay it so that you face a rhombus.
- Fold the top down.
- Lift the half of the folded end up.
- Unscrew the triangle and bend its small tip.
- Fold the triangle over the folds.
- Wrap the bottom of the rhombus.
- Bend the end down, as in Figure 8.
- Flip the shape.
- Wrap the sides of the part slightly.
- Wrap the left and right sides to the middle of the figure.
- Tuck the ends as in illustration 12.
- Wrap the left wing, as in illustration 13.
- Lift the bottom of the right side.
- Place the raised part in the formed pocket.
- Do the same with the left wing.
- Turn the figure over (Figure 17). You got Santa Claus out of paper.
- Draw a face.
Craft is ready!
Paper cones
Decorations made of paper look very beautiful on a Christmas tree in the form of cones. Making them is pretty easy, the main thing is to have the right shape at hand. It can be a foam ball or oval, a Kider-surprise egg, and other similar things.
Take a big hole punch and make a lot of confetti. It is desirable that the resulting circles were about two to three centimeters in diameter.
Take the mold and use the glue gun to stick the finished circles on it. Start at the narrower end. Glue so that the half circle is free. Each new row begins over the previous one. When the bump is done, attach a small loop of ribbon and glue the spruce twig.
The second option is bumps - pendants
To make a bump in a slightly different shape, you will not need a hole punch, but you will also need an egg-shaped base.
Operating procedure:
- Cut a square out of paper and bend its left and right sides to make a triangle. In this case, you need to leave a small piece from the bottom (see above for the presented diagrams).
- Make many more similar blanks from paper.
- Take the shape and stick the four blanks on the narrow end so that they touch their vertices at one point.
- Glue the next layer of blanks. It should begin immediately above the previous one, and the top of the triangle should be located between the two previous elements.
- Stick all the rows in this way.
- Attach a ribbon.
The cone for the Christmas tree is ready!
Paper christmas wreath
To make paper decorations on the door, you need to take sheets of cardboard or cardboard rollers, a glue gun and scissors.
The procedure for the manufacture of wreaths:
- If you have cardboard rollers, squeeze them a little and cut circles of equal width.
- If you have sheets of cardboard, then cut them into strips of equal width and length. Then glue the edges of the stripes to make rings, and then squeeze them so that the ovals come out.
- Glue together five ovals with sharp peaks. As a result, you should get a flower.
- Make a lot of similar flowers.
- Glue the flowers into a circle. Choose its value arbitrarily. Each flower is inserted into the previous one between the petals.
- Make the wreath smaller.
- Stick a smaller wreath on a larger wreath.
- Decorate the finished wreath with beads in several places.
Craft is ready!
Christmas tree made of colored paper
Of course, this craft will not replace a living forest beauty, but it will cope with the role of the subject for interior decoration. It can be placed in a room where there is no real Christmas tree, on a festive table, in the hallway.
Instructions on how to make a Christmas tree from colored paper:
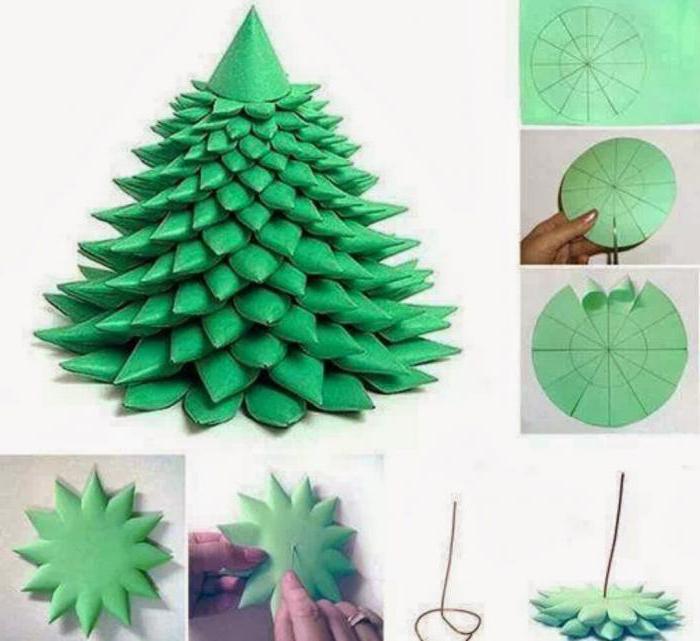
- Take a piece of thick paper or cardboard green.
- Draw a circle with a compass, and in it, in the middle, another one.
- Draw several lines through the center that divide the circles into sectors. Remember that the more divisions, the more “branches” your tree will have.
- Cut the circle along the outer contour.
- Make some similar blanks. Each new part should be a couple of millimeters smaller than the previous one. The number of blanks depends on how tall your Christmas tree will be.
- Make cuts with scissors in divisions to a circle inside.
- Wrap the notched parts to form a cone and glue the edges.
- Turn the part over.
- Do all the other elements in the same way.
- Pierce the first part with the wire in the center.
- String all other constituent elements onto the wire, like a pyramid: first there are more details, then smaller ones.
- Correct the rows so that the "branches" do not overlap each other.
- Make a small cone and place it on top of the Christmas tree.
Craft is ready!
Volumetric paper monkey
Using thick double-sided tape, you can make funny voluminous paper monkeys. Cutting patterns will simplify the task, but if there are none, then it's okay. To make the craft, you need to choose sheets more tightly or take cardboard.
Master class how to make a monkey-3D:
- Take a suitable paper and draw on it the elements that the monkey will consist of. For example, you want the monkey, the head, legs and tail stand out. Then these elements are drawn separately from the body.
- Next cut out all the details.
- If you used white cardboard, then color the details of the monkey.
- Now you need to connect all the elements. To do this, take a double-sided thick adhesive tape and cut several small pieces from it. Glue them to the joints and stick the parts. It is worth noting that the 3D effect of the craft is achieved by superimposing one part on another.
Volumetric paper monkey is ready! It can be hung on a Christmas tree or decorated with a birthday card.
How to make paper volumetric snowflakes?
There are several ways to make voluminous paper snowflakes. Here is not the most famous. Craft made in this way will look very beautiful and unusual.
A master class on making volumetric snowflakes is given below.
- Take two sheets of square shape.
- Fold each leaf so that it takes the shape of a triangle.
- Wrap the sheets again in a triangle.
- Cut the curved part from one triangle, as shown in Figure 3.
- Then make two more cuts on the right and left sides, repeating the edge of the figure.
- Expand the detail.
- Wrap the middle cut out part on each petal under the first one, as in illustration 6.
- Make the same flower from another triangular blank.
- Align the second element of the snowflake so that it is flat.
- Rotate the first flower 45 degrees relative to the second and glue it on top.
Unusual snowflake is ready!
The second way to make a volumetric snowflake out of paper
The most popular way to make voluminous paper snowflakes is as follows.
- Take five equally sized sheets of square-shaped paper.
- Fold one leaf in half so that you have a triangle in your hands.
- Make cuts as in the diagram above. The more cuts, the more magnificent the snowflake will turn out. The recommended amount is three to five.
- Uncover a sheet of paper.
- Now carefully wrap the cut out central rhombus and glue its edges.
- Flip the shape.
- Glue the edges of the next rhombus.
- So, in turn, turn the figure over and glue the edges of each rhombus.
- When one part is ready, proceed to the second. Similarly do all five elements.
- Now you need to glue everything together. To do this, just drip glue on one end of the part and glue the other to it. So glue all the petals together.
- If you have a large snowflake, then you need to additionally glue the petals in the middle between each other.
Volumetric snowflake is ready! This craft will look great as a wall decoration or chandelier.
Christmas ball
Master class on how to make Christmas balls with your own hands:
- Prepare paper patterns for cutting. To do this, draw twelve circles with a compass. You can take any paper except cardboard. The toy will look best if you take colored sheets or for decoupage.
- Contour the drawn circles.
- Stack your blanks and bend them in half.
- Spread the stack of circles and fasten them with rubber or wire at the bend so that they do not crumble.
- Now, using glue stick or thin double-sided tape, start gluing segments of circles, each time alternating the junction.
- Spread the ball.
Craft is ready! To make it easy to hang on a Christmas tree, attach a ribbon or thread.
What else can be made of paper jewelry?
You can make a lot of decorations from paper: various figures, decor elements, Christmas tree pendants, and so on. Sheets can be folded using the origami technique, glued together, and cut out schemes.
Sometimes surprisingly beautiful things come out of paper. For example, if you take decorative cardboard or sheets for decoupage or crafting and just cut out some New Year's silhouettes (ball, deer, Christmas tree, star, Santa Claus and so on), make a small hole with a hole punch or sew and sell a beautiful ribbon or twine, then you get amazing Christmas tree decorations. It is enough that moisture does not get on them, and such crafts can easily be stored for more than one year.