The Vladimir surface is a well-known embroidery in which stitches are applied to the material, completely filling the entire surface of the fabric. In another way it is called Vladimir Verkhoshov. It was invented by the masters of the Vladimir region. In ancient times, there was no other way to decorate your clothes than embroidery. Russian craftswomen with the help of a simple needle and threads created unique patterns. This is a complex art requiring perseverance and attentiveness. In each family, the wife and daughters provided their entire family with clothes, and each girl prepared a dowry in a chest in advance.
For each locality in Russia there was an original embroidery inherent only in this territory, which had its own characteristics, color schemes and ornaments. Over the years, embroidery techniques have improved and acquired new details, but the originality and features have been preserved.
History of Vladimir embroidery
Satin stitch embroidery by Vladimir seam has ancient historical roots. During excavations conducted by archaeologists studying the history of the Vladimir-Suzdal principality, scraps of clothing with beautiful embroidery were found. The front side was sewn with long stitches, but only the contours or light dashed lines were visible from the inside, and some details even had ironing elements attached. This is when long stitches are attached to smaller ones.
Sewing on linen products was done with gold threads. A study of the history of the region led to the conclusion that it was made in the XVIII-XIX centuries by the nuns of the monastery of St. John the Gracious, located 100 kilometers from the city of Vladimir in the village of Mstera. It is these craftswomen who are considered to be the ancestors of the Vladimir suture with a smooth surface.
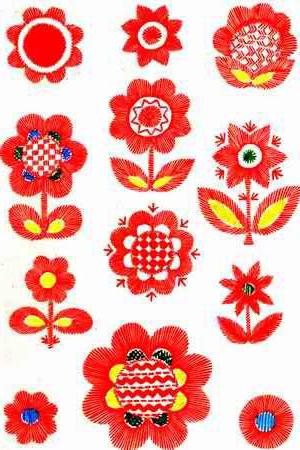
Residents of nearby villages and cities learned the art of embroidery from these nuns. But ordinary people no longer sewed with gold threads, which were very expensive and valuable, but replaced them with red ones. The patterns contained large flowers and leaves, which were embroidered with long stitches, the middle was filled with patch nets.
Red flowers were combined with centers made by other bright shades of blue and green. Allowed elements of yellow, brown, black and beige.
Embroidery Features
In ancient times, expensive gold threads were used to embroider the clothes of noble persons. In order to save, most of the threads were on the front side of the product. On the inside, small dotted lines were visible , barely visible to the eye. That is why the Vladimir expanse was also called the upper seam.
Its main difference from the rest is one-sided sewing with small stitches. Elements are both large and small stems or thin branches.
Various elements are made in a special way. For example, leaves, birds, flowers and other large details are embroidered with satin stitches, nets are used for the middle, the stalk is made with a stalked seam.
Distinctive features
Although from ancient times the Vladimir surface was improved a bit by masters, it nevertheless retained its main feature - one-sided embroidery. The theme also remained the same. These are mainly plant elements, sometimes you can find birds. The color scheme is also quite recognizable. Most often floristic ideas come across in red and white. This uniformity is diluted with small elements of blue, green or yellow.
Masters of the Vladimir surface use woolen threads, a mouline thread, which are folded in several layers, you can also find iris threads.
In most cases, the work makes a border of crosses or other ornaments, such as bushes or tassels and other repeating elements.
Types of Stitches
- Stroke. Sews in long stitches on the front side.
- Bilateral smooth surface. The mouline thread is sewn in the same way, both on the front side and on the inside.
- Smooth with flooring. If you want to make the element voluminous before embroidery, stitching is done on the flooring, that is, the material is stitched along the contour of the pattern with simple stitches, then the surface is sewn on top, directing the thread from the middle of the element to its edges.

- Paws. This is an embroidery that resembles bird tracks (hence the name of the seam). They often fill in the gaps in large details.
- A seam "forward needle" is made as a flooring for volumetric parts.
- "Stalk" seam. Such embroidery is used in embroidery of Vladimir stitch for making thin branches or stems of flowers. With a needle, pierce the fabric at the top and diagonally.
- "Goat". Very similar to cross-stitch. The stitches intersect above and below the stitch of the previous and next. The size of stitches the master chooses spontaneously, at will.
How to embroider stitch
For Vladimir smooth surface use white embroidery and smooth surface one-sided and two-sided. As the name implies, only white threads are used for white embroidery. Embroider the pattern on top of the flooring. To do this, first all the contours drawn with a pencil are stitched with a “forward needle” seam, then a floor is sewn that completely covers the surface of large flowers or leaves with stitches. A pattern is applied on top with white threads. Stitch embroidery "Vladimirskoe sewing" is used to decorate bedding: duvet covers, sheets, pillowcases, towels, etc.
Stitch in this embroidery all major elements are stitched. Sewing starts from the sharp end of the leaf or petal and passes in the direction from the center of the part to the edges. You can clearly see examples of seams on the old Russian embroidery "Vladimir surface" on a sample of stitches in the figure in the article. However, when the flower shape is formed, the stitches of the surface are sent from the part outline to the center.
Overhead mesh
Images of the flower have a large hollow center, which in this type of embroidery is filled with patch nets. The middle of the flower consists of symmetrically located small elements: squares, stripes, wavy lines, triangles. Between them can be paws or goats.
Sometimes the middle of the cavity is filled with long stitches located either horizontally or vertically. A cross is often formed at the intersection. A feature of this embroidery is that all the elements of the grid are filled symmetrically, evenly.
Preparation for stitch embroidery
Before embroidering stitch, you need to prepare. This is conveniently done using special tools. To choose the right thread, you need natural light. Light should fall on the left. Do not allow threads and needles to lie on the table. Everything should be put in place to quickly find the right tool if necessary.
Necessary materials
- The cloth. It is better to take linseed. Unbleached flax is traditionally used.
- Thread floss or two-thread.
- A set of needles whose thickness corresponds to the thickness of the threads.
- Scissors.
- The hoop so that the fabric is well stretched.
- Soft centimeter for marking the main lines and contours of the pattern.
- Tracing paper, carbon paper, pattern samples.
- A simple pencil with a well-sharpened edge.
- Iron.
Embroidery Care
After the work is completed, it is still important to properly care for the product so that the embroidery does not deteriorate, does not deform. Wash the fabric only in warm water. Detergents can be used, but they should not contain bleach, then rinse well. If you wash in a typewriter, then the product with embroidery should be placed in a pillowcase or specially designed bag for washing delicate items.
There is one little secret. In order not to spoil the thing, it is better to twist the fabric through a terry towel. Ironing is only possible on the wrong side using a damp cotton cloth. It is better to iron on a soft towel. You can’t fold a damp cloth, you need to spread it and let it dry completely.