Tilda toys have firmly taken a niche in terms of domestic female hobbies. Now, every needlewoman must have a craft in this style, whether it be a doll or a little animal. We offer you to make a toy tilda-deer. A master class in tailoring such deer implies the presence of a bright and colorful fabric, preferably with patterns and floral prints.
Cute deer tilda
A master class with a description of how tilda-deer is sewn:
- The toy pattern consists of five parts: the body, legs, horns, ear and nose. Cut out all the elements from the paper pattern.
- Fold the fabric in half, attach a paper pattern and cut out the required number of parts. As a result, you should get two parts of the body, eight - legs, one nose, two - horns and four - ears. To make the toy more interesting, for the nose, ears and horns, choose a fabric of bright colors with a pattern.
- Sew together two pieces of ears.
- Connect the two parts of the body and put the finished ears in the right place on top between them. Sew the items together, leaving a small hole. Turn out a detail of a toy.
- Sew together the two parts of the horns.
- Sew four parts of the foot in pairs.
- Fill the horns, trunk and legs with filler and sew holes.
- Sew a nose on the body, and sew horns on the top.
- Sew legs to the body with large stitches to make a cross on the front side.
- For decor, you can sew a heart on a toy.
- Embroider black thread eyes.
The toy tilde-deer is ready!
Christmas deer
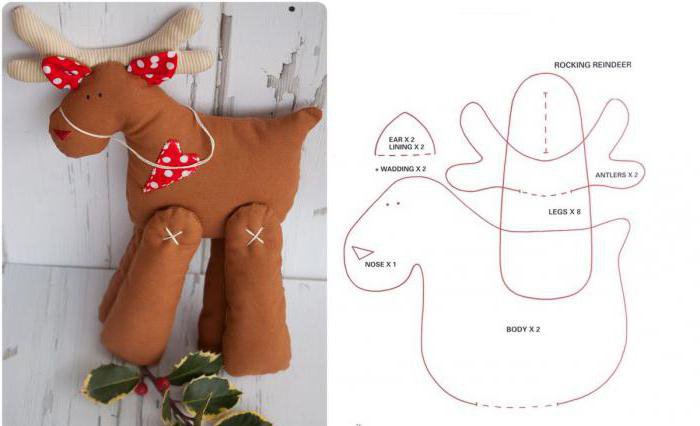
New Year's deer-tilda differs from the usual toy in two details - a checkered ribbon with a bell and a red nose.
The instructions will tell you how to make a toy deer:
- Cut out all the details of the pattern and transfer them to the fabric. As a result, you should get each element in two pieces, and the nose - only one circle.
- Sew all parts except the ears in pairs, leaving small holes.
- Turn out all the details and push the filler inside with a wooden stick or pencil.
- Spread the filler evenly over the entire part so that there are no lumps or bulges. As a result, you should get a slightly voluminous toy. Therefore, the filler layer should be a couple of centimeters, not more.
- Sew the hooves to the legs.
- Sew all other holes with a hidden seam.
- Sew together all the details of the toy. As a result, you should get a deer, as in the picture above.
- Connect the ears below and sew them to the head.
- Make a nose. To do this, put a little filler in the middle of the circle and pull the edges together with a needle and thread. After that, sew the ball to the face.
- Embroider a mouth with a red floss thread and make eyes with black beads.
- Sew a bow under the muzzle with a bell made from a wide ribbon into a red-green cage.
Tilda-deer: full-size pattern
If you want to make a bigger tilde toy, you will need to draw a pattern on a large piece of paper. The number of parts from which the deer will be sewn is as follows:
- two parts of the body with the head;
- four parts of the front legs;
- four parts of the hind legs;
- four parts of the ears.
The master class step by step describes how to make a tilde toy:
- Cut out all the details of the future toy from the fabric.
- Then sew the blanks in pairs. On the paper pattern, dotted lines indicate the places where the elements will be stitched together. So leave holes there.
- Turn out all the details and fill the filler inside. The finished toy must be stable, so put on a synthetic winterizer or other material tightly. Pay particular attention to the legs and torso. Fill a small layer of filler in the ears.
- Sew ears and legs to the torso.
- Take twigs and sew or glue them to the head instead of horns.
- Sew black bead eyes, make a spout and mouth with a marker or thread. Make up cheeks with cosmetic blush.
- The neck of a tilde-deer can be decorated with a ribbon, and its ends tied in a bow.
Craft is ready!
Fawn girl
Description of how to make a girl deer:
- Cut out two parts of the head, muzzle and four ears from the fabric in beige or brown.
- From a patch with a pattern, cut out two body parts with handles and legs.
- Sew together the head and body parts in pairs, leaving the holes below and above, respectively.
- Sew in pairs the details of the ears.
- Sew the triangles of the muzzle together, leaving the bottom unstitched.
- Turn out all the details.
- Put filler inside the body and head. There are many corners in the part, so use a wooden stick to make a synthetic winterizer or cotton wool evenly placed throughout the toy.
- Sew together the head and torso.
- Sew the muzzle by first placing a little filler under the part.
- Sew on the ears.
- Cut out a circle of colored fabric. Fold it in half twice and cut off the top. As a result, you should get a circle with a hole in the center. It will be a skirt.
- Put the skirt on the toy and sew it on. To hide the seam, you can tie a ribbon like a belt.
- Draw eyes and a nose, make horns, sew in button-beads.
The little deer girl is ready!
Simple deer tilda
Such a toy is made very simply, but it looks beautiful and can decorate the room. To create it, you will need to cut out two identical body parts from the fabric with the head and legs, and from felt or felt - one whole horns.
Then just sew together the two parts of the toy and fill in more filler. Sew horns with a decorative button. Tie a beautiful ribbon or lace around your neck.
It's just that simple to make a wonderful tilde toy.
Advice
- To make your craft look like a tilde, choose fabric in bright colors.
- It is not necessary to make the entire toy from one fabric. You can choose a brown or beige shade for the body and legs, and make ears and horns from shreds with a floral or abstract pattern.
- If the legs go as a separate part of the pattern, and are not sewn together with the body, then the junction can be original beat. For example, sew on top large beautiful buttons or ribbons (see picture above).
- Tilde deer can also be sewn from plain fabric. Then complement the toy with an interesting decor or accessory (for example, a ribbon with a bell).
- If you have a pattern of a tilde toy standing on four legs (a bunny, a cat, a sheep), it can also be used for sewing a deer. Just change the shape of the ears and add the horns.