In most cases, when it comes to antennas, people imagine large "plates" that are installed outside the window or on the roof of the house. However, it should be understood that this is far from the case. The fact is that the size of the antenna depends on what frequency and wavelength it will catch. Naturally, if you want to catch a satellite signal in order to broadcast several tens of television channels, then you will need a large antenna. But far from always you need such a signal. That is why it is worth considering such a thing as a 433 MHz antenna. This device is very different from those antennas that you are used to seeing on windows and roofs. It is very small and, as you can already see from the name, does not receive the longest wavelengths of the signal. Why can such waves come in handy? Most people do not pay attention to them, but if you like to fill your house with various items that work on the remote control, then you definitely need more than one 433 MHz antenna. If you learn to use their properties, you can create things in your apartment, such as a radio outlet or even a remote control feeder for your pet. Interested in? Then read the article further, and you will find out what this antenna is, how to use it, where to buy it, and most importantly, how to make it with your own hands if you do not want to spend money on a purchase.
What is this antenna?
So, first of all, you need to figure out what the 433 MHz antenna is. As you can already understand, this is a device that allows you to tune a specific device to a specific frequency, then interact with it. By installing the antenna in a specific device, you can then send it a signal at a specific frequency to activate this device and control it. This is a very useful feature in any home, as you can greatly simplify many processes. However, not everyone will be able to do something similar - you need to be well versed in this area to tune the instruments to the desired frequency. But if you set a goal, you can definitely achieve it. You just have to try hard and start by studying this particular antenna, as it is one of the most important elements. You should definitely know that there are three types of 433 MHz antennas: pin, helix, and etched on a circuit board. How do they differ? Which is better to choose? This is what will be discussed further. You have to find out what each of these antennas is and understand which one is best for your specific purpose.
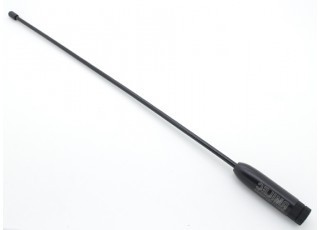
Whip antennas
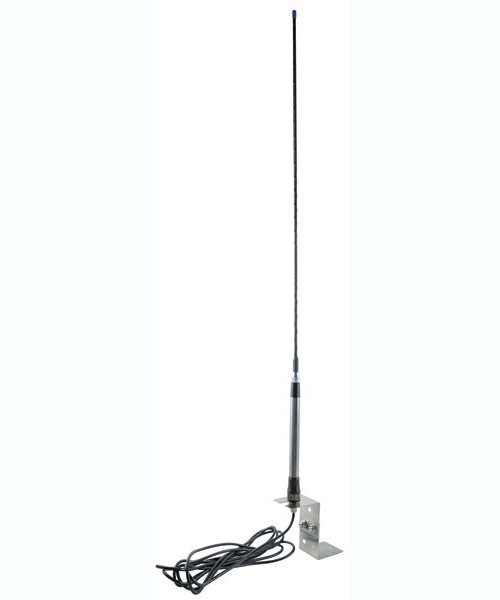
How can you get a 433 MHz antenna? Doing it yourself is quite simple, but you can also buy a finished one, which will cost you a little more, but save a little time. In any case, you first need to decide which type you want to get. And the first type that will be discussed is a whip antenna. Its main advantage is that it has the best technical characteristics compared to other types. That is why almost always people make a choice in her favor. Moreover, making it yourself is much easier. So in general, this is the best antenna at 433 MHz, made by yourself or bought in a store. However, you should not think that it is perfect. If this were the case, then there would simply be no need for other species. That is why it is necessary to separately consider the disadvantages that this type of antenna has so that you are aware of all the features before making a purchase decision.
Disadvantages of whip antennas

The first drawback that 433 MHz directional antennas have is environmental exposure. The problem is the very strong reflection and interference that occurs when you try to use the antenna indoors. Thus, it is more suitable for portable appliances, rather than for household appliances, as in houses due to the small amount of space, obstacles in the form of furniture and walls, the signal may be distorted, lost and not reach the target device. So, first of all, you should think about what purpose you are going to use the antenna for, and then decide on its purchase. However, this is not the only drawback of whip antennas that might initially seem ideal. It turns out that the pin in this antenna should be practically (or completely) parallel to the grounded plate on which the structure itself is located. As you can easily understand, in small household appliances it is very difficult to implement. Therefore, you could already realize that 433 MHz whip directional antennas are best suited for various portable devices of more or less large sizes or those on which the antenna can be mounted externally. At home, the use of such antennas is not recommended. But then why replace them? As you recall, there are two more types of such antennas, so it's time to pay attention to them.
Spiral antennas
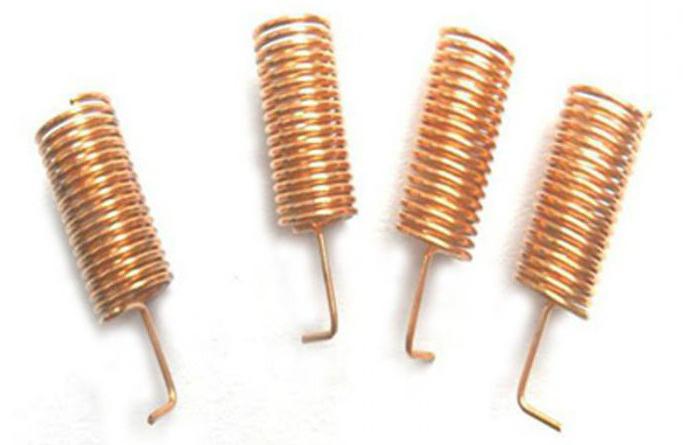
The easiest way is to give you a 433 MHz homemade whip antenna, however, as you can see above, it is imperfect. Therefore, it is worth paying attention to other types, for example, to a spiral antenna. How is it different from a pin? Firstly, it also has good technical characteristics, so in this regard, you can use both the first and second views with complete peace of mind. What about interference? It turns out that they are also present in enclosed spaces in a spiral antenna, and sometimes they are even stronger than in whip antennas. Therefore, it remains to take a look at the last parameter - compactness. As you remember, pin antennas should either be located on the device’s body or inside it, but there should be a lot of free space inside the device, which is difficult to achieve when it comes to small household appliances for home use. And in this parameter, the spiral antenna bypasses the whip antenna, because it is extremely compact and will allow you to make virtually every device in your home radio-controlled. Naturally, a homemade 433 MHz directional antenna made in this way will take you much longer, but if you are going to buy an antenna, then you should definitely look at the spiral versions, as they can come in handy and help you a lot.
Antenna on board
If you need a high-quality compact collinear antenna at 433 MHz, then you should definitely pay attention to this type, that is, to antennas that are etched into the board. This means that this type is impossible (or very difficult) to do with your own hands, so they will be considered exclusively as purchased. What are their advantages over the two types described above? First of all, they have good characteristics. Of course, not as impressive as the previous two options, but good enough for everyday use. Their main advantage is compactness - such antennas can be placed in absolutely any device. But, as mentioned above, their main drawback is that the 144-433 MHz dual-band antenna on the board, made by hand, is something fantastic. That is why this option will not be considered further for the reason that the rest of the article will be devoted to creating the antenna with your own hands. How hard is it to do? What is needed for this? You will learn about all this later.
Necessary calculations
But if you decide to make the antenna with your own hands, then you will need a lot of theoretical knowledge on this topic. The fact is that any deviation in the manufacturing process will not allow you to tune the antenna to receive a specific frequency. Therefore, everything must be done very accurately, so it is always recommended to start with calculations. Making them is not so difficult, because all you need to calculate is the wavelength. Perhaps you understand physics, so it will be much easier for you, since you will understand what is at stake. But even if physics is not your strongest side, you don’t need to understand what each variable means in order to make the necessary calculations. So, how is the 433 MHz antenna length calculated? The most basic equation you need to know is one that allows you to calculate the required length of the antenna. To do this, you first need to calculate the wavelength, since the antenna length is one fourth of the wavelength. Those people who understand physics can themselves calculate the necessary wavelength for a particular frequency: in this case, 433 MHz. What needs to be done? You need to take an indicator of the speed of light, which is constant, and then divide it by the frequency you need. As a result, it turns out that the wavelength for this frequency is about 69 centimeters, but with such a detailed setting it is better to use more accurate values, so you should save at least two decimal places, that is, the final result is 69.14 centimeters. Now you need to divide the resulting value into four, and get a quarter of the wavelength, that is, 17.3 centimeters. This length should be your 433 MHz J-antenna or any other view that you want to use. Remember that regardless of type, the length of the antenna should remain unchanged.
Use of received data
Now you need to use the data that you received in practice. The 144-433 MHz antenna can be done in various ways, however, the practical application of theoretical information should always be the same. What is it about? Firstly, you should always take the wire a few centimeters longer than the desired antenna length. Why? The fact is that in theory everything turns out pretty accurately, but in practice everything will not always work the way you plan. Therefore, you should always have some margin in case something goes wrong or the signal is not caught at the frequency at which you wanted. You can always easily bite the wire in a particular place when you determine the required length. Secondly, you should always remember that the length is measured from the place where the wire comes out of the base. Thus, the received 17 centimeters should be counted from the base of your antenna. Most often you will have to use a slightly longer wire, since you will need to solder your antenna. The 433 MHz whip antenna will work better the more you use the pins, so you should make sure that each one is the same length.
Preparation of materials
So, the theory is over, it's time to start practicing. And for this you will need to take everything you need to create your own antenna. First of all, this is the wire or rods that will make up the main receiving part of your antenna. Secondly, you will need a base for your antenna. It is advisable that it has several holes that you can use to attach the pins. If these holes do not exist, you will either have to drill holes, or solder directly to straight metal, which is not very convenient and will not allow you to correctly calculate the length in advance. Therefore, use a base with pre-made holes. Naturally, you will need other things, such as a soldering iron, for example, but everyone knows this, so it makes no sense to list all such items.
Performance of work
First of all, you need to prepare material for further work. To do this, all the pins you need to strip, tin and process flux. After that, you need to cut the pins to the required length, but do not forget to leave a little length, then to adjust the finished result. Then you need to take up the soldering - each of the pins must be soldered on the back of the antenna, and then take another one that will be attached to the antenna. Its length no longer plays a role, since it will fulfill the function of a holder and will not be responsible for receiving a signal. It also needs to be soldered, after which you can already admire the result of your work.
Final steps
Well, your antenna is ready to use. You just have to take the final steps. Cut the extra length of the pins so that the signal is perfectly received. If you have heat shrink, use it. And remember, this is just one example of a makeshift antenna. You can also make a spiral antenna, and the whip antenna in your design may look completely different. However, the calculations for obtaining the antenna length are relevant in any case, and the steps for creating an antenna with your own hands will also differ only in details.