Kanzashi is an original needlework technique that came to us from the East. Namely from Japan. The basis of this technique is origami, only in this type of needlework do not stack paper, but silk ribbons and squares. The result is very beautiful flowers that traditionally adorn the hair. It is not surprising that more and more fans all over the world take possession of this ancient Japanese art.
History of Kanzashi
This type of needlework arose thanks to Japanese geisha who complemented their kimonos with original make-up and flowers using the kanzashi technique. Daisies, roses, asters, chrysanthemums - this is not a complete list of the types of flowers that the craftswomen of that time made of silk. In Japan in those years, necklaces and bracelets were banned by women, so they adorned themselves using the kanzashi technique. Flowers (chamomile) turned out bright and unusually beautiful.
A silk daisy or aster, woven into an intricate hairstyle, immediately attracted attention and distinguished the girl from the crowd. At first, daisies made from kanzashi tapes in Japanese society were simply a fashionable attribute. Over time, such jewelry began to reflect social status, belonging to a layer of society, the presence of children and a husband. Translated from Japanese, "kanzashi" is a hairpin. This refers to a wooden, bone or metal hairpin on which a silk flower is attached.
Even nowadays, wearing kimonos, Japanese girls and women will certainly decorate kanzashi hair. Silk origami jewelry is also worn by schoolchildren, and Japanese brides decorate their hair at weddings.
The choice of colors for Kansashi, depending on the time of year
In Japan, for each month of the year its own hair ornaments are intended. Each month is associated with certain flowers and plants, which are usually reflected in the hairstyle.
- January is the month of bamboo, plum blossoms and pine.
- February is the time of butterflies, daffodils and tulips.
- March - peonies, butterflies and peach flowers.
- April is the month of sakura blossom.
- May - blue plants, usually wisteria and irises.
- June - cloves, hydrangea and weeping willow.
- July - a variety of flowers and plants, decorated with raindrops and dragonflies.
- August is a time of white and pink flowers.
- September - chrysanthemums, clover, dark pink bells and carnations.
- October is the time of red and white chrysanthemums.
- November is the month of falling leaves; maple trees are especially popular.
- December - white flowers motibans, pine needles, bamboo.
General principles for creating kanzashi
You can add square blanks to flower petals, or rectangular ones. The result is products of various shapes: sharp, oblong or rounded. By combining different colors, the number and shape of the petals, you can get a huge number of different types of flowers. Classic jewelry is created from silk and connected with rice glue. Modern needlewomen prefer more affordable materials - satin ribbons and a glue gun. So that the satin ribbon does not crumble during the manufacture of flowers, its edges are seared with a candle or a lighter.
Kansashi Tools
To make products from satin ribbons you will need:
- Satin ribbons of different colors and widths.
- Sharp scissors.
- Candle or lighter.
- Thread and needle.
- Adhesive for fabric.
- Tweezers.
- Finished hair clips, hairpins, hoops or elastic bands on which you will fasten finished products.
This type of needlework does not require special material costs, the main thing that is needed for work: perseverance, accuracy and the desire to do a beautiful thing with your own hands.
Kanzashi technique. Chamomile: a master class for beginners
Chamomile is a flower, which since ancient times symbolizes fidelity, love, tenderness, simplicity. Jewelry with such flowers, according to Japanese rules, is best worn in the summer, at the time of their flowering. In this master class, we will look at how to make daisies from kanzashi ribbons. So, we will consider all stages in order.
What does the kanzashi technique require of us? Daisies will turn out to be unusually beautiful in the presence of such materials:
- Satin or silk white ribbon 40 mm wide.
- Satin or silk green ribbon 13 mm wide.
- Yellow rhinestones for the middle.
- Crocodile hairpin or elastic.
- Lighter.
- Tweezers.
- Scissors.
- Ruler.
- Glue gun.
- White threads and a needle.
Operating procedure:
- To make chamomile from kanzashi ribbons, cut the white satin into squares.
- The use of fire involves the kanzashi technique. Daisies should not "bloom", so the side edges of the squares need to be burned with a lighter. Our flower will have 11 petals, respectively, we need 11 squares.
- We continue to create a masterpiece in the kanzashi technique. Daisies, as already mentioned, consist of squares, each of which must be folded diagonally.
- We turn the corners of the resulting triangle to the center.
- We bend the rhombus in half vertically with the corners inward so that we again get a triangle.
- With tweezers we take the workpiece parallel to the long side of the triangle. We cut off her right angle and burn with a lighter.
- We straighten the workpiece and get a petal.
- In the same way we do the rest of the elements of our flower.
- Now take a needle and thread and collect the petals in a daisy.
- From a white ribbon, cut a circle with a diameter of 25 mm. We burn with a lighter its edges. In order to make our circle smooth and beautiful, you can first make a blank from cardboard, and then circle it on a ribbon. A large button can also be used as a template.
- We take a needle and thread and along the edge of the circle we make stitches, pulling it into a ball. This will be the substrate for the petals.
- We begin to make green leaves. Take the appropriate ribbon and cut into pieces of 50 mm. For one chamomile, two pieces will be enough.
- Cut the leaf. To do this, simply cut off the corner on one side or circle the template of the cardboard leaf.
- We burn the edges of the parts so that they do not crumble.
- We collect the flower. Glue the petals to the substrate with a glue gun.
- Glue green leaves to the back side of the substrate.
- Fasten the back of the flower to a hair elastic or hairpin. To make the mount more reliable, we attach a thin ribbon to the substrate over the elastic band.
- It remains to attach the core of the flower - a yellow rhinestone.
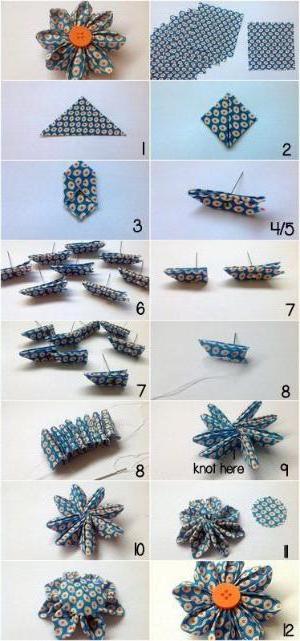
The figure above shows the process of creating a daisy flower in stages. Quite an interesting lesson is the kanzashi technique. Chamomile, the master class of which is quite simple, turned out to be gentle and magnificent. We hope you enjoyed our tutorial.