The metal tile can be called a truly unique building material, which is distinguished not only by durability, but also by its attractive appearance, and high strength, which manifests itself throughout the entire period of operation. It is made of steel sheets, which are coated with a polymer in the process. Special stamping made it possible to make the material look as if natural tile was used in the work. If the sheets are fastened using technology, then the joints of the sheets along the waves and rows will be invisible. You can use this covering material on pitched roofs, the inclination of which is 14 ° or more. Together with the metal you will have to purchase roofing strips, namely: valley, ridge and cornice. One can not do without flat sheets with the same coating, which has a metal tile. Using these additional elements, you can form aprons and other roof units.
Recommendations for fixing metal
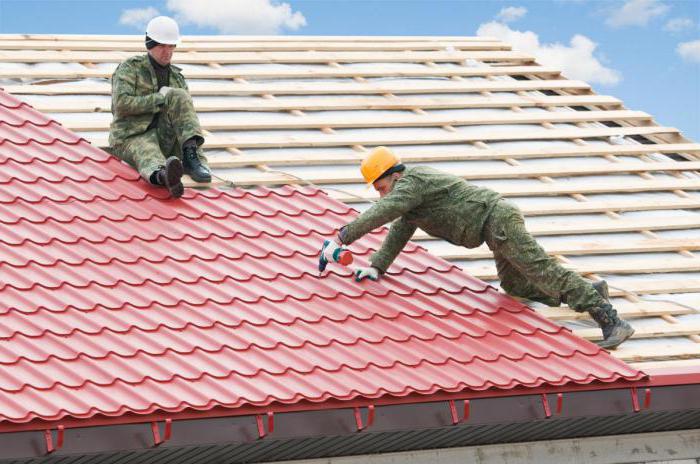
Before fastening a metal tile, you should familiarize yourself with the technology of work. Self-tapping screws should be used for this, the most common sizes of which are as follows: 4.8x35 or 4.8x28 mm. Fasteners must have a rubber gasket. In order to exclude the release of self-tapping screws on the surface, their hats are painted in the color of the covering material. When using a screwdriver, torque should be limited. After pressing is completed, the rubber gasket should only be slightly tightened. With insufficient torque you will not be able to achieve the desired degree of sealing of the hole. Otherwise, there is a risk of turning the screw, which will cause loosening of the fasteners. Among other things, in this case, the gasket will be deformed, which will shorten the life of the coating.
Wizard Tips
If you are thinking about how to fix a metal tile, you should remember that the self-tapping screw is located strictly perpendicular. There must be a 90 ° angle between the surface of the crate and the fasteners. The fixture when installing the sheet on the crate is screwed into the deflection of the wave. The bottom sheet to the starting bar is fixed with a spacing between the screws through the wave. Many novice masters think about how to fix a metal tile at vertical overlap points. In this case, you can not do without short screws, the screw length of which is 19 mm. This screw is installed in a wave recession. Along the perimeter of the roofing system , screws should be screwed into the deflections of the wave. The screws are staggered, they should be installed in each slat.
Features of fastening sheets
Self-tapping screws for metal will be used up in a certain amount. 8 pieces per square meter of coverage will be needed. You must also remember the need to fix the accessories, in this case, 3 pieces on each side will be needed per running meter. Accessories are fixed so that the screws are 350 mm apart. The scheme of fastening metal tiles with self-tapping screws involves the installation of fasteners in a transverse wave. When attaching along a ramp, the fixture should be installed in the upper ridge, then it is located through one wave. When installing fasteners, you should get rid of the resulting chips and sawdust. To do this, a brush with a soft pile is suitable. If you do not do this on time, then the chips will rust and spoil the appearance of the roof.
Features of fastening metal tiles with multi-row laying
Metal fasteners for multi-row laying can assume the presence of up to 4 sheets at the junction. If overlapping is carried out in the same row, an offset will occur. On the 10th cornice, it can reach 3 cm. This recommendation is true for the case when the anticapillary groove is located on the right. The amount of displacement during rotation should be approximately 2 mm. The scheme of fastening metal tiles with screws when installing the second and subsequent paintings suggests their location to the left and to the right of the first. It is necessary to start work on the side of the house where there are no bevels and there is no need to cut the sheets. Laying continues towards the abutment, which is formed by another ramp. You can also advance to the endow, which is located between neighboring slopes.
Mounting a metal tile with a triangular slope
The scheme of fastening metal tiles with self-tapping screws will be slightly different if the roof slope has a triangular shape. At the same time, the master at the first stage carries out marking, indicating the central part of the ramp, the axis is drawn through it. Further, the same axis should be marked on the roofing sheet. When laying, the axes must match. The sheet is fixed with one self-tapping screw, which is located at the top point. Then the work is carried out using the same technology as on rectangular roofs. When mounting on triangular slopes in the area of valleys, the metal tile must be trimmed. For convenience, you need to get an improvised tool called the dash. The scheme for fastening metal tiles with self-tapping screws provides for the use of four boards, two of which should be parallel to each other, while the other two should be perpendicular to them. The mount will be articulated, not rigid. The step between the inner surface of the left board and the outside of the right should be 1100 mm, this parameter is equivalent to the working width of the sheet of covering material.
Additional nuances
For work, a metal tile that needs to be sized is laid on a dash. One side of the instrument should be on the edge of the valley or ramp. When using this device, make sure that the transverse boards are horizontal.
Laying scheme of a metal tile with hidden fastening
If for work you decided to use a metal tile with hidden fastening, then for this you should take galvanized roofing screws with a press washer. For the reason that surface mounts will not be visible, galvanized screws can be used that are not painted in the color of the roof. The main difference is that there is no need to make through holes in the coating, because the self-tapping screw will be installed in a special groove. The canvases are fixed to each other by hooks of mounting protrusions and grooves, which are located at the edges. The place where the self-tapping screw will be located is hidden by the following canvas. There will be no fasteners and through holes on the surface. Thus, you will be able to create a sealed and more durable coating.
Mounting metal on the ridge and cornices
Self-tapping screws for metal are also used to design a cornice. Cloths must be mounted so that the lower cut extends 50 mm beyond the edge of the bar. This will allow rainwater to enter the gutters. To avoid overhanging the lower cut, the extreme lath of the crate should be 15 mm thicker than the others. Sometimes an abutment bar for a metal tile is installed on a cornice, it is necessary for water drainage. On the eaves, the material fixation units are located along the eaves line 8 cm below the stamping. In this case, the self-tapping screws are installed through a single wave. When the length of the upper cut of the covering material is more than 30 cm from the extreme line of stamping above the upper board of the crate system, it is necessary to install a subroofing board, its thickness should be increased. The master must provide a ventilation gap between the components of the crate system and its upper elements. The clearance should be 80 mm. The fixture is installed in the deflections of the wave of the extreme row of stamping, the distance between them will be equal to one wave. With a cut length of more than 130 mm, the upper part should be further strengthened.
Mounting metal around obstacles
An abutment rail for the metal tile should be installed around the pipe. It is attached to additional boards of the crate, which allows to obtain a continuous coating. To begin with, the master marks the junction lines of the lower bar, which should be located above the metal tile by 15 cm. Using a grinder, you should make a stroba along the line. The lower bar will be introduced into it. The very bottom of the apron is going to be the very first, after which you can go to the side parts. The lower apron is decorated with sheets of covering material, while the upper parts of the apron are installed on top. Elements are interconnected according to the methodology adopted in the implementation of tin works. To increase the tightness, silicone sealant should be used.
Installation of accessories: installation of a snow retainer
Accessories for metal tiles are presented for sale in a wide range. Among them you can find snow retainers, the installation of which is carried out in several stages. A pipe should be installed in the holes formed in the mounts. The snow retainer itself is fixed with screws to the crate at the bottom of the wave. And in order to ensure tight fastening of snow retainers on the metal tile, it is not necessary to organize a continuous crate. The places of fastening metal tiles with self-tapping screws were disclosed above, but for the successful completion of work it is important to know about the features of installing snow retainers, the installation of which is carried out in several stages. The next step will be the installation of snow retainer pipes, which can be arranged in one row, while they are joined one by one. These elements should be located above the doors and windows, as well as at different levels of the multi-level roofing system. If there is a sufficiently large length of the ramp, it may be necessary to install additional elements to retain snow. Sometimes a tubular snow retention system is improved by the installation of a bar, which eliminates the fall of ice crumbs. This element is attached to the crate at the top of the wave.
Accessories and screws
Roofing self-tapping screw with a drill, the sizes of which can be very diverse, is offered for sale in a wide assortment. Its dimensions can vary from 4.8x16 to 6.3x150 mm. These elements have an end in the form of a drill, which for installation does not provide for the preliminary formation of holes. With their help, it is possible to achieve compaction of the compounds. Installation is carried out to the metal frames of the roof. The thickness of the metal profile or sheet should not be more than 1.2 mm.
In addition to fasteners, you will have to buy a semicircular or straight skate, as well as a narrow one, which will depend on your preferences, a skate cap or the right bar. You will need a cornice strip, endova, as well as grooves. You need to buy an abutment and a smooth sheet, the last of which is used for finishing parapets and pipes.