Many people in our country have long been fond of the original art of folding paper of various figures of animals, birds, equipment and household items. Some have been familiar to us since childhood, while others are first encountered. In the article, we will tell you how to make an origami butterfly out of paper. It is best to use heavy color paper for the printer. It is bilateral and large (A4), so the finished craft will be large. Children can play such a butterfly, from several elements you can add a beautiful picture by adding grass, flowers or the sun from colored paper.
The article presents several options for origami paper butterflies. The step-by-step instructions will clearly describe all the actions, so that there will be no difficulties in the work. Consider several schemes of the origami of this insect, some of them are lightweight, suitable even for working with older preschoolers, but there are more complicated options for schoolchildren or adult masters.
Children's craft
Origami paper butterflies for kids are pretty simple. It is enough for kindergarten teachers or parents to provide a child of 5 or 6 years old with a blank. It can be fused, as in the photo below, represented by a rhombus connected to a circle. There is a variant of a separate blank - a circle and a square.
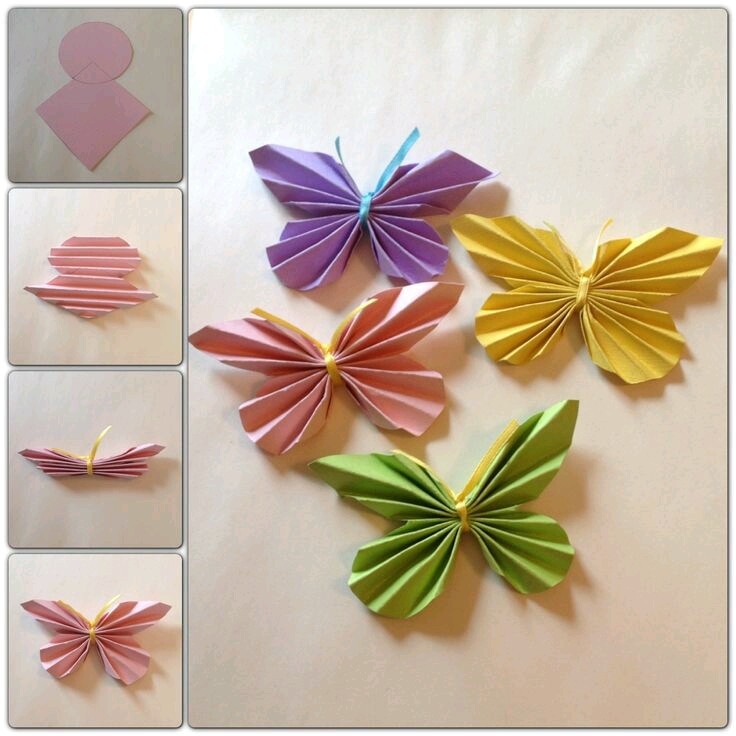
Additionally, you will need a satin thin ribbon or piece of velvet yarn with a wire base for work. How to make an origami butterfly out of paper is explained to children in detail in the lesson. First you need to fold a sheet of colored paper of round shape with an "accordion", folding the paper back and forth. It is necessary to ensure that all the strips are the same, otherwise the craft will look untidy. The same procedure is done with a square laid down angle. Be sure to warn the baby that you need to smooth all the folds carefully, you can use a pencil or ruler for this. Then both parts are connected by tape, bandaging the crafts in the middle. At the end you need to leave two antennae. For this, the knot is not tied at the very end, but a little earlier. Knowing how to make an origami butterfly out of paper, children will be able to collect a whole flock at home and play with them, tossing them up. You can hang them on a thin thread to a chandelier or ledge, decorating a room at home or a group of kindergarten. It will be interesting to look at the origami of a butterfly, which has the front wings of one color and the rear wings of another. You can use glossy magazine sheets with a bright picture for work, then the insect will turn out original.
Folding paper according to the scheme
How to fold an origami paper butterfly in stages is clearly seen in the diagram below. For work, you need to take a square of colored paper. To get an even square from sheet A4, you need to take one of the corners and put it on the side, folding the sheet with two triangles. It can be seen that an extra rectangular strip of paper remains on the side. It needs to be cut with scissors, and the workpiece deployed to its original position. It will turn out the necessary figure to start the work - a square. In the diagram, step-by-step instructions are shown on blue paper, the back of which is white. This is done in order to better see how to fold paper properly. You can take any bright double-sided paper.
How to make an origami paper butterfly
The square blank is bent in half diagonally. The resulting right-angled triangle folds in half twice again. Then it fully unfolds in the original square. These manipulations were necessary in order to make the necessary bends of paper. At number 8 in the figure, the diagram shows how to create a triangle and bend up a right angle by wrapping the side corners in the middle of the workpiece.
Further, on the front of the edge, they lift up and smooth the bends with fingers. In the figure under No. 15, the part is turned with the back side at a right angle down. Then it needs to be lifted up to form an even line parallel to the top edge. It remains to turn the part on the back side and fold it in half to determine the center line of the butterfly. After it is opened again, the shape of the insect will be clearly visible. Craft is ready!
Room decoration
It’s easy to assemble an origami butterfly from paper step by step with your own hands. Let's think about how they can be used, for example, when decorating a room. The photo below shows how the three-dimensional insect figures adorned the wall. It seems that a multi-colored flock flies from one room to another. It is better to make such a panel on a plain wall of light tones, on colored wallpaper butterflies will simply be lost.
The panel looks beautiful due to the color scheme. Colors smoothly change from warm to cold tones, vaguely reminiscent of the colors of the rainbow. Insects are strengthened in one wing, so they look voluminous.
Origami assembly according to another scheme
We will not talk again about how to make a square blank for work from sheet A4. You are already familiar with such an easy method. In this embodiment, folding also occurs in half, but already in a flat line. Then each half bends again inward. Then the bends are done vertically. The workpiece is folded into 4 parts, and then returned to position No. 3.
Thus, the necessary smooth folds were obtained for further work with paper. The lower edge rises, forming a trapezoid, similarly done with the upper part of the workpiece. The connection of the two figures occurs along the center line. From the bottom, the corners go down to the center line connection. The upper trapezoid is lowered so that a triangle forms. Then the small corners dividing the upper and lower wings are bent.
Finished craft
A butterfly made according to this pattern is quite large and flat, so it can be placed on a cardboard basis, supplemented with large voluminous flowers made of paper or fabric. Wings need to be smoothed out well by lifting them up, then we get a three-dimensional figure.
When you learn how to easily fold butterflies in origami patterns, you can make them in different colors and sizes. It will be enough to draw a few squares under the ruler, each decreasing by a couple of centimeters.
As you can see, it’s easy to make paper figures, it’s enough to carefully look at the step-by-step diagram, performing actions according to the numbers, and smooth all the folds with your fingers well. Try to make this origami yourself at home. Creative success!