Now, the creation of various souvenirs and accessories for the interior is gaining popularity. Try using ready-made patterns of pillow-owls to make an original decoration for your sofa. Such a thing will be a great gift for any holiday.
Materials and Tools
To sew the same cute characters, you need the following:
- patterns of pillows, owls;
- paper and pencil or printer to print the finished template;
- scissors;
- safety pins;
- fabric of any available shade or several colors;
- needle with thread;
- sewing machine;
- synthetic winterizer or other filler;
- eyes and other decor (optional).
As you can see, nothing complicated is needed. If you are doing needlework, you probably already have everything you need.
How to sew an owl pillow
Any soft toys are made using similar technology. If you have already done something similar, making this cute souvenir is not difficult. The sequence of work will be as follows.
- Build a pattern on paper. If you have a ready-made owl circuit in electronic form, just print it and cut it out.
- Pin the appropriate parts to the fabric and make blanks in the right amount.
- Fold paired items or one with the main faces facing inward.
- Sew or pre-mark the seams, leaving a hole for filling.
- Turn the product to the front side and fill it with a padding polyester.
- Sew the hole with a blind stitch.
- Sew additional items (if any), decorate the product.
Using such a simple and understandable technology, you can make a thing of any complexity.
DIY Pillow: Pattern
At this stage of the work, you have two options:
- use a ready-made template;
- Build the image yourself.
If you find your favorite circuit in electronic form, it is enough to print an image of suitable dimensions or redraw from the monitor screen. You can change the scale of the entire workpiece or its individual parts at your discretion. As a first experiment, it is better to take the average size, within 30 cm. Too small a product is difficult to carry out, and a large one will require more time and patience.
If you have before your eyes only a photograph of the finished thing, relate the image to the existing schemes. Modify the template to the desired form. In fact, building patterns on your own is not at all difficult, since all the details are usually symmetrical. In order to make the base of the pillow in the shape of a bird out of fabric, it is enough to have a half of the blank on paper, and then fold the material in half and pin the pattern along the fold line. By the way, having completed one blank, you can make many different options for souvenirs, changing the color and material of individual elements.
See ready-made templates
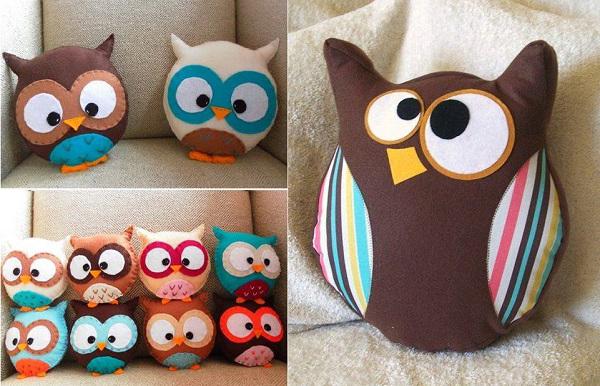
If you are new to sewing and needlework, take the simplest patterns of pillow-owls. One of the easiest options is shown in the following illustration.
To get such a product, use one of the following blanks. As you can see, the pillow consists of several parts: the body, eyes with pupils, beak, wings and legs. Additional elements are usually attached by a zigzag seam over the base, while wings and paws can be performed separately, only the work will be somewhat more complicated.
Please note that in the previous version, the body is built as one part with a closed loop, that is, it may well be asymmetric. If the left and right halves are the same, use the second template when the half of the part is applied to the fold line of the material.
For the simplest way to complete the product, use the previous blank, cut out all the parts one at a time, the body in two copies. Stitch the elements on the front side of the front of the owl, and then do the work in accordance with the technology described above.
The second option (the diagram above) will be more complicated, since you will have to sew the paws separately. By the way, they, as well as the base, can be made voluminous, but it will take not two, but four parts. The same goes for wings.
The third pattern in the section is distinguished by proportions, as well as additional decor. The details decorating the body can be stitched in tiers, then you will get an owl in a dress with frills. It will look especially beautiful if these elements are made of light material and stitched only along the upper edge. The effect of the volume of "clothes" will be created.
Flat pillows
The easiest way to sew an owl (pattern in the next photo) is to make a product of simple shape, consisting of two parts without additional elements.
In fact, you will need to make one seam. Wings, paws and other parts can be cut out of fleece and sew or even glued to the base. If it is made from the same material, then the pillow can be sewn on the front side, since the fleece does not require edge treatment. If you are building a pattern yourself, try to avoid sharp corners and transitions of shapes. Make the outline smooth.
If this is not possible, for example, I want to show the carved shape of the wings, carefully turn out small incisions in the seam allowances in “dangerous” places before turning the product. This will not allow the fabric to collect and wrinkle after turning on the front side.
Voluminous owls
An original and beautiful pillow with your own hands (a pattern can be made using the following photo) will turn out perfectly if you put more effort and time. Here you will actually sew a soft toy, only the size corresponding to the pillow.
In this case, it will be necessary to manufacture many individual elements, and then combine them into a single whole. Such things look more spectacular and original and can fulfill not only the functional role of the pillow on which they lie, but also decorative or utilitarian, for example, be a place to store the remote control from the TV.
So, you were presented with various patterns of pillow-owls and photos of finished product options. Choose your favorite. Create beautiful accessories for your interior.