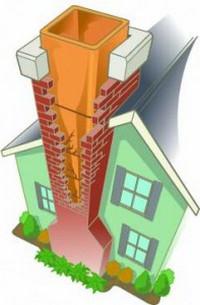
Owners of country houses often build stoves. For many owners, this design not only serves as a heat source. The furnace for a large number of people is a tribute to Russian traditions. In addition, the design also performs aesthetic functions. For it to become not just an interior item, but an element of decor, appropriate decoration is necessary. Cladding with a brick kiln is the most optimal solution to the issue of external design. Next, consider how this is done.
Material
In the market today, the range of coatings is quite wide. The most popular material for facing the stove is ceramic tile. It has many advantages. The technology by which the stove is tiled is quite simple and understandable. Therefore, all the work can be completely done independently.
Material benefits
Facing the stove with tiles will allow several times to increase the heat capacity of the structure. Finishing material has the following advantages:
- Durability.
- Fire resistance.
- Environmental friendliness.
- Rigidity.
- Longevity.
Quality tiles over time will not lose color and brightness. One of the undoubted advantages of the material is its ease of maintenance. In addition, the tile is machinable and easy to install.
Classification
The material is available in several types. Cladding with kiln tiles is very popular . It consists of various components: fireclay, dyes, clay and other things. It looks like porcelain tile. However, it has a monolithic structure. The furnace is often lined with majolica tiles. It is a pressed element coated with glaze on top. Terracotta tiles are also popular. She looks like a majolica. The difference is that the "terracotta" does not have a glaze. You should also know that the thickness of the material has a direct effect on the strength and thermal conductivity of the finish. As for the size, the square is considered optimal, the side of which is 12 centimeters. Tile to use for decoration is highly undesirable. This is due to the fact that the material does not tolerate the effect of high temperatures and begins to crack and break off from the surface over time.
Do-it- yourself tiling of the stove : preparation
This stage, in turn, can be divided into three main stages. The first will be the preparation of the furnace surface, then the selection of tiles and tools. The final stage is the choice of glue. To work with the base you will need:
- Brush (metal).
- Grinder and abrasive wheel.
- Level.
- Brush.
- Plumb line.
- Sand.
- Water.
- Cement.
- Capacity (the solution will be mixed in it).
- Metal grid.
- Nails with washers, hammer.
The surface of the furnace is cleaned with a brush from the old plaster, dirt, dust. Next, using a grinder, it is necessary to carry out the jointing (shallow) of the masonry joints. Next, plastering the surface. The solution is mixed in the container. Sand in it should be 3 parts, cement - 1. The solution mixes well. It should not have lumps. For greater reliability, a mesh is fixed to the furnace surface. Fixation is carried out in embroidered seams with the help of nails. After this, the surface should be thoroughly moistened with water. For convenience, it is better to use a brush. Using a spatula, the solution is applied to the oven. The surface must be made even. To do this, use the level and plumb. The required number of tiles is calculated in accordance with the area of the furnace. Material is purchased with a small margin (for marriage and pruning).
The choice of adhesive
The solution, like the tile itself, must be resistant to elevated temperatures. You can buy ready-made glue. For example, customers speak well of Plitonite-Super Fireplace and Skanfixsuper solutions. You can use self-made clay or sand-cement mortar.
Technology
Before facing the stove with ceramic tiles, you should prepare the tools:
- Solution.
- The tile.
- Rubber mallet.
- Tile cutter.
- Mix for grouting.
- Plastic crosses.
- Dry and wet rags.
- Level.
- Wooden rail.
- Spatulas (notched, rubber and flat).
Before facing the stove with tiles, the surface should be well dried. A wooden rail is attached at the bottom . It is fixed so that the distance from the floor to it is equal to the width of the tile. The evenness of the staff is checked by level. The second row from the floor is laid out on it. Start gluing the elements should be from the corner. The rail is necessary to prevent skewing of the cladding, since the floor is not always perfectly horizontal. Finishing material with hot glue is applied to the surface and gently pressed by hand. For better fixation, the elements are slightly knocked out with a rubber mallet. Excess glue is immediately removed with a damp cloth. To ensure that the seams are even, plastic crosses are inserted between the tiles. Before grouting, they will need to be removed. If any irregularities or distortions appear, they should be removed immediately (until the glue has dried). The lowest row is stacked last after removing the rail. If necessary, adjust the tile to size should use the tile cutter.
Masonry completion
3-4 days after the adhesive solution dries, it is necessary to fill the seams between the elements. To do this, use a special grout. The mixture is applied with a rubber spatula. Excess grout is removed immediately. After the solution has dried, the final cleaning of the lining is carried out. For this, dry and wet rags are used. After a few days, the stove can be used.
Features of terracotta tiles
To begin with, it should be said that this material is indispensable for decorating the walls of the chimney, fireplace, barbecue and other similar structures. You can use the "terracotta" tiles on the masonry with rough, rough and second-hand bricks. Using the finishing material, you can not only correct defects in the work and tidy up the appearance of the structure. Terracotta tiles can be used to create real masterpieces.
Material laying
Facing the stove with terracotta tiles begins with the placement of corner elements. Horizontalness is verified in accordance with the level. Elements made in the proportions of one and a half or single brick are fixed so as to imitate the masonry. Due to the natural play of shades (from ocher-fiery to straw), to prevent the appearance of clearly visible color spots on the surface of the cladding and to achieve a distribution of tones as close to natural as possible, it is more expedient to carry out the work by opening all the packaging with the material at once and using it in turn 1-2 items from each box. The back corrugated side of the material provides long-lasting and reliable adhesion to the glue and the base. If the heat-resistant reinforced glue "Terracotta" is used as the fixing composition, the surface of the furnace should be wetted before application. Heat-resistant mastic is a ready-made mixture. It is very convenient to use and has a high degree of reliability. The paste retains its operational properties even when the temperature rises to 1100 degrees. This material provides an absolute advantage over other compounds.
Application of mastic
Before use, mix the solution thoroughly, achieving a consistency of thick sour cream. If it will be more liquid, then you need to add a little sand. Mastic is applied to the base and tile. Using a comb spatula, the mixture should be evenly distributed over the surfaces. To maintain the required distance between the elements, pieces of drywall are inserted , the thickness of which is 9.5 mm. They will need to be removed no earlier than four hours after the completion of work. Finishing should be carried out without breaks and breaks, since the mastic hardens quickly enough when interacting with air. It is also recommended to cover the container with a lid during operation.
Finally
As can be seen from the material, tiling of the furnace is quite simple. The price for the services of masters starts from 600 rubles / m 2 . However, you can save a lot if you do everything yourself. The main thing is to choose the right tile, glue and correctly prepare the base.