Which resident of a modern metropolis does not dream of a vacation in the country? Far from the bustle of the city, noise and smog. It is so great to relax in the garden with a summer house, in which you can hide from the rain. Just the same, an excellent option for the realization of such desires would be to purchase a plot in a summer house partnership. But just a plot is not a solution to the problem. As mentioned above, some kind of shelter from bad weather or scorching sunshine will be required on this site, and for this we will build a small, but at the same time comfortable summer house.
Design for future construction
First you need to choose the best place for construction on the site. Next, you should decide on the size of the future home and the layout of its premises. Sizes, as a rule, are determined based on the size of the site, the number of family members and, which is also important, from the financial capabilities of the developer. Nevertheless, if you are planning a simple summer house, and not a country house, it makes no sense to build it very large and with many rooms. It will be enough 4 by 6 meters or 5 by 6. Well, the same with the second floor. There is no need to make it capital. It will be enough to arrange an attic. There is one more nuance of the layout: in many country associations there is a set of rules for the location of buildings. Therefore, before designing, it is necessary to familiarize yourself with these rules and requirements.
Material for construction
So, the site is planned out, a project for future construction is developed, now you need to decide on the materials from which you can build an inexpensive summer house for a summer residence. Fortunately, there is now something to choose from. There is a classic brick or logs, and a wooden beam. You can also opt for more modern materials, such as foam or aerated concrete blocks. And if there is clay nearby, then you can make the building material yourself, namely to make brick - raw or, as it is called adobe. In general, materials are for every taste and budget, but the most popular method of construction among summer residents is a wooden summer frame house. Such a house is being built quite quickly and at minimal cost. We will consider it in the future, and now we will move on to the first stage of construction - laying the foundation.
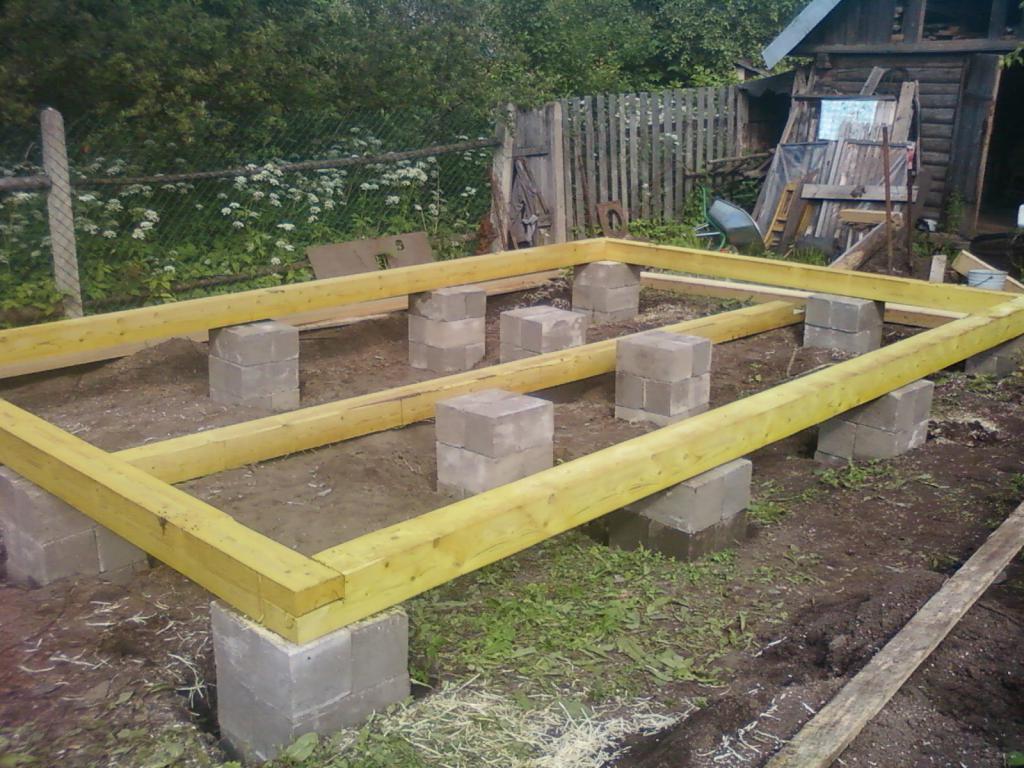
Foundation
Since the wooden frame method is most often used to build a summer house for a summer residence , there is no need to lay large and costly foundations. For example, concrete monolithic will be completely unnecessary. And the strip foundation is also not always appropriate. Unless, according to the project, a cellar or a small basement is planned under the building. The best solution would be a columnar foundation. With its help, you can not only make a solid foundation for the house, but also exclude the contact of the latter with the ground, lifting the entire building above the ground to a certain height. And in terms of its cost and time cost, the columnar foundation compares favorably with everyone else. Columnar foundations are concrete, block, brick and even wooden. The simplest and most reliable option is a brick column foundation. For him, markings are made on the ground, in accordance with which holes of the required depth are dug. A sand cushion is poured at the bottom of the pit, onto which a layer of concrete is poured. After it hardens, brick supports are laid out on top, on which, in fact, the whole building will be located. So, the foundation is ready. The next step will be the erection of walls.
Construction of a summer garden house
You should immediately pay attention to the fact that all the wooden parts of the house are pre-saturated with flame retardants and antiseptics for resistance to fire, as well as protection against fungi and insects. Construction begins with the assembly and installation on the foundation of the lower frame, or, as it is also called, the lower coring. This frame will be further laid on the floor. The next step will be the installation of the supporting beams of the frame, which is made on the coronal bars along the perimeter of the foundation. The bars are fixed with the help of corners, for greater reliability, you can add metal staples. Next, proceed to install the wall frames. If the number of assistants allows, you can assemble the frames in advance, and then lift and install. If the summer house is being built with a minimum number of assistants, then it will be advisable to assemble the frame directly at its future location. The frame is attached to the lower harness using powerful corners. It will also be better to use self-tapping screws instead of nails. So the mount is more reliable. Corner posts for greater structural rigidity need to be strengthened with diagonal struts. After the construction and strengthening of the wall frame, the assembly phase of the upper strapping begins. When the frame work is completed, an external wall cladding is performed. It can be ordinary boards, wooden lining, etc. Next, we move on to the installation stage of the attic floor and the rafter roof system.
Erection of a roof
Before proceeding with the construction of the roof, first, ceiling beams are installed on the upper wall trim. In the future, attic floor and ceiling will be mounted on them. After the beams, the rafter system is mounted. It can be of two types - hanging and layered. With a hanging system, the rafters rest solely on the outer walls and do not have any other supports. This option is more suitable for a summer house for a small cottage. If the building has impressive dimensions, as well as capital internal walls, leaning directly on the foundation, it will be more appropriate to use a layered rafter system. In this case, in addition to the main emphasis on the external walls, the rafters have additional emphasis on the capital internal walls.

There are three main ways to install rafters. In the first case, the rafter pairs in their upper part are fastened together by a ridge plate, and below they are attached to the upper harness. In the second case, the extreme rafter pairs are mounted on the ground, then climbed up, installed on the front and rear pediment, fixed at the bottom of the harness, and at the top on the ridge beam and then continue to lay the rest of the rafters. Well, in the third case, median racks are installed on the gables, fastened with a ridge beam, and then the remaining rafters are installed. After laying the rafters on top of them, they are covered with a vapor barrier film, a crate is laid on top of the film, on which the main roofing material is laid. This can be slate, metal, ondulin, metal profile, etc.
Warming
Regarding the warming of the house: many consider it superfluous, since the house is summer, and they plan to stay in it exclusively in the warm season. Nevertheless, if there is a desire, then you can make the cottage suitable for living in the autumn-spring or even in winter. To do this, you can provide a small stove in it, as well as insulate the walls, roof and floor. For this purpose, it is better to take mineral wool, which insulates the walls from the inside, and a vapor barrier film is laid on top, after which the inner wall lining is already done. The roof can be insulated from the inside of the roof, thus obtaining a warm attic, and you can also from the side of the ceiling, and on top of the insulation, as on the walls, put a vapor barrier and then install the ceiling coating. The floor is insulated during its installation, this process will be discussed in the appropriate section.
Windows and doors
When assembling the wall frame, openings for windows and doors are left. In these openings, window frames and door frames are installed. In order to pre-fix their position, use the struts of their wooden slats or bars. Next, the frames and door frames are fixed with metal strips and screws, and the free space is filled with mounting foam, which after drying will provide additional fixation of the structure, and the remaining foam is simply cut off with a knife. So, the walls of the summer house are ready, the roof is also built, the windows and doors are installed, now you can proceed with the installation and insulation of the floor covering.
Installation of the floor and its insulation
First, the so-called cranial bars are attached to the supporting beams for the flooring of the primary floor with the help of self-tapping screws . Already placed on them transverse boards. A vapor barrier film is laid on the finished draft floor. A thermal insulation layer is placed on top of the film, for which either a layer of fine expanded clay or a special ecowool is taken - the appearance of rodents is excluded in such materials. A layer of vapor barrier is again laid out on the insulation, and the main floor is already laid on top of the entire structure. It can be thick plywood or boards. That’s all about installing flooring.
Exterior and interior decoration
So, the house was built, insulated, little things remained, namely the internal and external decoration. Outside, the country house can be painted resistant to the influence of the external environment with paint or beaten with lining. Inside, you can also beat the walls with a wooden lining. And you can finish it with drywall, and then putty it and paint it with water-based paint or glue it with wallpaper. Here it all depends on the flight of the owner’s imagination. There is nothing complicated in the construction of a summer house with your own hands, especially if a person who is at least a little familiar with the construction work takes up the matter. Well, of course, no one can cope with such a task alone. Helpers will be required. And the more, the better.