The needlewomen know how much money can be saved if children sew clothes on their own. Naturally, for products to be obtained no worse than on the market, and sometimes even of better quality in terms of tailoring and the materials themselves, some experience is required. But here it is all about practice. Therefore, it's time to arm yourself with sewing accessories, fabrics, accessories and useful tips on how to sew outerwear, and get to work.
This article will discuss how to build a coat pattern for a girl, the main stages of modeling at the template stage, and also give advice on the choice of materials and their processing.
Stage One: Taking Measurements
In order for the coat to fit well on the figure of the child, it must be sewn taking into account the peculiarities of the physique. Individual tailoring is therefore good because measurements are always taken directly from a person, and not generally accepted dimensional standards. The ideal coat pattern for a girl should be based on basic measurements, such as back width, chest, and girth of the abdomen or hips (more is taken). It is by these parameters that the fit of the product is usually evaluated. In the shoulders, the thing should not be too large, and on the tummy should be wide enough so that under the coat you can easily put on a warm sweater.
Of course, additional measures will be required, such as chest height, sleeve length and product length, shoulder width.
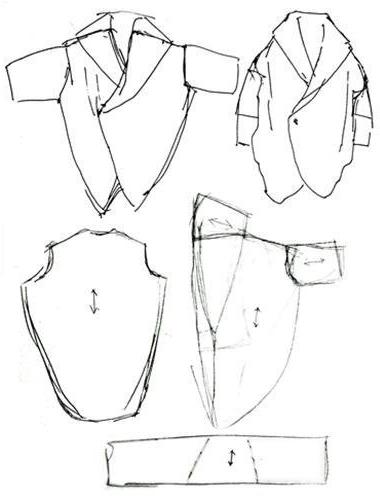
Stage two: building the basis for the pattern of shelves
Patterns of a children's coat for a girl are built on the basis of a rectangle, where the horizontal side is equal to the circumference of the chest + 5 or 7 cm for a loose fit. The vertical sides should correspond to the length of the product.
Further, the whole process consists in transferring the measurements taken from the figure to paper:
- Determine the level of the line of the chest in accordance with the measure "chest height".
- Further on this horizontal mark half the measure “back width” + increase in free fit and put an end to it. After determine the size of the armhole. To do this, the chest girth is divided by 4 and the obtained value in the drawing is postponed from the previously set point.
- The remaining segment will be the front shelf area.
- Below the chest line by about 25-30 cm (the exact value can be measured from the chest to the convex belly or hips), another horizontal line is drawn, on which ½ measures of a larger girth (hips or abdomen) are laid.
- Next, in the armhole zone, find the middle and put a point from which the side seam will descend.
- On the line of the hips or abdomen, on each vertical side of the rectangle, ½ measures of a larger girth (hips or abdomen) + 5 or 7 cm are laid for free fit. After, starting from the midpoint in the armhole zone and to these marks, the straight lines are lowered, which slightly extend to the bottom of the product.
- Then again it is necessary to rise to the upper side of the rectangle, set aside 5-6 cm for the neckline from the upper corner, put off the “shoulder length” measure from the received point, and deepen the neckline by 1.5 cm for the back and 5 cm for the front shelf. Shoulder seams for the front are drawn similarly to the back.
- Next, go to the armhole, where you need to connect the extreme points of the shoulder seams with the middle set earlier. In this case, align all sharp angles. In order to properly arrange the armhole, auxiliary verticals will be required: from the point of the width of the back to the top and from the point of the border of the armhole and the front shelf to the top.
Additional model details
Patterns of children's coats for girls do not have tucks for the chest, which makes construction easier. If you plan to stitch the product with the presence of tucks, additional measures will be required, such as a tuck solution, which is measured from the center to the center of the chest. Half of this measurement is laid on the drawing along the chest line from the front shelf side, the perpendicular is raised from the point received. 3-5 cm to the shoulder line to the edge of the shoulder and lower the line to the starting point. After the shoulder line is extended by a similar distance and the armhole line is corrected. This pattern coat is suitable for a teenage girl. If desired, the tuck can be transferred to the armpit area, cutting the paper part until both lines of the vertical tuck are combined until an even plane is formed on the paper.
Stage Three: Building a Sleeve
The pattern of a children's coat for a girl (3 years old, more or less is not important) can be with a one-piece sleeve. Such a template is constructed according to the “bat” type, where the shoulder seams are extended to the required length and the lower seam of the sleeve is removed from the side cut, rounding the part in the armpit area. With such a cut, the bottom can be well flared or, conversely, narrowed, as in cocoon coat models.
To build a set-in sleeve template, ready-made patterns of shelves will be required. They are folded along the shoulder sections, laid on a sheet of paper of sufficient size for the drawing and circled the entire armhole, indicating the joint. The upper eye resembles a circle that needs to be drawn and closed. After that, at the junction point, the line is raised by 1 cm. Next, draw a horizontal line along the lower boundary of the circle and, descending in a circle, nullify the edges of the sleeve ridge. In this case, the length of the armhole of the shelves should be taken into account so that the sleeve fits into it without any problems.
Stage Four: Modeling
When the template pattern of the coat for the girl is ready, it's time to try your hand at the role of the designer and outline the model lines. This can be pockets, zippers, inserts, embossed seams, embroideries, decorative ruffles and more. To make it easier to present the final version, it is better to draw a sketch of the product. This will help determine the size of the ticking of the shelves from top to bottom, and the length of the sleeve with its model features. The sleeve can be decorated with a bow or make three quarters, complementing it with a high dovy.
Material selection
There is so much choice in fabric stores that it is sometimes difficult to decide which particular fabric to give preference to. Here, one should proceed not only from the style of the product, but also from the purpose of the outer clothing. Whether it will be demi-season, or winter outerwear. The pattern of the coat for the girl described above is suitable for both options, but the differences can be in the allowances for free fitting, insulation and, of course, the main fabric used. This can be a raincoat fabric, cashmere, polar or other coat fabrics.
As a heater, you can choose hollofiber, synthetic winterizer or synthetic winterizer. For interior decoration, it is better to take a dense lining fabric and separately “figure out” the lining on the sheepskin. This will allow you to wear a thing at a plus temperature, and in decent frost.
Easy to sew
The manufacturing process is not so complicated in fact, so put off all doubts and sew a winter coat! The pattern of the coat for the girl is also built quite easily, with a little zeal - and everything will work out! A little imagination for decoration, a few touches in the form of embossed seams or stitching - and an excellent product will come out. A ready-made coat pattern for a girl can be used both for tailoring a summer cardigan and a windbreaker. Adjust the length a bit and think over additional details in the form of a stand-up collar, hood and cuffs - and a whole collection of children's clothing is ready!