The modern world seems to be obsessed with needlework. Products made by hand are in incredible demand and, accordingly, are not cheap. However, models get bored as quickly as they appear. Therefore, the craftswomen constantly come up with something new. The last original and really spectacular invention was a hat with a gradient. And she fell in love not only with kids, but also with adults. For this reason, in the material presented below, we will talk in detail about the technology of this unusual product.
Model selection
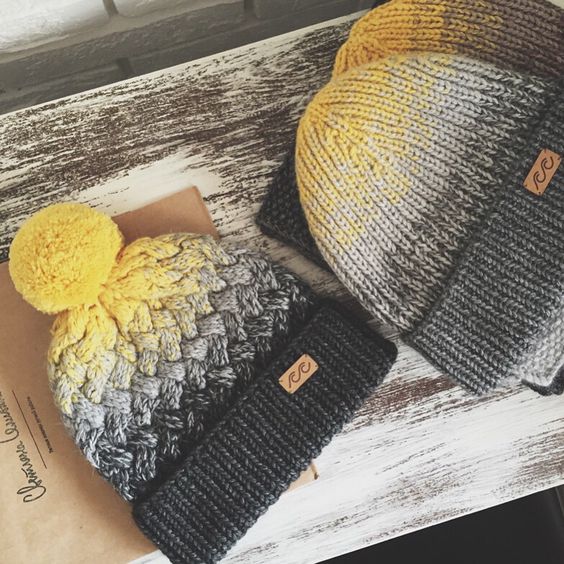
Before starting work, it is necessary to carefully consider the style of the desired accessory. Traditionally, needlewomen knit a classic hat and complement it with a fur pompom or made of yarn. The finished product looks very bright and original. Moreover, you can combine completely different shades. The main thing is not to use more than three. Otherwise, the product will turn out to be too clumsy, and the fashionable ombre will be completely lost.
It should be noted that gradient caps with a pattern of braids and plaits look most interesting. So that the reader can knit similar products, we offer a diagram and description of the pattern. The rapport of which is 12 loops. This must be taken into account at the beginning of the work.
Taking measurements
Having approved the most suitable model of a hat with a gradient, we prepare an elastic centimeter, a piece of paper and a pencil. Then we measure the head of the person to whom we will knit the accessory. We need only two parameters:
- Girth of the head. Measure the widest part by placing a measuring tape over the eyebrows.
- Cap height. Determine the distance from ear to ear by putting a centimeter on top of the head. And then divide it in half.
Choosing shades and buying yarn
The gradient on the cap can include absolutely any shade. However, experts do not recommend choosing dark knitting threads for babies and teens. Better to use bright saturated shades. For example, those that are part of the rainbow. It is also worth noting that the colors of this palette can be safely combined with each other. They perfectly coexist and give the product juiciness. You can also combine any color you like with white. But in any case, you need to purchase two plain skeins of yarn. It will be especially good if the thread is double. That is, to consist of two thinner. Otherwise, knitting a hat with a gradient will not be very convenient.
Finding the perfect tools
It is possible to bring a conceived product to life with both knitting needles and crochet. However, professional knitters say that the latter tool is more suitable for lace or rather dense things. But for knitting hats it is better to choose knitting needles. The product made with this tool will turn out to be very voluminous and airy. Especially if you supplement it with braids and plaits. The main thing when buying knitting needles is to give preference to those made of metal. It is much more convenient to work with them - the thread glides well, so that the work goes faster and better. But it is important not to forget to examine each instrument for defects. If the tip is too sharp or rough, knitting with a knitting cap with a gradient will not bring any pleasure.
Calculation of the number of loops and rows
To bring the conceived product to life, professional knitters recommend practicing the pattern. To do this, we need to knit a sample about 10 cm in size. This will also help us calculate the number of loops and rows in a future hat. After all, only masters can determine both parameters by eye. It’s easy to make calculations. It is only necessary to divide the girth of the head by the width of the fragment, and the height of the cap by the length. After that, calculate how many loops and rows were obtained in the sample. And multiply the loops by horizontal measurement, the rows by vertical. Correct both values based on the repeat of the selected pattern.
Start knitting
Masters strongly advise beginners to knit the first rows of knitted hats with a gradient with an elastic band. Too much should not be done. The most optimal option is a single and double series of front and back loops. The rest look too rude and inappropriate. Therefore, we take annular knitting needles if we plan to make a product with one seam, or hosiery on a seamless hat. Then we collect the calculated number of loops using the first skein of yarn. Having knitted an elastic band of the required width, professional knitters add two or three more rows of the selected pattern. This is necessary so that the gradient does not turn out too sharp.
The middle part of the product
A do-it-yourself hat with a gradient looks very impressive and original. However, the implementation will have to work hard. The stage that we will study in the current paragraph is especially difficult. And all because it is required to divide the thread of each skein into two parts. Knitting in two threads is not recommended, because the hat in this place will be too thick and rough. Therefore, we call someone for help, carefully separate the thread of the skein and weave it into a ball of the right size. Then we do a similar procedure with the second skein. But first we connect the separated thread with the first color and rewind a new ball. We use it to knit the middle part of the cap. If there is not enough yarn, we repeat the above manipulations.
Cap completion
When the middle part is knitted to the desired size, we take the second skein of yarn. And we finish the rest of the product. Fifteen rows to the end, we begin to reduce the loops. But first, we calculate how much falls on each row. To do this, subtract eight from the total number of loops, divide the rest by fifteen. Then we begin to uniformly reduce the extra loops. Difficulties may arise in those who knit a patterned product. After all, the decrease must be carefully entered into the pattern. When knitting hats with braids and a gradient, professional knitters recommend reducing excess loops on the harnesses. That is, first cross, for example, 10 loops, then 9, 8, and so on as it decreases.
Here is our instruction and came to an end. We hope that in it we were able to convince novice knitters that it is much easier to bring the conceived product to life than it seems at first glance. The main thing is not to be afraid to experiment and try something new, and also not to give up if something suddenly fails.