Experienced psychologists do not get tired of repeating that children from an early age need to craft something. It can be crafts from plasticine, colored paper or any other improvised materials. In the material presented below, we will study the technology for implementing the best ideas for cardboard applications. Master classes are suitable for children of different ages. Therefore, the article will be useful to parents, educators, teachers, as well as young curious talents.
What you need to create original crafts
Before embarking on the implementation of various ideas, a set of materials and tools should be prepared. However, in most cases, all that is required is available in each house where the child lives. Since our article is devoted to children's creativity, it means that you certainly will not have to buy anything. It is only necessary to find and put next to us objects with which we will make the application of cardboard with our own hands:
- a ruler;
- a simple pencil;
- PVA glue;
- comfortable scissors;
- various types of color cardboard (you can use double-sided, velvet, matte, glossy, metallized, corrugated and any other);
- colored pencils, pens or felt-tip pens.
In addition, for creativity, children will need a soft cloth to remove excess glue from the applique, and a small towel for hands. Also, some details are more convenient to perform according to the template. For this we need album sheets. And of course, I want to decorate each craft beautifully. Therefore, we additionally prepare various decorative elements (beads, sparkles, confetti, etc.).
Flowers in a vase
Truly the most popular version of the application of cardboard is the idea that we will study in the current paragraph. To do this, prepare cardboard sheets of red, yellow, green, blue and any light shade. Then we take the blue cardboard, turn it face down and draw a vase of arbitrary shape. We try to place the desired item closer to the edge so that the remaining cardboard can still be used for another craft.
After which the part is cut out, greased at the edges with glue and carefully applied to the base. It is important to remember that we also need to fit flowers on cardboard applications. Therefore, we place a vase at the bottom of the sheet. We glue and remove excess glue with a cloth. Then draw three sticks and three leaves on green cardboard. Cut out, but do not stick yet. On the red cardboard we see three flowers, on the yellow - the same number of circles. Cut out all the details. Next, glue the stems to the vase, trying to move them as close as possible so that there are no gaps. We attach leaves and flowers on top. As the next layer, we attach the core of the flowers.
Having finished work, we give applications from a cardboard to dry within an hour. And even then we present an interesting craft to someone close to us as a gift or use it as a room decor. For example, decorating a children's bedroom.
Teddy Bear
Children adore various animals and often make them from various materials. In this paragraph, we will consider the technology of making a funny teddy bear out of cardboard. To make this craft, you need to prepare brown cardboard, yellow, black, white and any other as a background. The idea presented in the photo uses red. Then we print out the template, cut out and transfer the details for the bear on a brown sheet. We outline the stencils with a simple pencil on the wrong side of the cardboard. Then cut out and attach to the base. From the yellow cardboard we cut out the ears, nose and tummy bear. We glue, not forgetting to remove excess glue with a rag. Then cut out the eyes and nose, glue it. If desired, decorate the finished bear with a bow.
If such a cardboard application is difficult for the child, you can cut the bear out of circles and ovals. As shown in the photo. Both work options will be happy to be accomplished by young talent. And it’s not worth talking about how the relatives of the child will be delighted with such an original gift.
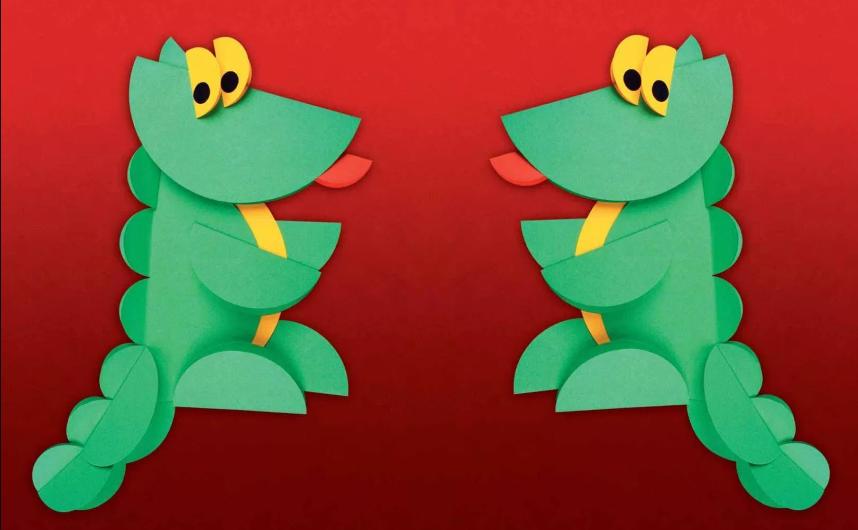
Crocodile Gena
Even modern children are delighted with many heroes of Soviet cartoons. Therefore, at this point we want to offer parents to fulfill with their child a sweet and kind crocodile Gena. To do this, you just need to prepare a cardboard of green, red and any other color (for the background). After that, print the templates on the printer. Or redraw by putting a thin album sheet on the screen of a computer or laptop. Carefully cut out the patterns and transfer to sheets of the corresponding shade. Then proceed to the assembly. We lay the foundation in front of us and glue the body of the crocodile on it. Above it are the upper and lower paws. After we put a hat on our hero. On the jacket, we first bend the collar along the dotted line. We give applications from color cardboard to dry for one to two hours. Then we finish the muzzle.
Crocodile
For younger children, you can offer a different version of the craft. To make it, you need a sheet of red cardboard, and green, yellow and red colored paper. It is also necessary to prepare a compass. Therefore, parents or the teacher will have to help the baby so that he does not accidentally get hurt. Having prepared everything you need, we proceed to the implementation of the volume application of cardboard and colored paper. On green paper, draw two large circles - the head and the bodies of a crocodile. Add six smaller parts and eight very small ones. Cut without going beyond the boundary line. On a yellow sheet, draw two circles, equal in diameter to the last green. Then draw the same on the red sheet. Also cut out. Then we fold all the mugs in half. And we begin to stick to the base, forming a crocodile. The first to put the largest circle is the torso. Add the tail of the two smaller circles, and the smallest ones on the back. On the muzzle glue the yellow eyes and draw black circles on them - the pupils. We complement the crocodile with a ready-made muzzle, paws and a red tongue. The latter must be glued inside the head. Finally, put off the application of cardboard and colored paper to the side and let it dry for several hours. After which we rejoice with the craft of loved ones.
Flowering cactus
Fans of original crafts can offer the following beautiful and unusual option. For its implementation, it is necessary to prepare cardboard in beige or light shade (for the background), as well as compasses and colored paper in green and red. Then draw three circles of five different sizes on a green sheet. On red we depict flowers. Then we cut out all the details and proceed to assembly. Fold all the mugs in half. Cut the red colored paper into small triangles - cactus needles. Glue them to the circles. Next, glue three circles of the same size to the base, forming a flower of the desired shape. At the end we add red flowers.
Children with an application of cardboard and colored paper will cope in a few minutes, but there will be so many joys from creativity that it can not be expressed in words. In addition, an unusual voluminous craft can easily be placed in the living room or bedroom of the parents.
Dog Pincher Bob
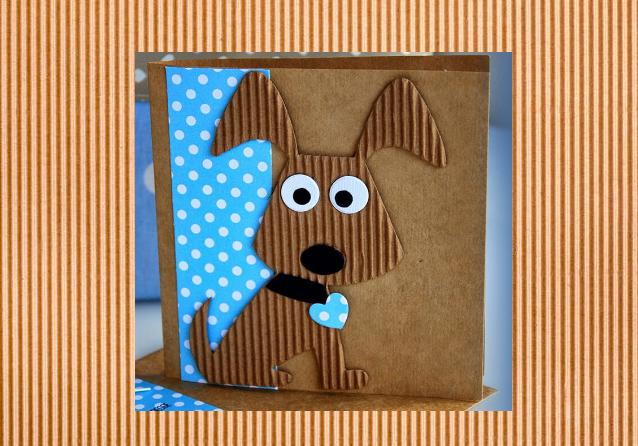
Various crafts made of corrugated cardboard look very interesting. One of them can be seen in the photo. If the reader would like to present a similar postcard to someone from his relatives, then we offer a detailed and step-by-step master class. It begins with the preparation of black, brown and white plain cardboard, brown corrugated cardboard and satin ribbon. In this case, blue and white polka dots. Then we fold a sheet of ordinary brown cardboard, which will serve as the background for our application, in half. Thus we prepare the basis of the postcard. Then we cut off the satin ribbon of the desired length and glue it to the front of the booklet. Then prepare the dog template. To do this, take a white album sheet and draw on it a conceived animal. Then we cut out the template and transfer it to the corrugated cardboard. Cut the animal and glue it on the card. Wet excess glue with a rag. We complement our dog with black eyes and a collar with a heart. And finally, let our corrugated cardboard appliqué dry thoroughly.
Autumn applique
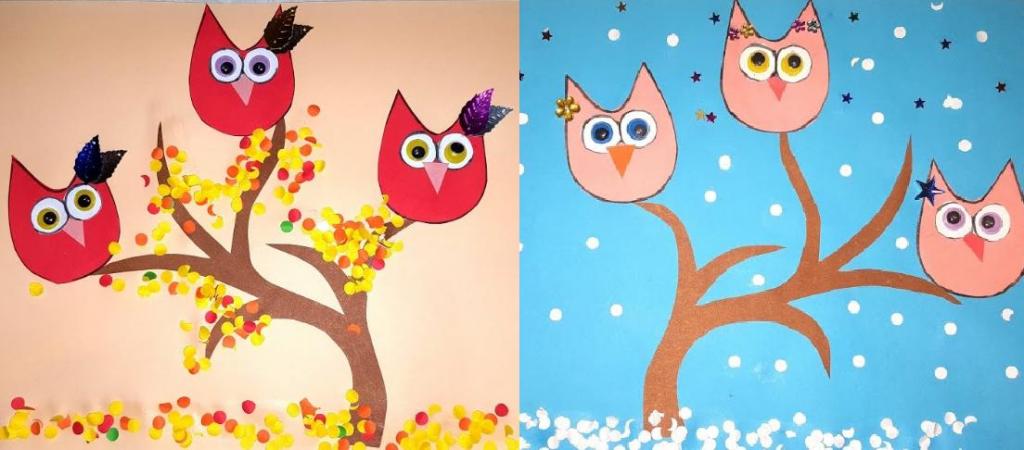
For some reason, it is generally accepted that autumn is the most boring and dull season. However, even this time of year can be revived with the help of bright crafts. Therefore, we further invite the reader to study the technology for performing interesting applications with owls. It requires preparing a sheet of cardboard of any light shade, brown, red, pink and yellow colored paper, a hole punch, a brush, a small lid of water and several scraps of metallized cardboard. Having completed the preparatory work there, we proceed to the main one. We draw a tree of arbitrary shape on a brown sheet. Cut and glue on the base. From red colored paper, cut out the owls. And we have them on the branches. We supplement them with eyes and beak. After dripping a little glue into the cap with water and stir well. Why with a brush we apply the resulting water on the lower edge of the base and between the branches of the tree. Sprinkle prepared confetti on top. At the end, we decorate the owls with leaves cut out of metalized cardboard. And finally, let our original Autumn application from cardboard and colored paper dry.
It is also important to note that, by analogy, you can perform a winter application. It is only necessary to use blue cardboard as a background, and instead of yellow-red confetti, take white.
Hedgehog in the autumn forest
The following craft also looks very interesting. A color printer is required for execution. However, if it is not, it is permissible to use a clipping from a magazine that depicts an autumn landscape. Or you can invite the child to draw the forest himself in a golden-crimson decoration. We print or redraw the details necessary for assembling the hedgehog from the screen of a computer or laptop. Then we prepare the templates and use them to draw and cut out parts of our crafts from color cardboard of various colors. Having completed all these steps, we proceed to the assembly of an interesting application of colored cardboard. It is important to note that all the details are numbered, so young talents will not be able to lose the place where this or that part should be. In addition, an attentive reader might notice that the eyes of the hedgehog pictured are not made of cardboard. These can be purchased at any needlework store.
Crow Clock
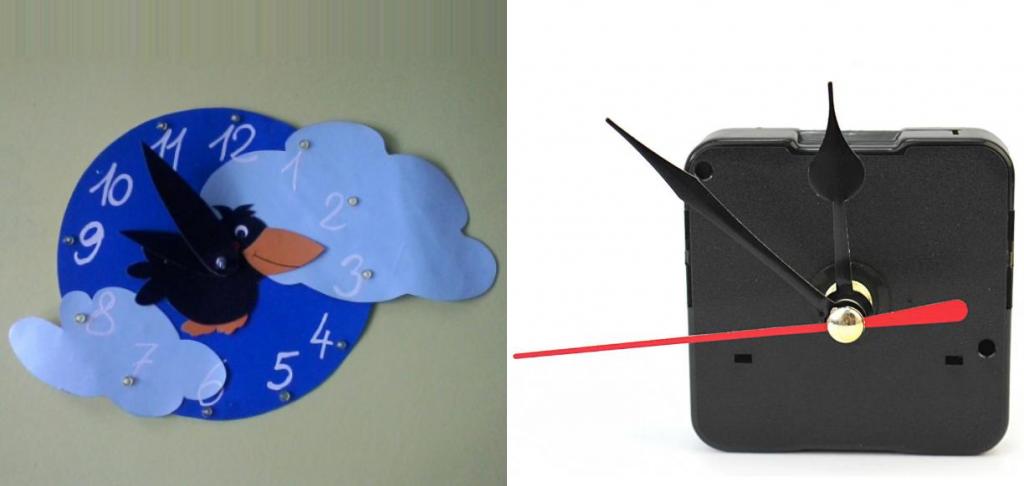
Creative parents along with their children can do the following crafts. To do this, prepare a sheet of blue, black, cyan and orange cardboard. As well as a pair of compasses, twelve large beads, a corrector handle and a working mechanism from unnecessary watches. When everything you need is at hand, proceed to creativity. First, draw a circle of arbitrary size on a sheet of blue cardboard. On blue - two clouds. One big, the second a little less. On the back of the black cardboard we draw a crow and two wings - large and small. On an orange sheet are beak and paws. Then we cut out all the details and proceed to assembly. Glue two clouds on the blue circle as shown in the photo. Then we attach a beak and paws to the body of a raven. Then we make a small hole in the center of the circle and insert the clockwork into it. We remove the arrows and attach the raven’s torso on top. We glue the big wing on the big arrow, and the small one on the small one. After that, with the corrector, we put down numbers from one to twelve. Next to each we attach a bead. At this, the master class on how to make an application from cardboard is completed, and we can only let the craft dry thoroughly. Then it can be used for its intended purpose.
March cat
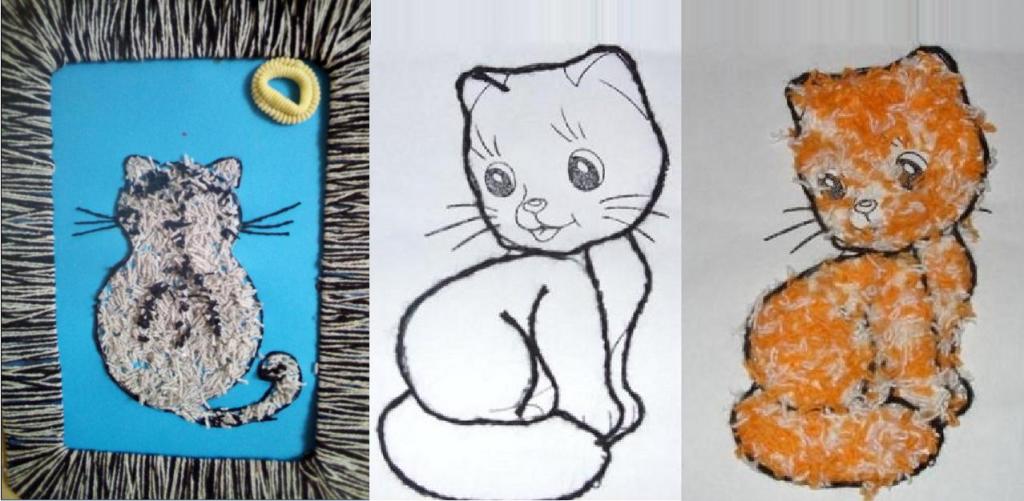
Another great idea for an applique is to use threading. We will describe this technology in detail below. It begins with the preparation of yarn in the right shades. In this case, black and white. A sheet of blue and white cardboard, a small yellow rubber band for hair, two small bowls and a little water are also needed. Then we proceed to the application of threads on cardboard. First of all, draw a cat silhouette on a sheet of cardboard. If necessary, first we depict the animal on a white album sheet, cut it out and transfer to the base. Next, proceed to the most difficult. Gently apply glue along the contour. We have a black knitting thread on top. We complement the silhouette with a mustache and leave it for several hours so that the glue dries out well. At this time, finely chop the yarn with scissors. We do not mix colors, but pour each one into our own bowl. We add some water there and mix everything thoroughly. We apply the white mixture first, gradually filling the entire body of the cat. Then on the back we add strips of black yarn, and spots on the head and ears. Next, we need to prepare a frame. To do this, take a sheet of cardboard the same size as the base. Using the ruler in the middle, draw a rectangle, pre-determining the width of the frame. Cut out. We attach the tip of the white knitting thread from the inside. And we begin to wrap the frame. We perform similar actions with black yarn. And finally, glue the frame to the base. Add a gum that mimics the moon. And we give our applique of threads on cardboard to dry completely.
This concludes our article. However, the creative path of young talents is only just beginning. Therefore, we can only wish readers new ideas.