Holidays bring to our lives a great mood, diversity and a sense of joy. Perhaps that is why we are so looking forward to them. The bright Easter holiday is no exception. Jews on Passover roast a lamb, a rabbit is considered a symbol of the Catholic holiday. And Christian Easter is associated with colored eggs. To surprise your friends, you can make an Easter egg from a modular origami - this is an amazing jewelry made by yourself. It will give the celebration a certain charm, exclusivity and charm.
Amazing craft
Craft with your own hands can be a great gift to family, friends or relatives. It will certainly become an unusual decoration for the Easter basket. To make such an egg is very simple. To do this, you must follow the scheme and a previously thought-out plan for creating origami. You can be creative and turn your fantasy into reality. For the manufacture of crafts, you can use paper in all colors of the rainbow. This choice expands the boundaries and increases the creation of all kinds of variations of paper masterpieces.
To create a craft you will need:
- Paper of different colors.
- Office glue or glue gun.
- Scissors.
- Ruler.
- A small wooden or cardboard stand.
Preparation for work
Create a modular origami "Easter Egg" is necessary on a flat surface. It is best to equip a desk. It is covered with oilcloth so as not to stain the surface. Light must fall on him. Therefore, it is best to equip the workplace near the window. It is recommended to place a table lamp on the surface. Poor lighting negatively affects a person’s vision. If children are involved in creating such crafts, then they need a break. 30 minutes you can show the creation of an origami egg, and 10 minutes to rest. Kids are happy to take part in such extra activities. Children like to learn new things. As practice shows, they always with curiosity and surprise master the art of origami. The master class “Easter Egg” attracts children with its unusualness and exclusivity.
Identical circuit
The main advantage of this craft is that for a short period of time you can get an excellent result. The same model provides a unique opportunity to create a variety of eggs. Despite the creation of crafts according to the same pattern, each egg will become exclusive and unique. It all depends on the craftsmanship, multi-colored modules and the idea conceived. Adhering to the basic principle of assembly, you can create an unusual pattern or Easter inscription. Next, step-by-step instructions will be presented on how to make an origami Easter egg with your own hands. To create such a craft, you will need 250 multi-colored modules, as well as 32 plain or color modules for the stand.
Create the top of an origami egg
Three modules are installed on the short side and interconnected so that one of the modules is in the middle. A chain of two such rows is created. Each row can have 6 or 8 modules. The chain should close in a tight circle. Then an Easter egg from modular origami requires an increase in modules by 2 times. One module is pocketed down on each of the tops of the pyramid of the first row. The result should be 12 or 16 modules, depending on the selected initial quantity. Then the next row of modules is laid out. Their number again increases by 2 times. You should get 24 or 32 peaks. Then 1 row of modules is superimposed on it, but of a different color.
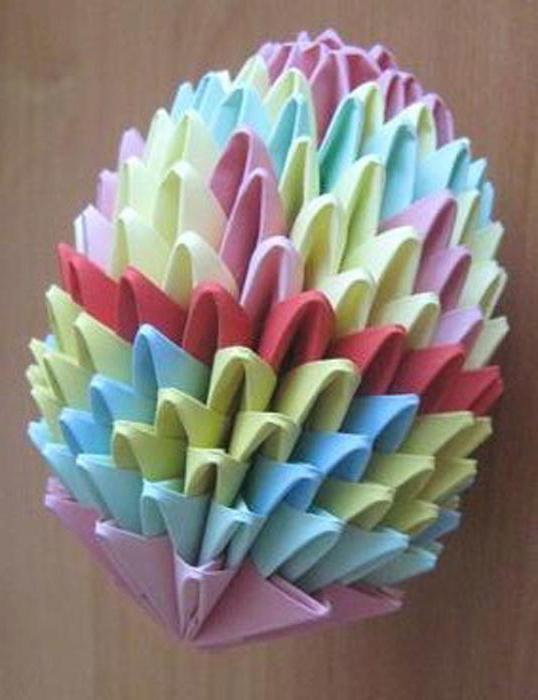
Modular origami "Easter Egg" allows the choice of shade at the request of the author. The next row is identical to the previous one. Spread a number of modules of the third shade. In the next row, the modules alternate in a sequence of different colors. Shades of white and blue, red and gold, lime and yellow are well combined among themselves. Modules must be arranged so that one color takes an even position, the other an odd one. On each of the tops of one shade of the last row, you need to hang 1 module of the same color. The pocket should be down. The result should be 36 or 48 modules.
Create DIY Center
The central row involves the alternation of shades. The monophonic row is laid out. In this row, a division into 12 or 16 fragments should occur. In one fragment there should be 2 monophonic modules. As a result, 24 or 36 modules remain. At this point, the modular origami Easter egg should take a rounded shape. Then 1 module is laid out for each fragment. In creating this series, only 12 or 16 modular fragments should be needed. On each crown 1 module is put down with a pocket. It will take 24 or 36 modules.
On each extreme fragment the module is put down with a pocket. The central tops are secured by fourth-tier modules. Such a performance will give the craft an unusual colorful pattern. As a result, each module should contain 3 modules. 36 or 48 modules remain in this row. Then the alternation of shades will go. Two modules are added to the extreme tops. Between them modules of other color are attached. Thus, in each fragment there should be 4 modules. In a row - 48 or 64 pieces.
Origami craft narrowing
A modular origami Easter egg is reduced by one division. The tops of the previous row are carefully put on the tops of the central modules. A total of 24 or 36 modules. 1 new module is put on the lateral vertices of the extreme modules of the previous row. The tops in the center are connected to modules of a different shade. As a result, in each fragment 3 modules should turn out. In the last row - 36 or 48 modules. Then comes the alternation of two shades. And neighboring fragments are connected with monophonic modules. The number of modules should remain unchanged - 36 or 48 pieces. This method of making crafts should appeal to both professionals and amateurs. Everyone is attracted to modular origami. The Easter egg pattern is simple and does not require additional skills.
Completing Eggs from Modular Origami
The monophonic row is laid out. For every third crown of the module in the previous row, 1 module is put on. A total of 24 or 36 modules should be obtained. In conclusion, 2 rows of the first shade are created. Each of these rows should have 24 modules. The final row consists of modules of the first color. Each such module is put on 3 vertices of fragments of the previous row. There should be 16 or 24 modules in the row. This row will be the bottom of the egg. Ultimately, you should get a modular origami "Easter Egg". The execution scheme is very simple. With the correct execution of the step-by-step instructions, you should get an amazing DIY craft.
Creating an Easter Egg Stand
Identical Easter egg patterns, craftsmanship, and creative thinking all combine modular origami. The scheme of an Easter egg consists not only of the most important subject, but also of the base. An Easter egg will be attached to the stand. To do this, create a chain of two rows. The modules are connected in a circle of 10 pieces each. In the next row, tint modules alternate. Then a number of monophonic modules are laid out. It is important that they are turned forward at a 90 ° angle.
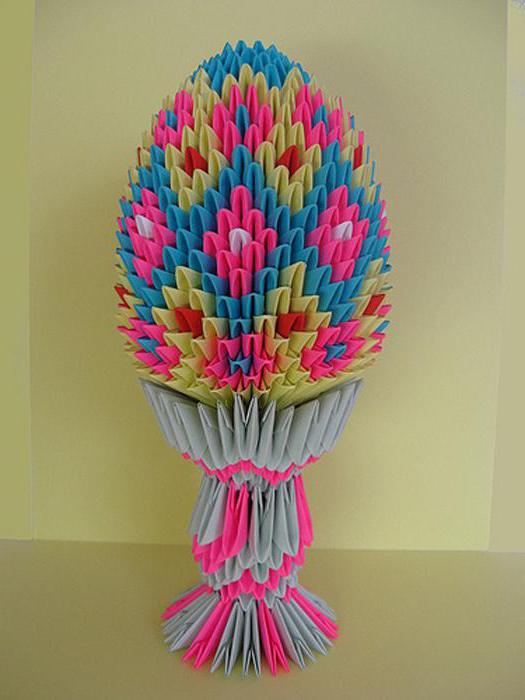
Next, the modules are pulled to the center. The next row fits in the normal position. In the next row is an increase in modules by half. They roll forward at a 90 ° angle. In this row of modules should become 2 times more - 20 pieces. In the final row, the modules are laid out in the usual position. Similarly, the second half is created for the base. Then both parts are glued with clerical glue. Glue a narrow base. The craft itself is set to wide. The result should have been the perfect paper origami. An Easter egg can be decorated with ribbons, rhinestones or colorful sparkles. In conclusion, the stand with the egg can be glued to a wooden or cardboard stand.