Origami figures from modules look very impressive. If you have never tried to collect voluminous flowers or animals from individual elements, then be sure to try. Our article is designed for beginners. Here you will learn how to make origami from modules according to schemes, how to cook triangular corners themselves, how to connect them in different ways. Photos and step-by-step instructions make the task easier, so prepare two-sided thick paper, and begin work together.
How to roll a module out of paper
Origami from modules is assembled from separately twisted elements. These are small pointed corners with pockets for connecting parts to each other. How to fold them from a piece of paper, read on. In a step-by-step photograph, the sequence of actions is understood.
A sheet of paper in A-4 format is folded in half several times so that small rectangles form. It should get 16 parts. They are cut into folds of paper, and work is done on each element according to the scheme. Origami from modules always begins with the manufacture of a large number of small parts. If you plan to make even a small figure, then prepare at least 300 modules. Then, if not enough, they can easily be rolled up yet. It’s better to pre-pack the modules in order to deal with fresh energy only with creating a character figure.
How to make a long connection
Origami from the modules for beginners can start with training exercises. There are two types of compounds. First, you need to learn how to make a long and thin strip from which you can create a neck for animals or birds, hands for people or fairy-tale characters, make circles, connecting the last module with the first. Secondly, it is necessary to understand the principle of connecting parts in height and width in order to create volumetric compositions. Let's look at the photos below, how to achieve this.
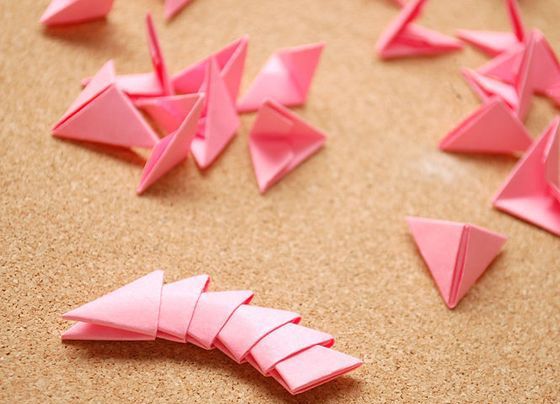
If you look at the module, you will understand that on one side it has sharp corners, and on the opposite side there are two pockets. To connect the parts in a long strip, two corners must be inserted into two pockets on the back of the module. Insert the next one in the same way until you get the required length. If you need a flat part, then the models are connected simply one after another. If you want to create a bend, for example, the neck of a swan, or a semicircle, then the shape necessary for the character is given. If you need a full circle, then the first and last parts are interconnected. You need to act carefully and connect the modules tightly so that they do not fly out.
How parts are joined in width
Explaining how to assemble origami from modules for beginners, it is necessary to show another type of connection between the elements. Consider making a simple fish figurine.
After manufacturing multi-colored parts, work begins with two blue ones. In this origami of modules, the connection of parts occurs differently. The corners of the first module are no longer inserted into the two pockets of the next, but as follows:
- the right corner is inserted into the left pocket of one module;
- the left corner must be inserted tightly into the pocket of another module on the right side.
The result is a triangular bond. Two modules come out of one module. Let's get back to making our fish figurine. Its nose consists of two modules, which are connected differently to create a steep transition to the wider part. The upper module with the left corner is inserted into the right pocket of the second row part, and the right corner is inserted into the left pocket of the element located next to it. Another corner of the first row is inserted similarly. It turns out immediately a large expansion of the series, that is, of the two modules at first there are not 3 standard, but 4 elements at once. Further work is carried out according to the usual method until the required size of the figure is created.
The tail and fins are formed in different ways. Sharp fins are made according to the first described scheme, that is, they are connected in a strip of modules of different colors. The tail is performed in the second way, that is, an extension from one module to five.
Stand for pens
Following the step-by-step instructions of origami from the modules described above, you can assemble the following figure. This is a round barrel, in which the walls are assembled from small elements of different colors. To get beautiful spirals, the first bottom row is made up of alternating placement of colors. The modules are positioned at right angles to the table surface.
After the end of work, the bottom hole is sealed with a circle cut out of thick cardboard. This origami from the modules looks impressive. Moreover, it is a practical subject, which will not only decorate the student’s desk, they will use the stand every day.
Origami flowers from modules
The seven-flower from the beloved children's fairy tale by Valentin Kataev is collected non-standard. The assembly of items in the craft begins with a yellow center. Seven modules are located in the middle pockets and right angles to the table surface. Then a sharp expansion is carried out. To do this, two elements in the next row are inserted into each module according to the standard scheme. The difference from the usual scheme is that between them there is also a third module, which is simply inserted in the middle between the corners. The third row of origami colors from the modules is already performed according to the usual scheme, that is, from 3 modules 4 are obtained.
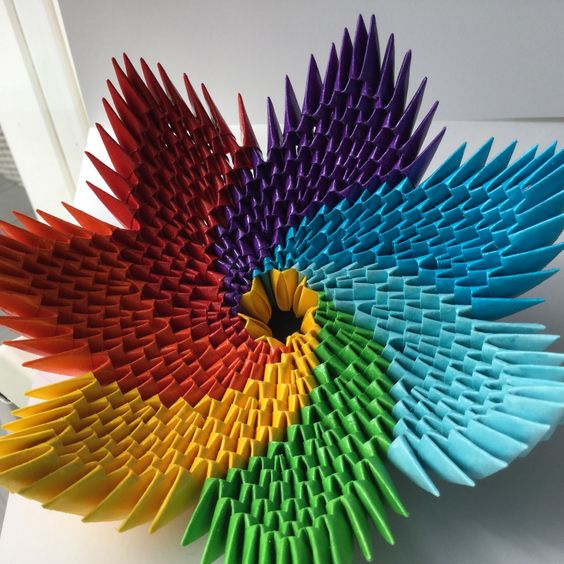
You also need to monitor the spiral arrangement of colors. When the required volume of the circle is reached, work begins on the individual petals. This is no longer an expansion of the figure, but a decrease in the number of details. Origami colors from modules should end with one element on each of the seven petals. At the end, the figure is bent with an upward movement. You need to act gently, slowly, so as not to ruin the structure.
Swan figurine
Creating such an origami from modules occurs in two ways. The neck is assembled as the first option for connecting parts, that is, each subsequent module is inserted into two pockets of the previous one. The body is assembled by the second method described above, that is, the corners of the modules of the first row are inserted into the pockets of the two modules of the second.
Circular assembly is carried out to the required level. Then you need to work separately on the expansion in several rows for attaching the neck and wide raising of the tail. At the back, each row decreases from two sides by one module until only one part remains in the center of the tail. On the head, the last element attaches a red or orange module. This is the beak of a bird.
Conclusion
The description of the origami from the modules given in the article will help to complete simple crafts for beginners without much effort. The work of making modular figures is quite painstaking and time-consuming, but the crafts are very effective, able to decorate any voluminous work for an exhibition at school, decorate the interior of a room or office.