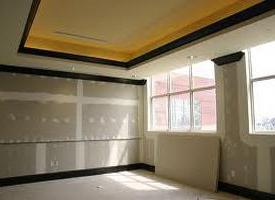
A box of drywall on the ceiling is considered one of the most common camouflage options for various communications. Often, ventilation and pipes spoil the appearance of the room, speaking not very accurately. It often happens that some elements do not allow you to bring to the edge of the wall a suspended ceiling made of drywall or simple wallpaper. How to hide interfering communications? We will understand further.
General information
So, the task is quite clear. When installing a plasterboard suspended ceiling, it is necessary to create a special design. It will allow you to mask pipes sticking out of the walls without plumbing intervention. A box of drywall on the ceiling will eventually be attached as a second level, or rather, a fragment of it. Many owners who do not have much experience in decoration think that the whole process will be fraught with certain difficulties. However, experts claim that the installation of drywall boxes is quite simple. It is quite possible to cope with it without having special special skills and sophisticated equipment. A plasterboard box with backlight will look very impressive. In this case, the design will not only hide communications, but will also become an original decorative element. In some rooms of the apartment, the presence of such an element is very welcome. So, for example, often make a box of drywall in the toilet. Designs are also relevant in the kitchen. Install a box of drywall in the bathroom. In this case, you need to remember that in this room humidity is almost always increased. In this regard, the box of drywall in the bathroom must be constructed using moisture resistant sheets.
Training
Before you assemble the box from drywall, you need to provide protection to the pipes. They are coated with a primer and stained. So the elements will be protected from the spread of rust, which will undoubtedly extend their operational life. The ceiling itself should also be prepared. This mainly concerns the holes near the pipes - they must be repaired. To do this, you can use mounting foam and plaster. You can proceed to the next steps after this “rough finish” has dried.
Frame
Regardless of the room in which the plasterboard box will be installed - in the toilet, kitchen, etc. - you must first construct a reliable crate. For the frame, you need a profile for modeling (CD-60). It is used to create non-standard structural elements. The profile should be rigid, but at the same time self-tapping screws should be easily screwed into it. In addition, you will need a grinder and pliers. The necessary piece should be cut from the profile. The calculation is carried out as follows: the distance from the main to the false ceiling is taken, plus 7 cm per bend. On the sides of the profile, cuts of about 40 mm are made on one side, then the petals are bent to the sides. Holes for screws (small diameter) are drilled in them. The central part needs to be cut off. On the other hand, you need to make cuts of 50 mm on each face.
Mount
It is more expedient to carry out further actions in order.
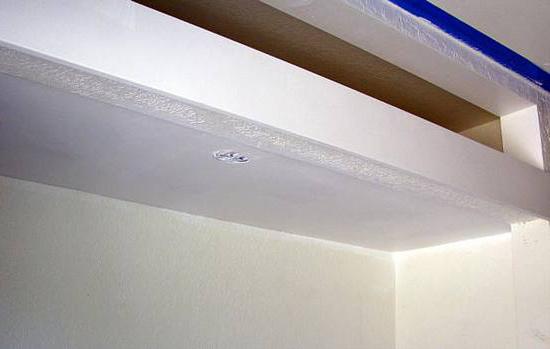
Checking the horizontal level, the UD profile is screwed to the wall. It should be located exactly on the bottom edge of the future box. In accordance with the marking, the brackets are fastened to the screws. The step between the fixing elements is 60 cm. The edge of the drywall that will abut the pipe will subsequently be attached to the CD profile. Next, from the profile element, you need to cut a piece with perpendicular edges. Its length is 160 mm. This piece is inserted at one end into the UD profile. Its other edge is fixed with screws on the bracket. On the installed suspensions the CD-60 profile is fixed. At the end, the frame is sheathed with GVL sheets using conventional technology.
Second way
A big problem in many kitchens is the ventilation system. It can be hidden in a box of drywall. On the ceiling and walls you need to mark in the places of fastening of the structure. Given the thickness of the GVL sheets, guide profiles (27x28 mm) should be fixed. Next, you need to drill holes in the ceiling. Their diameter is about 6 mm. The guides are fixed on the dowel-nails. Next, using scissors for metal, 60x27 mm should be cut from the suspension profile. Here you need to be careful and not go too far. The size of the suspensions depends on the dimensions of the box. Fixation of elements should be carried out to the guide using self-tapping screws. Next, a profile is attached that forms the lower edge of the future box. The guide should not have excesses. All its parts should be located at the same distance from the ceiling. The design, which will eventually turn out, will allow, among other things, to align the angle. In this regard, it is necessary to make all measurements as accurately as possible.
Additions
The finished look will add lighting. As an additional decor, you can use spotlights. In advance (before covering the frame with GVL sheets), it is necessary to outline the places where the wires will pass, and fix them there. Cables should not interfere with the installation of the box. Next, the transverse guides are cut and inserted into the frame. Elements are mounted perpendicular to the wall and fixed with screws. Then the whole structure is fixed. First check the base of the box. After that, the drywall sheets are cut into elements in accordance with the sizes. For cutting material, you can use a conventional mounting knife with removable blades. Immediately before fixing the casing, you need to carefully examine everything again - whether any wires were left hidden. Otherwise, you will then have to disassemble and assemble the entire structure again. In the GVL sheets, holes are drilled for the diameter of the fixtures. Next, the casing is fixed, wires are output. At the end of the installation, the fixtures themselves are fixed.

Finish finish
When a plasterboard box is fixed to the ceiling, each owner chooses all further actions at his discretion. As a finish, you can use plastering with a decorative composition, painting, wallpapering. Before coating, the surface is putty. Joints are glued with a reinforcing film. In general, assembly and installation does not take so much time.
Design choice
Three-dimensional patterns in the form of regular or irregular polygons or colors are applied to drywall planes. Additionally, you can pick up light bulbs of different color shades. Most of the ceiling can be done in blue or green. Using wallpaper and other improvised materials, you can depict upstairs - on an ordinary flat surface - real works of art, the plot of which is close to the interior design of the room. Current trends suggest the use of a variety of elements in which straight lines are excluded. Such structures include components of a wave-like type, curved segments. Broken abstract lines are considered quite fashionable and therefore very common.
Important points
When drawing up a preliminary sketch, it is necessary to take into account the height to which each level will fall. As practice shows, in the process of constructing the first tier, the plane lowers 3-6 cm from the main floor, the second - 10 cm from the first level. If the ceilings are even, then the slab acts directly as the first tier - the old base. An important point is the determination of the location of the bulbs. After the sketch is done, some measurements need to be made. They are also transferred to the drawing. It is also important to indicate on the sketch the areas where the profiles for the crate and suspensions will be located. On the technical plan, the necessary dimensions are affixed.