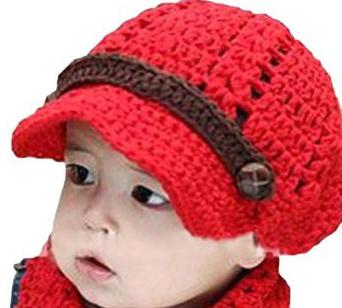
Spring is just around the corner. So let's get ready for warming in advance and tie the caps to our kids. How glad they will be for the new thing! So let's get started.
Master class number 1: crocheted cap for a boy (with a soft visor)
It will be required for work:
- yarn (one hundred grams);
- large button (for decoration);
- threads
- needle;
- hook number 4.
Cap crochet: scheme of work
We will knit, implying that the circumference of the child’s head is 52 centimeters (two to three years of age). The cap consists of several parts - this is a visor, a rim over it and the hat itself. Let's get started with knitting hats. First, we collect six air loops. We knit twelve double crochet. We are constantly making increases. It should make a circle, its size corresponds to the volume of the head. Next, we knit without increases to the required depth. The visor is made separately and attached to the cap with twenty-two single crochet columns. Next, add three more columns. In the next rows we remove one on each side. The last row - we knit loops without a crochet. Finish the work by strapping with single crochet on the bottom of the product. For the decor, we will make a strip (rim) about twenty-five centimeters long. To do this, we collect a chain of 78 air loops and then we knit six circles in a single crochet. As the bezel is ready, position it above the visor. On the right side, fasten with inconspicuous stitches, and on the left - a large button. So, the cap crocheted for the boy on his own is ready. You can decorate it in different ways, for example, make an application. The main thing - show your imagination! Consider another cap model. Crocheting in this case will be more difficult, so be patient.
Workshop number 2: cap with a hard peak
For work you will need:
- yarn (two hundred grams);
- plastic bottle;
- hook number 5;
- paper visor template;
- scissors;
- pencil.
Scheme of work
First we start to knit a hat in the calculation that the head coverage is 56 centimeters. First of all, we will tie the bottom. To do this, we draw a circle with SC with increments. After its diameter reaches eighteen centimeters, we add the loops to finish. The height of the cap should be seventeen centimeters. To strengthen the hem below, we knit one row with a single crochet. Now proceed to the visor. So that it has a shape, we take a paper template, apply it to a plastic bottle, circle it with a pencil and cut out the future insert from this solid material.
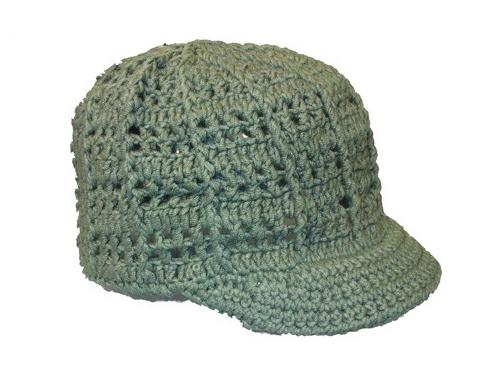
Now we will make a cover for the visor. We collect eighteen air loops and add three loops for lifting. We knit the first row with double crochets. Before you start knitting the second row, turn the product, then knit a crochet. In the next row - a single crochet and a connecting loop. We turn over the workpiece again and dial the fourth row with a connecting loop, which will help us go to the single crochet. Then we knit only with a crochet, and at the very end we knit a connecting loop. The visor cover is ready. So the crocheted cap for the boy is almost ready, just a little remains. Insert the previously prepared template from the bottle. We cover the visor along the edge. Sew to the cap itself. You can also sheathe the visor with a cotton cloth. Such a cap is suitable, crocheted for a boy knitted as described, for a child aged 7-8 years .
I wish you creative success!