Cable laying in the floor has been used for quite some time. Such a system allows you not to violate the aesthetic appearance of the room, hide all connections and wires, as well as equip a warm floor. To avoid errors in performing this operation, it is necessary to know several important aspects of the installation of the structure. In addition, you should first determine the pros and cons of such an arrangement, and also find out its relevance to the characteristics of your home or business.
General Information
Laying the cable in the floor coupler involves installing it in a corrugated pipe. This will prevent damage to the wiring during grouting. The thickness of the concrete above the corrugated pipe should rise by several centimeters. The distance to the walls is about 150 millimeters to exclude deformation during the installation of skirting boards. Before the bay screeds, it is necessary to draw up a wiring diagram. It is advisable to note exactly all sizes. This will allow you to work safely when you need to drill the floor or carry out similar work.
Advantages
Laying the cable in the floor provides increased security for the premises. This is due to the fact that the design in question does not require the installation of wall junction boxes, and this eliminates their accidental damage. The use of expensive diamond equipment during the installation process significantly simplifies the entire procedure for arranging the complex. This saves time and labor costs.
To carry out the operation in question, no gating of walls and other parts of the interior is required. Laying the cable in the floor is carried out simply by installing electrical wiring according to the provided scheme, after which the entire system is poured with cement mortar. The user cannot get to the parts of the wires, possible injury is excluded.
Features
Laying the cable in the floor has a number of characteristic features:
- The minimum thickness of the cable tie is at least 30 millimeters from the cable sheath.
- Wiring is extended only in special boxes.
- It is not required to expand the openings or decorate the elements of the apartment.
- The destructive force of the concrete-cement mortar acts on the cable, and therefore use additional protection in the form of a shell of polymers.
The main disadvantage of this design is the need to dismantle the flooring and screed in case of repair work of the installed communications. This is due to additional inconvenience and expense.
Another disadvantage of laying the cable in the floor is the high cost. For work, you will need a special tool with diamond coating, use skills or hiring specialists. In addition, for each outlet you will need to organize a separate wire, which takes a decent amount of time and labor.
Application
Cable routing under the floor is most often done in residential areas. Two mounting options are used: strobes and coupler. In the first case, the wires are installed in the walls, masked in special grooves (gates). The considered method (in the floor) is laying the wiring on the base and its subsequent pouring with a solution.
Cables must be routed in corrugated pipes. The best option would be modifications with a probe, which greatly facilitate installation. Instead, it is permissible to use metal hoses that are oriented to operation in industrial and other non-residential premises. The corrugation has sufficient strength and electrical safety, and it will be necessary to take into account the increase in the cost of work.
If the laying of cables in pipes in the floor goes through rigid metal structures, such a system is called closed wiring. Most often it is used in floors and false ceilings. The disadvantages of the method include the lack of flexibility and the use of additional mounting elements. Pluses - reliability, protection against mechanical deformations.
Step-by-step instruction
The following are the steps for laying a cable in a concrete floor:
- First make the marking of electrical points. This is necessary to choose the location of the sockets, taking into account the length of the wires supplied to them, and the thickness of the future coupler.
- At the second stage, the lengths of the pipes into which the cable is drawn are measured.
- The third stage involves the installation of pipes on the base and covering them with a reinforcing mesh by fixing to the clamps.
- Next, pour the concrete mortar, and then level the screed.
- With the help of a plaster mixture, boxes and pipes are closed.
- The final step will be the installation of sockets and switches.
Protective measures
The norms for laying the cable in the floor suggest the possibility of installing monolithic wiring of an irremovable type. However, the best option would be the installation of pipes, which will make it possible, if necessary, to replace or repair the damaged part of the line.
In the apartment, this design requires de-energizing the neighbors. If you can coordinate with them the mutual replacement of the old wiring with a new option, the problem disappears. However, if residents refuse to shift their line, it is advisable to further secure their branches by reinforcing with special boxes or pipes, after which it is already necessary to fill the screed.
Checking Nodes
Do not leave bundles of wires in the floor. This is fraught with electric shock when pouring the working mixture. Elements must be insulated with tight couplings. It is also worth considering that the further efficiency of the power supply system depends on the quality of the wire connection.
After complete installation of the cable on the floor in the apartment, a set of control measures should be taken. They include:
- Visual inspection
- Performing measurements of the correctness of the readings of the phase-zero circuit, taking into account the characteristics of the protective device and the conductor.
- Check for contact between parts of the ground.
- Testing of automatic and controlled circuit breakers.
- Measurement of the resistance level of insulating windings.
Recommendations
Installation of hidden wiring under the floor must be done with a supply of cable. This will avoid problems with damage or the need to add part of the wire.
All structural elements are checked for operability until pouring. Otherwise, some defects will be very difficult and costly to fix.
Connection points are carefully insulated despite having a protective tube. Safety boxes must have the necessary safety margin in order to support the weight of the mortar and not be deformed at the same time. The quality of the protective tubes depends on the manufacturer and the material. You should choose trusted manufacturers, not tempted by cheap, but dubious analogues.
When wiring cables in the middle of the concrete floor, try not to touch the wiring leads until the screed solidifies.
Installation of wires in draft mode should provide for the exclusion of overlapping cables between themselves. Otherwise, an increase in the thickness of the screed is observed, which entails an excessive consumption of material and problems in installing doorways.
Arrangement of the system in a wooden floor will be more reliable if you drill holes in the logs than to conduct wiring under them.
Useful Information
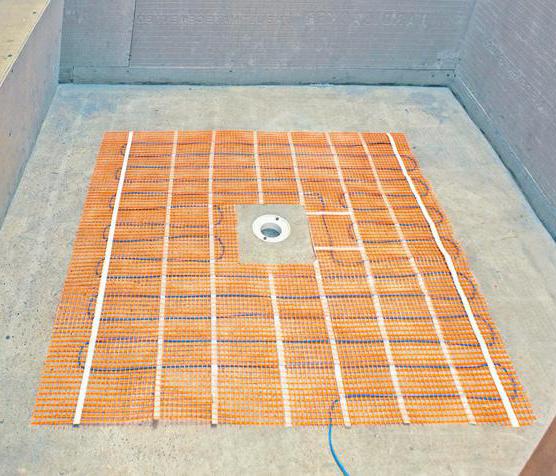
The following information will help you learn how to avoid obscure situations and problems when laying a floor heating cable:
- Installation of distribution blocks with test covers is the best method to prevent the cable tie from opening completely if the wiring or its components are damaged.
- It is more difficult to arrange hidden wiring through the floor in the apartment. This is due to the need to comply with a certain height of the screed. In private homes there is no such problem - the lower floor can be adjusted as necessary, and the floors of the upper levels, as a rule, are designed for installation of the structure in question.
- Since the reinforcement is laid on top of the wiring, it is necessary to check before filling that the mesh has not damaged the wires.
- Before the procedure, it is advisable to additionally treat the wooden floor with special compounds that reduce the combustibility of wood. In such constructions, twisting is recommended to be completely eliminated, and in the concrete version it is also better to minimize them. Any such bundle poses an additional operational risk.
- Remember to pre-make and save the wiring diagram. If it is necessary to carry out drilling or other types of work that violate the integrity of the floor, it will help not to damage the hidden wiring.
- Branch points of cable cores should be isolated according to the same winding of whole analogs.
- Pipe wiring is preferably done interchangeable type. In building nodes - this is an open type, and in baseboards and baskets - a closed way.
- In rooms with a high moisture content, as well as in attics and in ventilation chambers, the system must be mounted by the open method.
- In non-residential buildings erected from non-combustible materials, it is allowed to lay cables in a monolithic non-replaceable way. It is mounted directly in the niches of the partitions and screed.
To summarize
Laying cable in the floor is becoming increasingly popular among owners of not only private houses, but also apartments. It is characterized by ease of use, ease of installation, high level of security. In addition, there is no need to use junction blocks and special plugs. The entire connection process can be carried out directly in the sub-space. Despite all the advantages, hidden wiring in the floor is an ambiguous prospect. Its arrangement requires professionalism, and also complicates the subsequent repair of cables.