Do you consider yourself a woman of fashion and want to look extravagant? Then you need to have unusual toilet articles in your wardrobe. For example, make yourself an original poncho with your own hands. This article offers two simple options for sewing this product.
Preliminary calculations for the manufacture of a rectangular wrap on the shoulders
The work is very simple. In order to make a poncho with your own hands, you must first carry out calculations to obtain a drawing of the pattern. Take a tape measure and any item of your clothing with a long sleeve, for example, a jumper or a wide blouse. Spread the sample on a flat surface, guiding the sleeves to the sides as perpendicular to the shelves as possible. Then mark the places where the sleeve should end in length "three quarters". Position the tape between two points, as close as possible to the level of the shoulders. The resulting figure will be equal to the width of the future cape. If you want to make the poncho do-it-yourself not too wide, then reduce this figure to the desired size. Length can also fluctuate over a wide range. Thinner and lighter products are usually quite short - at or slightly above the waistline. Winter options, such as vests, usually cover the hips.
Step-by-step description of knitting a rectangular poncho
Consider an embodiment of a cape of size 48-50 with knitting needles. Its width will be equal to 95-100 cm. For knitting, dial 180-200 loops using knitting needles No. 3-3.5. A crocheted poncho with your own hands will also look very beautiful. Patterns prepared in advance will help to more accurately calculate the loops. To do this, they usually knit a line according to the pattern repeat, and then make the necessary calculations based on the figures of the drawing. So, starting work, move in a straight line to the height of the product 50-55 cm. Then, by dividing the total number of loops into two equal parts, begin to decrease the loops in the middle, making a hole for the head. Its width should be 22-25 cm in finished form. Having reached the desired size, start increasing on both sides to join two canvases into one. Its width will be equal to the initial value before the start of the descent to the neck. Continue the work by knitting the fabric of the desired length. The hole in the product can be trimmed with a high collar or several rows of knitting (knitting, crocheting) in a circle. Pass the string, simulating a belt, at waist level. The cape is ready!
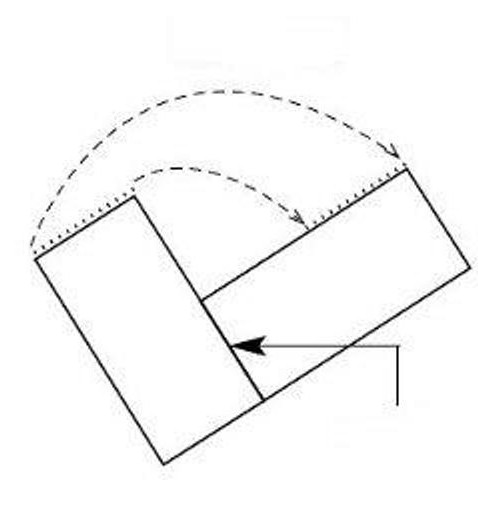
How to make a triangular poncho with your own hands?
This cloak is more versatile. For its implementation does not require the construction of a pattern and preliminary calculations. In addition to knitting, you can sew such a poncho out of a dense fabric or knitted fabric. To do this, you need to carve two identical rectangles. Their width will be equal to the distance from the starting point of the shoulder near the neck to the elbow joint. And the length of the workpiece will be proportional to the narrow part in double size. Arrange these two canvases according to the proposed pattern. The first connection step is indicated by a large arrow. Make a beautiful seam, for example, gently decorating it with a finishing braid. The second stage is indicated by two dashed lines. Treat the resulting seam in the same way. Combining the product according to the scheme, you will get a two-layer triangular canvas with a hole in the middle for the head. The finish of the neck and edge of the poncho can be decorated with the same braid that has already been used.
Imagine and get unique products made by yourself!