Pillows - an integral attribute in the decoration of a bed or sofa. They not only help to relax comfortably. It’s easy to add a new touch to your home decor with such a thing as a stitched sofa cushion with your own hands. We offer to study the master class on creating these accessories in different ways below.
Patchwork Pillow
The patchwork style is perfect for creating your own homemade cute things, such as a bedside rug, plaid, blanket and sofa pillow, with your own hands.
Sewing master class:
- Take a fabric of different colors. It is desirable that all the patches fit well together.
- Cut nine identical squares and five hearts a little smaller in size.
- From the five squares, cut out the middle in the shape of a heart.
- Four squares are cut diagonally two times so that each is divided into four triangles.
- Draw up schemes for sofa cushions (Figure 1).
- Take the four elements that are assembled into one small square and stitch them together (Figure 2).
- Connect all the squares in the same way (Figure 3).
- Sew the hearts into the appropriate boxes (illustrations and 4 and 5).
- Stitch together all the finished squares, placing them three by three.
- Cut four strips. Their width is equal to the side of the square, and their height is to a row of three parts.
- Cut four squares.
- Stitch all the elements together (Figure 6).
- Cut a single piece of fabric that is the same size as the front of the pillow (Figure 7).
- Sew in the snake (Figure 8).
- Stitch the front and back of the pillow together.
- Fill the pillowcase with a padding polyester, holofiber or other filler.
The sofa cushion is ready!
Flower pillow
Decorative pillows on a sofa can have any shape. For example, the shape of a flower.
Instructions on how to make such a pillow:
- Take ten shreds of fabric - five plain and five floral.
- Put all six pieces together and cut the petals out of them (picture 1).
- Sew the petals in pairs, connecting a plain flap with a patterned one. Leave a hole below (picture 2).
- Push the filler into each petal (picture 3).
- Spread the bottom of the petal, step back one centimeter from the edge and sweep the fabric (Pictures 4 and 5).
- Sew together all five petals (picture 6).
- Cut two identical circles, in diameter they should be significantly more than a cent of the flower.
- Put filler in the middle of each and pull the edges together (picture 7).
- Insert one circle on each side of the flower and carefully sew them to the petals (picture 8).
The original pillow is ready!
Make a word out of pillows
Such sofa attributes have recently become very fashionable. No wonder. After all, they not only look beautiful and unusual, but also comfortable. Moreover, it is very easy to sew a sofa cushion with your own hands.
Master Class:
- Draw the necessary letters on a piece of paper and cut them out (Figure 1).
- Then lay the pattern on the fabric and cut out the details (Figure 2).
- Also cut out the tape, the width of which will be equal to the desired volume of the pillow, and the length should completely cover the letter on all sides (Figure 3).
- Stitch the ribbon to one side of the letter (Figures 4-6).
- Stitch the second side of the letter, leaving a small hole on either side (Figure 7).
- Turn the pillowcase out (Figure 8).
- Fill the pillowcase with filler and sew a hole (Figure 9).
The pillow letter is ready!
Fox pillow
You can even create your own sofa cushion even with this shape.
Sewing master class:
- Take an orange and white fabric, as well as a flap with a pattern (picture 1).
- Cut out two identical details from the orange fabric - the body of the chanterelle with ears (picture 2).
- Cut a circle out of a patch with a pattern - the future of the belly (picture 3).
- Sew a triangle to the front side of one of the parts - a muzzle, bead eyes and a nose, and below it is a belly (picture 4).
- Stitch together the back and front.
- Turn out the pillowcase and fill it with filler.
The fox-shaped pillow is ready!
Embroidery pillows
In this way, you can easily decorate both an existing pillowcase and a new one. To do this, you just need to select the desired pattern with a drawing, take the canvas and the thread of the floss. When the pillow embroidery is finished, the opposite is sewn to the front side (a simple piece of cloth), and the pillowcase itself is filled with filler.
Thus, you can make a lot of cushions with different images. There will be one style.
Applique
The idea of an application can be absolutely any, but decorative pillows on a sofa are sewn equally.
Instructions for creating the application "Peacock":
- On a piece of paper, draw a silhouette of the body of a peacock, a crown and a droplet (picture 1). The tail of the bird will consist of several of these.
- Attach the pattern to the fabric and cut out the peacock detail (picture 2). Indentation is not necessary.
- Cut two identical rectangles to create a pillowcase on the pillow.
- Place one side in front of you.
- Sketch all the details of the application in the order that they should be in the final form (pictures 3 and 4).
- Stitch all the elements (picture 5). The line can go both along the contour of the part and in the center. It all depends on your wishes, the capabilities of the sewing machine and imagination.
- Stitch together the front and back of the pillowcase and place the filler inside (picture 6).
The decorative pillow is ready!
Round cushion with a button
Master class on how to sew a round cushion:
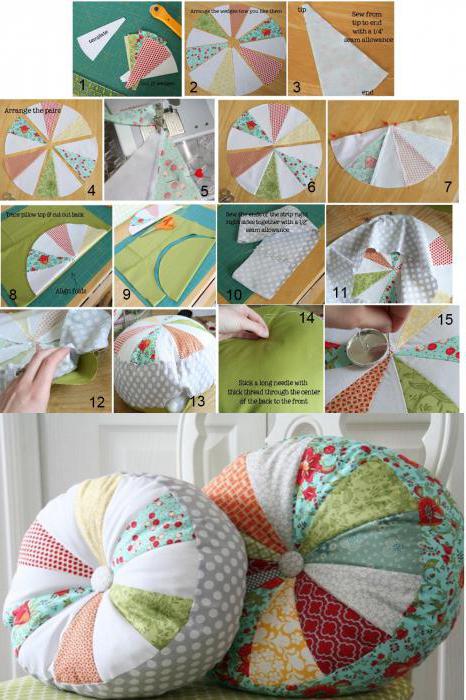
- Draw a circle on a piece of paper. Its diameter will be equal to the size of the future pillow. Divide the circle into twelve identical segments and cut out one of them.
- Attach a segment to shreds of fabric of different colors and cut twelve pieces (Figure 1).
- Lay out all the segments in front of you in a circle, alternating a single-colored part with a colored one (Figure 2).
- Sew pairs of color and white parts (Figure 3).
- You now have six pairs of segments (Figure 4).
- Sew together three pairs of segments (Figure 5).
- You have the top and bottom of the circle (Figure 6).
- Put the halves together and stitch them together (Figure 7).
- Fold a piece of fabric in half and a stitched circle. Attach the half to the fold fold to the fold (Figure 8).
- Circle the circle and cut another one-color fabric (Figure 9).
- Cut a piece of fabric. Its length should be equal to the diameter of the circles, and the width to the thickness of the pillow.
- Sew together the ends of the rectangle (Figure 10).
- Stitch the bezel to one circle (Figure 11).
- Stitch the second circle to the rim, leaving a small hole (Figure 12).
- Turn the pillowcase out and fill it tightly with filler (Figure 13).
- Sew in the hole.
- Insert a long piece of thread into the needle.
- Sew the pillow through, passing the needle through the middle of the pillow. The end of the thread should be on the back side (Figure 14).
- Sew a special button on the front side (Figure 15). Pull the thread tightly and thread back. Tie a knot.
The round ottoman pillow is ready!
Knitting and pillows
Knitted sofa cushions are made as follows:
- A crochet is made of a chain of loops of columns without a crochet of black thread. Its length is equal to the size of the future pillow (picture 1).
- Several such rows are made (picture 2).
- Next, several rows of white threads are knitted (picture 3).
- Continue knitting, alternating between black and white thread (picture 4).
- When the desired piece is ready, take a soft cloth and cut the flap a few centimeters larger than the knitted one (picture 5).
- Sew together a knitted piece and a textile one (picture 6).
- Place filler inside the pillowcase.
The warm pad is ready!