In finishing works, surface preparation often takes longer than the process of applying the material. This is due to the imperfection of the draft base, on which it is planned to lay the facing solution. To facilitate the leveling operations, special beacons for plaster allow, being guided by which, the master can easily get rid of cavities, irregularities and other surface defects.
How is the lighthouse used?
Close to a perfectly flat surface texture is not always required. Small flaws are often compensated by the laying solution for future cladding - for example, tiles. However, the application of paint or wallpaper just provides for the preparation of "zero". This means that the surface should be flat and as smooth as possible. But even a high-quality mortar of plaster will not allow achieving such a result without the correct tactics of laying it over a large area. After all, we are not talking about the accurate sealing of individual pits and cracks, but about the proportional restoration of the surface geometry in accordance with the requirements for decoration without level differences. It is for this purpose that the beacons are installed on the walls for plastering with the use of additional fasteners. As a rule, these are long profile elements, the presence of which orientes the master in the process of laying the solution. More importantly, beacon alignment is applied not only to walls, but also to the preparation of the floor draft base and ceiling. Another thing is that in these cases the mechanics of work itself becomes more complicated.
Types of device
The conditions under which the surface is leveled may differ, therefore, the beacons are also carried out in different design options. So, according to the functional purpose, mortar and reinforcing devices can be distinguished. The first are designed specifically for the orientation of the strip of the working mixture. Subsequently, they are not dismantled, but are included in the coating structure. In turn, reinforcing beacons for plaster serve not so much to guide the laying lines as to strengthen the corner ledges. For example, when in the wall you need to create a small extension to the outside for decorative or structural purposes. If you leave the structure of the mixture without strengthening, it simply collapses. However, the presence of a hard beacon at the base of the protrusion will keep it for a long time.
A fundamentally important sign of the classification of beacons is the material of manufacture. Profile strips can be made of wood, plastic (polyvinyl chloride) and metal. Wooden products are good because they are inexpensive and are suitable consumables for large volumes of work. A metal beacon will be advantageous where it is planned to apply thick layers of mortar - the supporting structure of the bar will allow you to cope with heavy loads. As for the plastic elements, thanks to the elastic structure they are advised to use when applying thin delicate coatings. In the small-format version, they are organically integrated into the cladding design and do not cause problems when finishing the surface.
Beacon Dimensions
Each guide strip has a supporting mounting base with perforations and a protrusion on the surface of a T- or V-shaped. The height of this protrusion is from 3 to 30 mm. Accordingly, from application in topcoats to major restoration of the surface. The length of the beacons for plaster can reach 6 m, but more often standard formats are used, designed for room heights of up to 2.7-3 m. The width of the bearing base is 20-50 mm on average.
What other tools and materials will be required?
Beacons are just a device that will help to lay down the plaster in a high-quality way, but the working operations will need to be performed directly with the following devices:
- The rule. The main tool in leveling surfaces "under zero". Allows you to distribute the working mixture along the contours of the beacons with the capture of large areas.
- Set of spatulas. Both narrow and wide models may be needed.
- Grater.
- Electric drill with nozzle for stirring the solution.
- Construction gun for spotting the mixture in hard to reach places.
- Auxiliary equipment. Tanks for mortar, strippers, square, plumb lines, levels, etc.
Also, depending on the conditions under which beacons for plaster will be used, the following consumables may be required:
- Primer composition.
- Polyurethane foam.
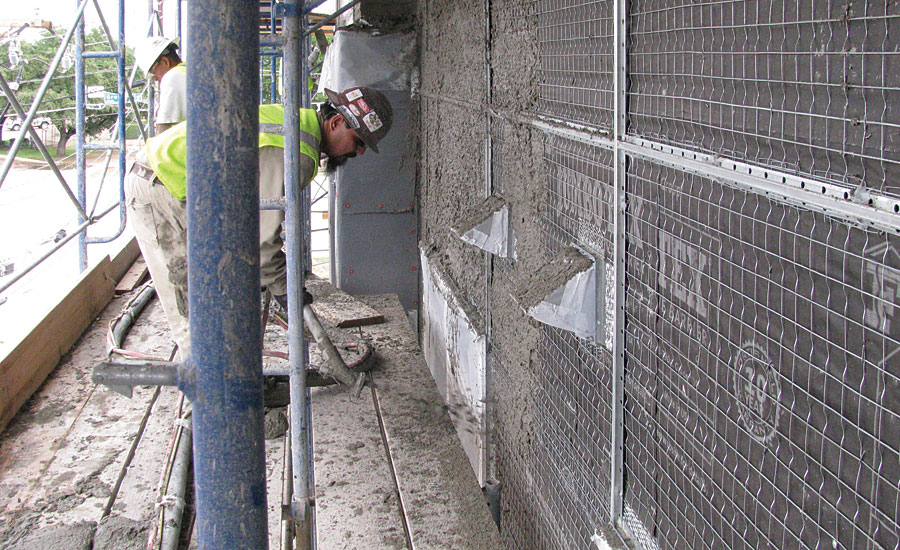
- Reinforcing mesh to strengthen the coating structure.
- Adhesive tape (painting).
- Fixture for beacons. The choice of hardware depends on the characteristics of the base - it can be both small nails and large-format anchor joints.
How to set beacons for plaster?
Installation of beacon strips is the most important task in the general process of leveling surfaces “to zero”. There are two ways to solve it:
- Using the laser level. The strips are arranged vertically along the markings that the self-leveling device projects. The only problem is that laser levels are quite expensive, so they are mainly used by professionals.
- A more painstaking method, which is implemented by improvised means. A plumb line is suspended at a distance of 25-30 cm from the corner of the room. The load line will be strictly vertical - it is along it that the first guide rail is installed. But how to put beacons on the wall under the plaster relative to each other? The vertical is maintained in the same ways, and the gap is on average 100-150 cm. Specialists also have a formula for calculating this value, according to which the distance of the indent is about 10 cm less than the length of the rule.
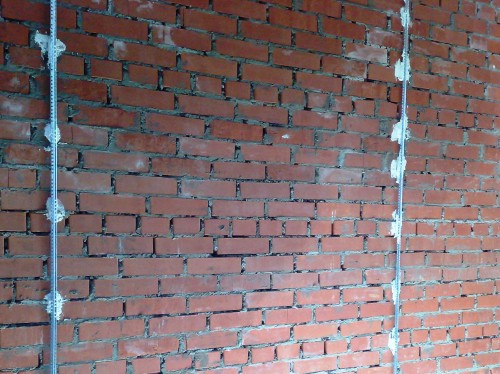
Lighthouse mount
When the installation line is planned, you can begin to fix the rail. To do this, indent 5-6 cm from the floor. At this level, you need to install the first hardware (again, it can be a nail, anchor, dowel , etc.). Moreover, the installation of fasteners is performed only half its length. A similar operation is performed in the upper part, where indentation is also 5-6 cm from the ceiling. When both edges are provided with fasteners, you can begin to fit in height. Hardware that is not fully driven into the wall is clogged to a level that will allow the mixture to cover the “caps” at the same height as the base layer. Next, you can proceed to mounting the strap. How to install beacons for plaster on finished hardware? The rail will be rigidly fixed through the perforated holes, on which it will stand at the points of location of the fasteners. The most important thing at this stage is to first apply the solution along the line of installation of the beacon. You should get a thin strip into which you will need to literally sink the bar without the smallest voids between it and the wall.
Preparation of plaster
Usually the dry mix is delivered in bags with a standard volume of 25-30 kg. As the manufacturers themselves note, for 27 kg, 15 liters of water will be required. Mixing is carried out by the already mentioned mixer at low speeds until a homogeneous mass is obtained. In the process of preparing the solution, you can adjust the consistency by adding a little more water or a dry mixture. The operation is repeated 2-3 times with small pauses of 5 minutes. So that the surface of the beacon under the plaster interacts optimally with the solution (adhesive ability to hitch), you can add special binding components. This quality, by the way, will be influenced by the material of the rail production. The same wood is not the most practical material for a beacon, but it is better than metal and plastic, it adheres to different types of finishing solutions.
Plastering
First, the solution is applied to the surface with large flip flops using a spatula, trowel or trowel between the installed rails. It should cover the entire working area from floor to ceiling without the slightest empty islands. Next, the rule is taken and the leveling of the laid solution begins. It is advisable to direct the mass from bottom to top so that the beacons for plastering the walls remain in the center of the captured strip. The joints, angles and transitions are separately aligned with a narrow spatula. After the solution has solidified, the defective areas and unsuccessfully corrected places can be additionally sanded with an abrasive or adjusted with a primer.
General expert advice
Experienced plasterers also draw the attention of beginners to the following points:
- Work with corners. For internal and external corners, it is worthwhile to prepare metal squares in advance, the design of which will optimally withstand the geometry of the site.
- The nuances of handling slopes. Another difficult area that you can work with in different ways. In the simplest version, angular guides are used. But how to set up beacons for wall plastering on slopes, if the angle design does not allow fitting a solid rail with the correct geometry? In this case, a system of individual slats is created, which will have to orient the laying of the mixture on the sides and on the top of the slope.
- Work with large areas. The plaster rule does not always save if you need to get an even coating based on a viscous and dense mortar. In this case, smoothing machines are used - this is a large-format spatula that gives great coverage when working between beacons.
- The way of fixing the beacon should be strong enough, but balanced, since a rigid massive fastening over a large area will provoke the destruction of the surface base.

Conclusion
With the help of guides, even an inexperienced user can get an even coating for future decorative finishes. The main thing that will be required for this is the right choice of materials, tools and the beacons themselves, as well as careful execution of technological operations during the installation and fastening of the rails. If possible, of course, it is recommended to use effective marking tools like the same laser level, but experience with plumb lines will not be useless.